
In this article, we will help you understand how to create a card.
|
Skip Ahead to: |
Navigation
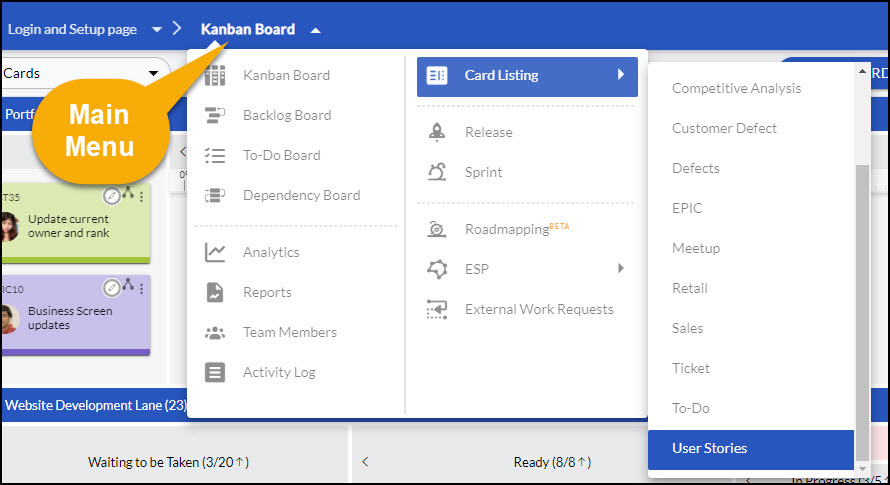
Navigate to the Main Menu > Card Listing and select the card type to create cards. For example, Main Menu » Card Listing » User Stories.
After defining the backlog, you can push them onto the board from the Backlog view or Kanban Board by clicking the Add to Board button for the required card.
Note: Cards in the SwiftKanban board come with permanent URLs that can help you access your card quickly (login required, if the session is not active) and save you a few navigation clicks. You can bookmark any card in your favorite browser to revisit it directly. You can also share/enter such links in any external application, making cross-referencing easily possible.
To view, edit, and track the cards of a specific card type, you can go to the List Views of the card types and filter the cards based on Rank, Priority, Class of Service, Lane, Current Column, etc. If you want to filter based on a custom field you created for the card type, modify the List View for the field to appear in the List View. After that, you can filter the list based on the custom field. See the Modify List View of Card Type section on the Define Card Types help page.
Create User Stories
Tips: We have an exciting in-app Learning Enabler, called Challenges that would help you learn and create cards interactively. Please navigate to Help & Support > Challenges from the top-level menu and try out the Challenges.
To create a card such as User Story, go to the selected Main Menu > Card Listing » User Stories view, and click the Create button. In the Details tab of the Create New view, enter the details such as Title, Description of the user story, Priority, etc., and then click the Save icon on the Side toolbar.
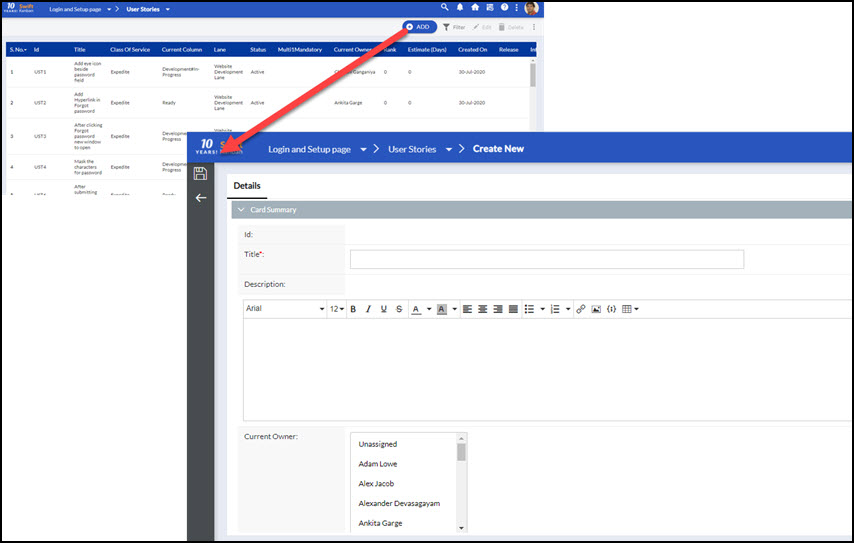
Following is the description for a few of the values to be entered which can help to prioritize the story.
- Prioritize a User Story: You can define the priority for a user story so that you can pick up the card on the board accordingly. You will find it easier to identify the high-priority cards based on the color code.
- Associate Class of Service based on Business Impact: You can associate a ‘Class of Service’ to categorize work items on business impact based on a cost of delay, risk, and Service Level Agreements. This category again can be used to pull work items for prioritization.
- Define the Story Size: Define the size in a generic sense which can be used to create a work estimate for a user story, if required. The sizes are based on the T-shirt size format.
- Rank a User Story: Enter a value to prioritize the user story.
- Assign Owners to a Card (User Story): To assign team members to work on the card, click the Profile Picture icon, and select one or more members. Alternatively, you can right-click the card, click the Assign Card option and then press the CTRL key (Windows) or Command key (iOS) and then select the user(s) you want to assign the card to. You can select multiple owners of a card by holding the SHIFT/CTRL keys in combination with the arrow keys/cursor. If you do not want to assign it to any member yet, select ‘Unassigned’ in the list.
Tips: We have an exciting in-app Learning Enabler, called Challenges that would help you learn and assign owners to the card interactively. Please navigate to Help & Support > Challenges from the top-level menu and try out the Challenges.
- If you have created releases for your board, you can tag the issues to the release from the Release list. For detailed help on Release scoping, check out the Release Planning page.
- Your enterprise may want to capture any specific information while adding a card on the Board or Detail view. You need to first add and configure the custom fields in the Card Type through Card Field Editor and then the team members can enter values in the cards. To add and configure custom fields, see Define Card Types.
After you save the details, additional sections – Comments and Attachments appear in the Details view, and additional tabs i.e. To-Do, Linked Cards, and Activity Log appear. The Details view displays the Wait Time, Work Time, and Blocked Time for the card as it progresses on the board. This is also available by flipping the card when in the board view.
You can create another user story by clicking the Create button while you are in the View or Edit mode of the existing user story.
Go to the User Stories view to track all user stories in a single list view.
The User Stories List view displays the list of user stories created on the selected board. From this view, besides creating a user story/card, you can:
- View/Edit User Stories by selecting a user story and clicking the relevant icons on the toolbar. Alternatively, you can just double-click a user story to view the details and make changes.
- Delete/Bulk Delete User Stories permanently by selecting a user story and clicking the Delete icon. To delete multiple user stories, hold down the CTRL key select multiple user stories, and then click the Delete icon.
- Filter User Stories by typing a text in the empty filter text boxes above any columns, and selecting values in the filter lists. For example, type any text in the text box above ‘Title’ to filter all User Stories containing the text in the title. If you are not able to see the filter boxes, click the Filter icon on the toolbar.
- Sort User Stories based on any column name by clicking the column label.
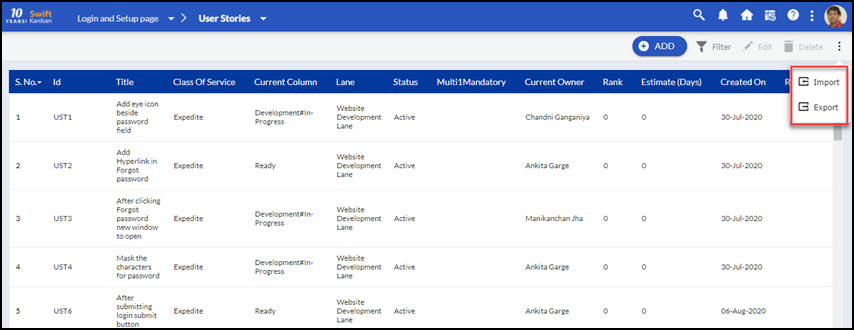
- Export User Stories to MS Excel/CSV file by clicking the Export icon. See Exporting Work Items section to learn more.
- Import User Stories from other applications using MS Excel/CSV file by clicking the Import icon. See Importing Work Items section to learn more.
Create Defects
To create a defect, from the selected Main Menu » Card Listing » Defects view, click the Create icon on the Side toolbar. In the Details tab of the Create New view, enter the details such as Title, Description of the defect, Priority, etc., and then click the Save icon on the Side toolbar.
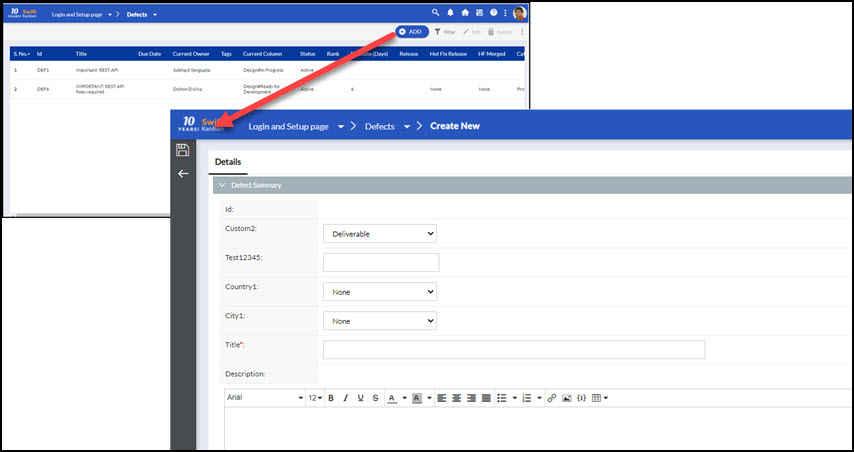
Following is the description for a few of the values to be entered which can help to prioritize the defect.
Prioritize a Defect: You can define the priority for a defect so that you can pick up the card on the board accordingly. You will find it easier to identify the high-priority cards based on the color code.
- Associate Class of Service based on Business Impact: You can associate a ‘Class of Service’ to categorize work items on business impact based on a cost of delay, risk, and Service Level Agreements. This category again can be used to pull work items for prioritization.
- Define the Defect Size: Define the size in a generic sense which can be used to create a work estimate for working on a defect, if required. The sizes are based on the t-shirt size format.
- Rank a Defect: Enter a value to prioritize a defect.
- Assign Owners to a Defect: To assign team members to work on the card, in the ‘Current Owner’ list, select one or more members. You can select multiple owners of a card by holding the SHIFT/CTRL keys in combination with the arrow keys/cursor. If you do not want to assign it to any member yet, select ‘Unassigned’ in the list.
- If you have created releases for your board, you can tag the defects to the release from the Release list. For detailed help on Release scoping, check out the Release Planning page.
- Your enterprise may want to capture any specific information while adding a card on the Board or Detail view. You need to first add and configure the custom fields in the Card Type through Card Field Editor and then the team members can enter values in the cards. To add and configure custom fields, see Define Card Types.
After you save the details, additional sections – Comments and Attachments appear in the Details view, and also additional tabs i.e. Resolution Details, To-Do, Linked Cards, and Activity Log appear. The Details view displays the Wait Time, Work Time, and Blocked Time for the card as it progresses on the board. This is also available by flipping the card when in the board view.
You can create another defect by clicking the Create button while you are in the View or Edit mode of the existing defect.
The Defects view displays the list of defects logged on the board. From this view, besides creating a Defect card, you can:
- View/Edit Defects by selecting a defect and clicking the respective icon on the toolbar. Alternatively, you can just double-click a defect to view the details and edit it.
- Delete/Bulk Delete Defects permanently by selecting a defect and clicking the Delete icon. To delete multiple defects, hold down the CTRL key select multiple defects, and then click the Delete icon.
- Filter Defects by typing a text in the empty filter text boxes above any columns, and selecting values in the filter lists. For example, type any text in the text box above ‘Title’ to filter all defects containing the text in the title. If you are not able to see the filter boxes, click the Filter icon on the toolbar.
- Sort Defects based on any column name by clicking the column label.
- Export Defects to MS Excel/CSV File by clicking the Export icon. See the Exporting Cards section to learn more.
- Import Defects from other applications using MS Excel/CSV file by clicking the Import icon. See the Importing Work Items section to learn more.
Create Issues
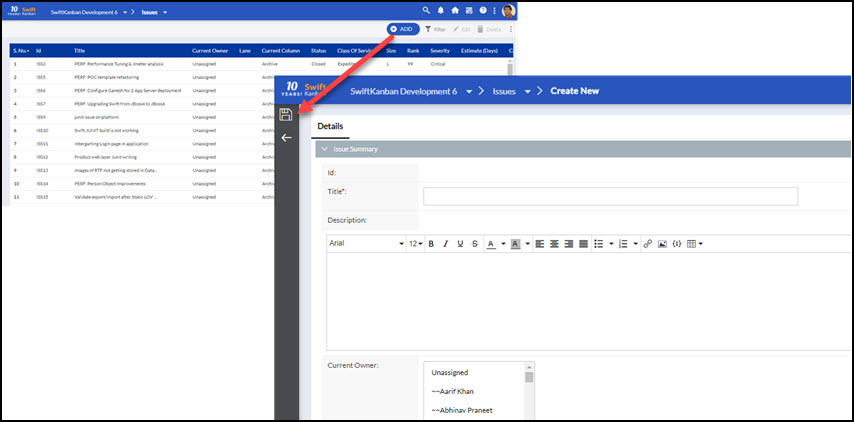
To create an issue, from the selected Main Menu » Card Listing » Issues, click the Create button. In the Details tab of the Create New view, enter the details such as Title, Description of the user story, Priority, etc., and then click the Save icon on the Side toolbar.
Following is the description for a few of the values to be entered which can help to Prioritize the issue.
- Prioritize an Issue: You can define the priority for an issue so that you can pick up the card on the board accordingly. You will find it easier to identify the high-priority cards based on the color code.
- Associate Class of Service based on Business Impact: You can associate a ‘Class of Service’ to categorize work items on business impact based on the cost of delay, risk, and Service Level Agreements. This category again can be used to pull work items for prioritization.
- Define the Issue Size: Define the size in a generic sense which can be used to create a work estimate for working on an issue, if required. The sizes are based on the T-shirt sizes format.
- Rank an Issue: Enter a value to prioritize an issue.
- Assign Owner to an Issue: To assign team members to work on the card, in the ‘Current Owner’ list, select one or more members. You can select multiple owners to a card by holding the SHIFT/CTRL keys in combination with the arrow keys/cursor. If you do not want to assign it to any member yet, select ‘Unassigned’ in the list.
- If you have created releases for your board, you can tag the issues to the release from the Release list. For detailed help on Release scoping, check out the Release Planning page.
- Your enterprise may want to capture any specific information while adding a card on the Board or Detail view. You need to first add and configure the custom fields in the Card Type through Card Field Editor and then the team members can enter values in the cards. To add and configure custom fields, see Define Card Types.
After you save the details, additional sections – Comments and Attachments appear in the Details view, and also additional tabs like Resolution Details, To-Do, Linked Cards, and Activity Log appear. The Details view displays the Wait Time, Work Time, and Blocked Time for the card as it progresses on the board. This is also available by flipping the card when in the board view.
You can create another issue by clicking the Create button while you are in the View or Edit mode of the existing issue.
The Issues view shows the list of issues registered in the selected board. From this view, besides creating an issued card, you can:
- View/ Edit Issues by selecting an issue and clicking the relevant icons on the toolbar. Alternatively, you can just double-click any issue row to view the details and make changes.
- Delete/Bulk Delete Issues permanently by selecting an issue and clicking the Delete icon. To delete multiple issues, hold down the CTRL key and select multiple issues, and then click the Delete icon.
- Filter Issues by typing any text in the empty filter text boxes above any columns, and selecting values in the filter lists. For example, type any text in the text box above ‘Title’ to filter all issues containing the text in the title. If you are not able to see the filter boxes, click the Filter icon on the toolbar.
- Sort Issues based on any column name by clicking the column label.
- Export Issues to MS Excel/CSV file by clicking the Export icon. See Exporting Cards section to learn more.
- Import Issues from other applications using MS Excel/CSV files by clicking the Import icon. See Importing Cards section to learn more.
Create Custom Cards
SwiftKanban offers flexibility to add custom card types after which you can add custom cards as you would create Defects or User Stories. See Define Card Types. Once you have activated the custom card type, you will see the card type menu link in the Main Menu » Card Listing » <Custom Card Type>. For example, Main Menu » Card Listing » Impediments, where Impediments is the Custom Card Type. You can then create Impediments cards as you would create cards for the default card types. The Side toolbar provides all features for the default card types for viewing, editing, exporting, importing, etc.
Activity Log
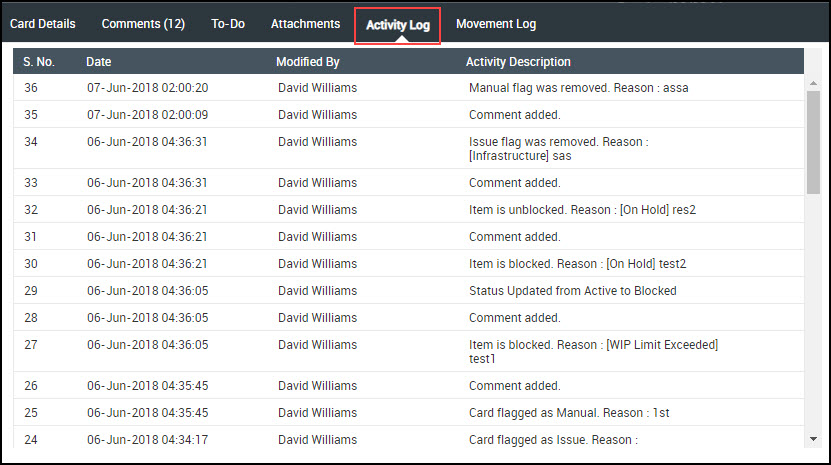
The updates to the card details and card movements can be tracked in the Activity log. Click the Activity Log tab in the Detail Card view. The log is listed in the descending chronological order of the Date and Time stamp. The log includes card updates such as Current Owner updated, Item moved from Develop#In Progress to Develop#Done, and events such as blocking of the card. It also shows who performed the card activity.
Consolidated ‘All Cards’ View
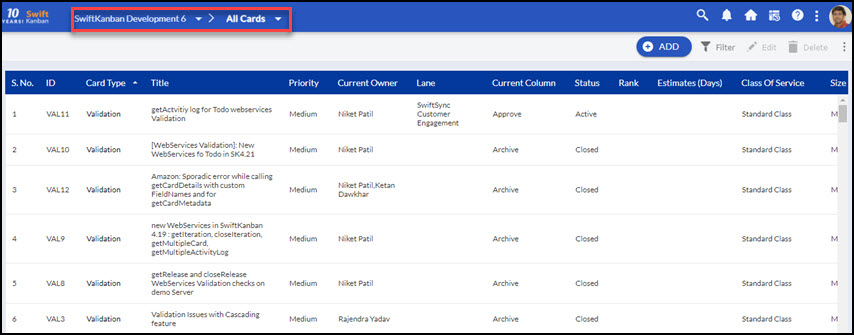
While you can view the pending items collectively in the ‘Backlog’ view, you can also view a consolidated list of work cards in all columns. Go to Main Menu » Card Listing » All Cards. From the All Cards view, you can also add a card to the backlog or the Kanban Board.
Cards are added to the backlog, Active cards are on the board, archived/closed cards are listed, displaying field values like Priority, Current Owner, etc.
For cards on the board, you can view the Current Column where the card is and if you have Lanes enabled, the Lane column displays the card.
From the All Cards view, you can also:
- View/Edit Cards by selecting a card and clicking the relevant icons on the toolbar. Alternatively, you can just double-click a card to view the details and make changes for active cards and backlog cards.
- Delete/Bulk Delete cards permanently by selecting a card and clicking the Delete icon. To delete multiple cards, hold down the CTRL key and select multiple cards, and then click the Delete icon.
- Filter cards by clicking the Filter icon and typing a text in the empty filter text boxes above any columns, and select values in the filter lists. For example, type any text in the text box above ‘Title’ to filter all cards containing the text in the title.
- Sort cards based on any column name by clicking the column header.
- Export cards to MS Excel/CSV file by clicking the Export icon. See Exporting Cards section to learn more.
- Import cards from MS Excel/CSV file by clicking the Import icon. See Importing Cards section to learn more.