
In this article, we will help you understand how to create users.
|
Skip Ahead to: |
Overview
For an enterprise, an administrator needs to create users so that these users can be assigned to boards. Once the administrator creates users and assigns a primary role, they get an invite to access the application, after which the user can start working on the board. According to the role assigned to a user, it provides or restricts access to application modules.
To create a user, you must have Manager access at the Board level or Admin access at the Organization level.
Create Users
To create users for the application, perform the following steps:
- From the control panel, click the More Options icon > People menu. The People page is displayed.

- On the People page, click the Create icon from the side toolbar.
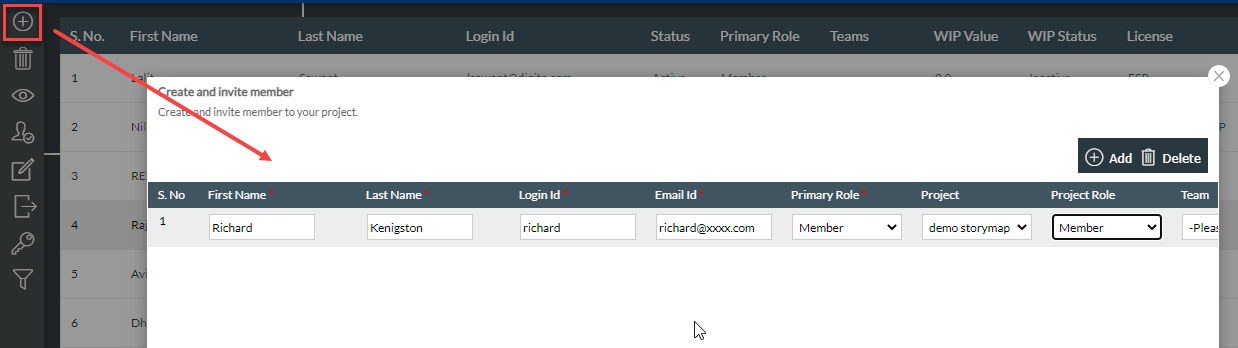
- Enter the following details:
- First Name and Last Name of the user
- Login ID: Enter the login ID of the user that will be used to log into the application
- Email ID: Enter the email ID of the user to whom the registration notification mail is sent. This email ID has instructions to change the default password of the account.
- Primary Role: Select the required role from the list for the user. It determines the user’s privileges to access modules in the application. To know more about roles, see the Roles in SwiftKanban help page.
- Board: Select the board name to which you would like to assign the user. Note, that only the active Boards will be available for selection.
- Board Role: Select the role you would like to assign a user for the selected board.
- Team: Select the team to which you want to assign the new user.
- Time Zone: Set the time to match the Time Zone of the user.
- Click Save to submit the details.
- Click the Add button to add more rows.
Note: For the creation of fewer than 10 users, ID creation status notification messages are displayed in the UI itself. When you add more than 10 users in one go, you will get a notification email indicating the user creation status in your registered email ID. The notification email provides tabulated data for both successfully created user IDs and failed instances with the error messages for their failure.
Editing User Profile
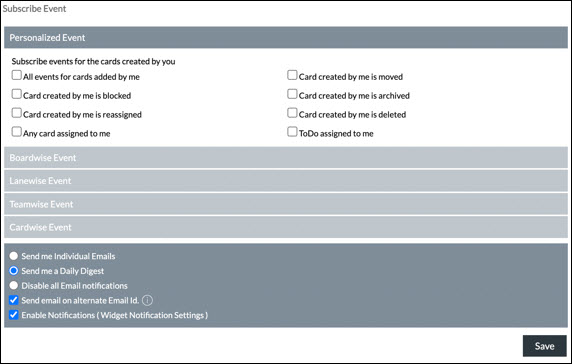
Once you have entered the necessary information to create a user, you can edit the user’s profile to add other details such as contact information, personal details, and so on. You can also provide an Alternate Email ID in the profile summary section of the profile page. So, the user can choose to receive board notifications to the alternate email ID, preventing clogging of the primary mailbox registered to log on to SwiftKanban. To set your alternate email ID, select the Send email on alternate Email ID option under Subscribe Event.
To edit the user details, select the user and click the Edit ![]() icon from the side toolbar.
icon from the side toolbar.
Note: If you are changing the role of an ‘Admin’ user, ensure that at least one user in the application has the Admin role.
Performing Other tasks on the People Page
Other than creating users and editing their details, you can also perform the following tasks from the side toolbar of the People page:
- View the user profile by selecting a row and double-clicking a user row to view the profile.
- Generate a password for a user by selecting a row and clicking on the Generate Password icon on the toolbar. You can generate a password if the user cannot set/reset the password for some reason. Once you click on the generated password icon, an email is sent to you with a link to change the password for the user. To know more about how to change your password, click here.

- Filter users based on user attributes. Click the Filter icon and in the empty filter boxes above any column, type the text to be searched, and select the values in the filter lists.
- Sort Users based on any column name by clicking the column label.
- Delete Users by selecting the required user and clicking the Delete button on the toolbar.
Deleting Users
Once a user leaves the organization, delete the user to close the SwiftKanban account.
Note 1: When deleting a user with the ‘Admin’ role, ensure that there is at least one user in the application with an ‘Admin’ role.
Note 2: When you delete a user, who is assigned to another board, you will see an alert message. Click OK. You should unassign the user from other boards (see Deleting a Team Member section to unassign a user) and then delete the user account from the people list as instructed below.
To delete a user account, perform the following steps:
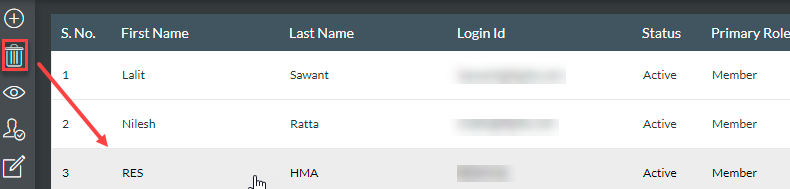
- On the More Options > People page, select the required user to be deleted and then click the Delete icon on the side toolbar.
- Click Yes in the confirmation window to continue.
- On successful deletion, click OK in the information window.
If you are trying to delete a user who is assigned to some Board, you will see an alert message. Click OK. You will have to delete the user from Boards and then delete the user account from the People list. See Deleting a Team Member section to unassign a user.