
In this article, we will help you understand how to manage the Board Settings.
|
Skip Ahead to: |
Overview
SwiftKanban provides a highly configurable Kanban Board designer using which you can map your value streams in terms of lanes and columns of the board, define WIP limits for columns, and track your work entirely using various features available on the Kanban board. When you create a new board, it comes with a default board configuration (as shown below), which can then be modified to suit your specific value stream.
Note: SwiftKanban board comes with permanent URLs that can help you to access your board (login required if the session is not active) and save you a few navigation clicks. You can bookmark your SwiftKanban board in your favorite browser to revisit it directly. You can also share/enter these links in any external application, making cross-referencing easily possible.
You can configure your Kanban Board using the Board Settings page.
Prerequisites
You must have a ‘Manager’ or ‘Admin’ role to view and navigate to the Board Settings page. The Board Settings icon will not be available for users with the ‘Member’ role.
Accessing Board Settings
To navigate to the Board Settings page, click the Board Settings ![]() icon on the top menu bar. The Board Settings page is displayed.
icon on the top menu bar. The Board Settings page is displayed.
![]()
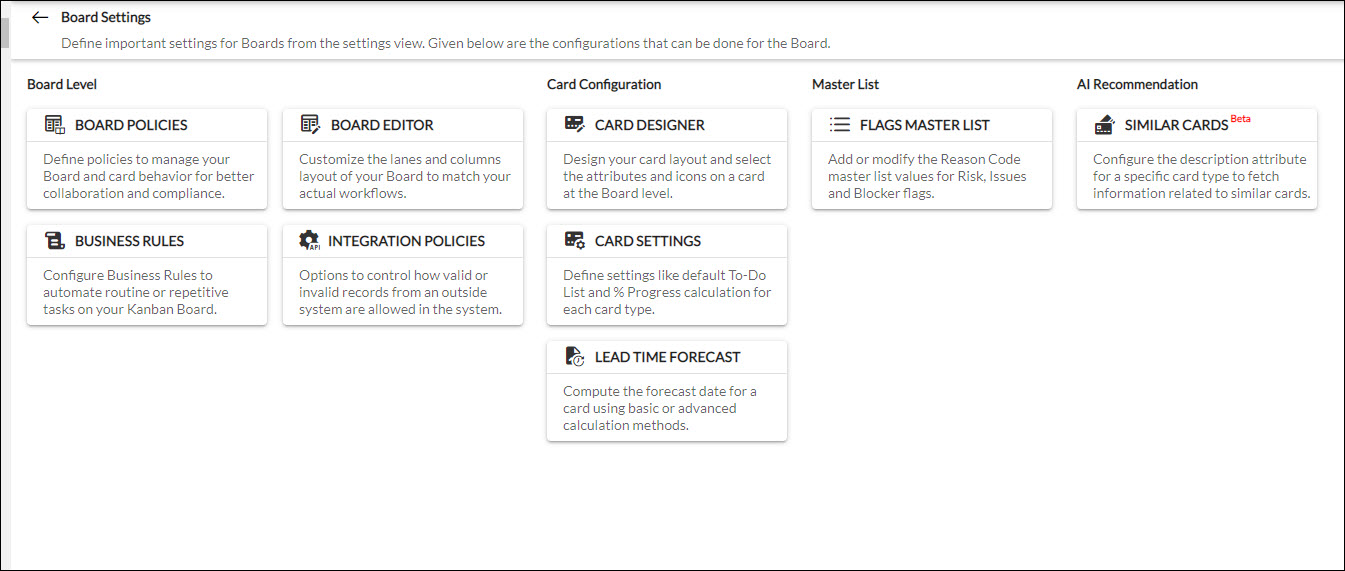
Board Settings Page Layout
The Board Settings page is designed in tiles mode. All the settings at the Board level are grouped under individual tiles and clicking any of them takes you to the particular settings. For example, if you want to update the Board policies, then click the BOARD POLICIES tile. All the tiles are grouped under 4 categories: Board Level, Card Configuration, Master List, and AI Recommendation. All the tiles are stacked vertically under each of these categories.
Note: Once the Board is closed by a ‘Manager’ or ‘Admin’, the Board Settings icon will not be available for anyone as the Board itself has been archived and turned into the read-only mode.
Get to know about each of these tiles by clicking the links in the following table:
Board Level |
Card Configuration |
Master List |
AI Recommendation |
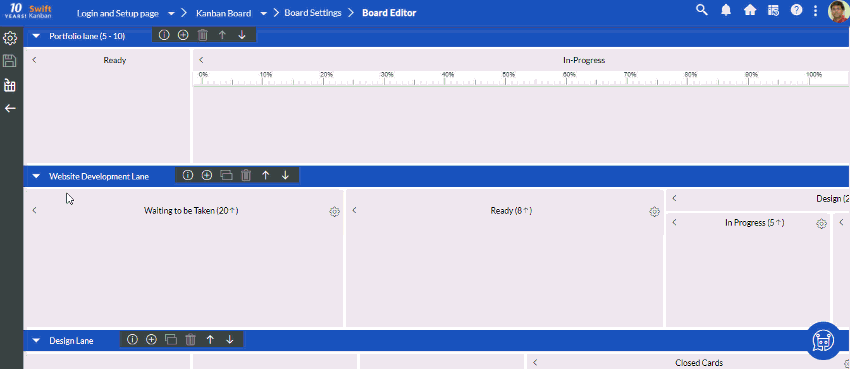
Board Editor
The following options are available under Board Editor.
- Define smart lane and settings related to lane.
- Set columns to upstreams.
- Change the workflow on the board by Configuring Columns.
- Add and enable Columns with the same or different value streams.
After you make any changes to the board layout, click the Save icon on the toolbar to save all changes. If you forget to save, you will see a prompt to ‘Save’, ensuring that no changes are lost, even by mistake.
Configuring Columns
To configure a column, click the Configure Column icon next to the column name. The changes you make will apply to that particular column only. After you make changes, ensure that you click the Save button on the toolbar. After the changes, the Kanban board will display the modified columns.
![]()
The icons available in the Configure toolbar are:
- Horizontal Split:
 – This icon lets you split a column horizontally.
 - Vertical Split:
 – This icon lets you split a column vertically.
 - Move Left
 – This icon lets you move a column to the left position. The icon is not available for columns on the extreme left.
 - Move Right
 – This icon lets you move a column to the right position of the selected column. The icon is not available for columns on the extreme right.
 - Add to left:
 – This icon lets you add a new column to the left position of the selected column.
 - Add to right:
 – This icon lets you add a new column to the right position of the selected column.
 - Delete
 – This icon lets you unsplit/delete the selected column. If a column is deleted and it has live cards, the cards are shifted to the parent column and if no parent columns exist, the column is not allowed to be deleted.
 - Column Settings
 – Click the icon
 on the toolbar to edit column properties. Using this icon, you can do the following:
- Add/Rename the Column Title
- Add/Change Column Description/Policy
- Change Column Type
- Change/Turn Off WIP Limit
- Change Cycle Time settings
- Set Column color
After you make a change to the workflow, ensure that you click the Save icon on the right side of the board to apply the changes when you return to the board.
Thus with the effect of the changes, when you pull a card to the board, the Add To list will display columns based on the new/modified columns.
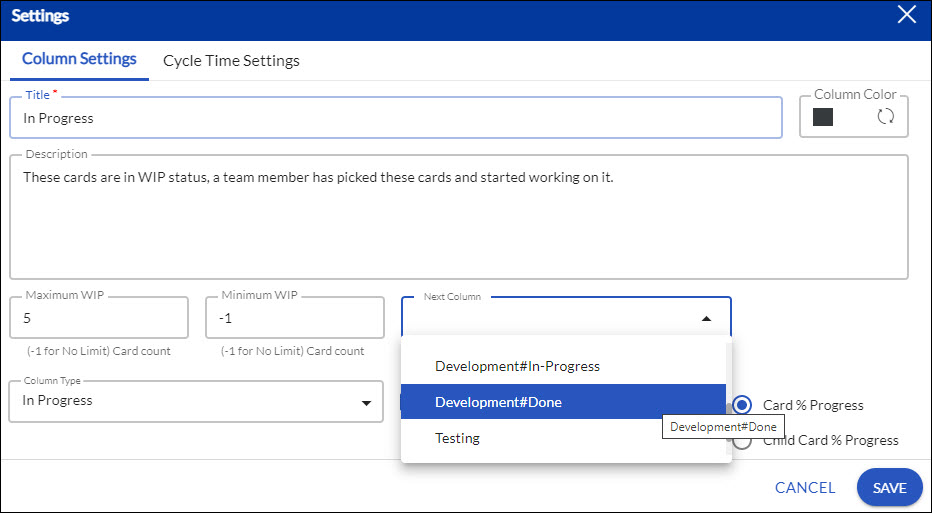
Add/Rename the Column Title
Add or rename the Column Title and description by clicking the column header, for example, ‘In-Progress’. You can even click the Configure Column icon and then click the ![]() icon. The Column Settings window appears where you can enter the new name in the Label box. Click Submit to Save.
icon. The Column Settings window appears where you can enter the new name in the Label box. Click Submit to Save.
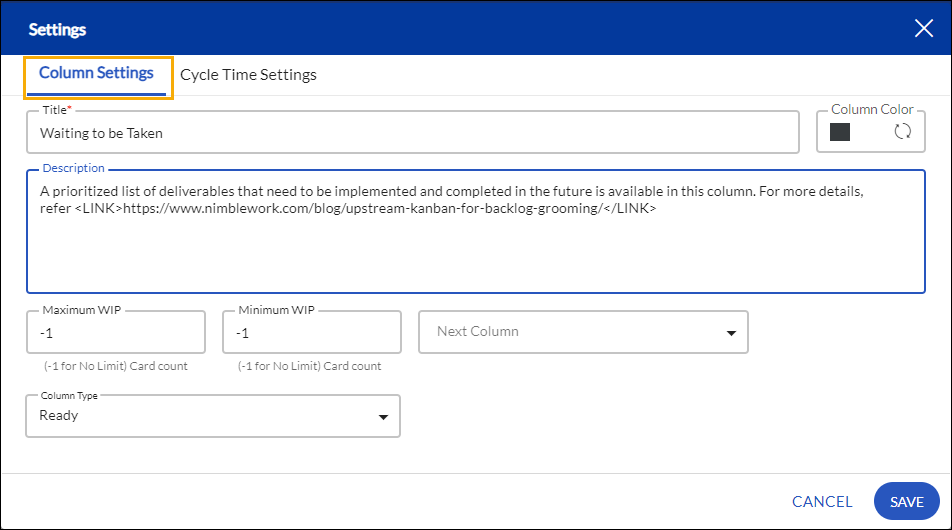
Column Policy
The description that you enter for the column in the Column Settings window is displayed on the mouse hover on the column heading. Clicking on the header will let you pin this description as a constant text in the same column. You can unpin the policy from the column by clicking again on the column header or by clicking the Cancel icon.
You can also add URLs as a hyperlink by using the <LINK> tag. For example, if you want your team to refer to more details related to using this column policy, you can add the HELP URL in this format, <LINK>https:/www.nimblework.com/blog/visualize-your-workflowprocess/</LINK>. Just add your URL between <LINK></LINK> tags as shown in the example. Anyone viewing the policy description can click and open these URLs in a separate tab.
Note 1: If a column has been split, the column description can be pinned only on the sub-columns and not on the parent column.
Note 2: Even if a column policy is pinned, it will still not be visible in the column header if you view the Board using the lowest zoom level in the new card layout or the lowest and second-lowest zoom level in the old card layout.
Change Column Type
Change Column Type by double-clicking the Column title, or click the Configure Column icon and then click ![]() the icon. In the Edit column window, you can now select any of the following Column Type and then click Submit to save:
the icon. In the Edit column window, you can now select any of the following Column Type and then click Submit to save:
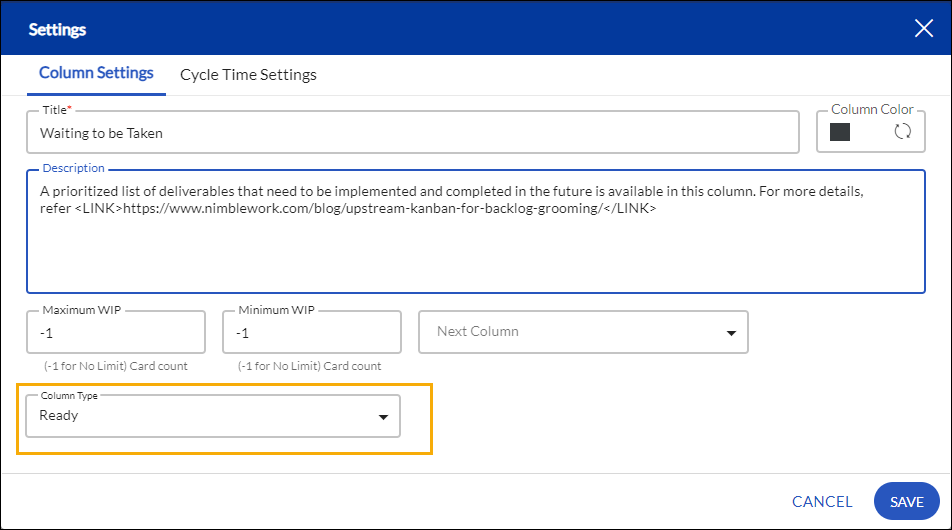
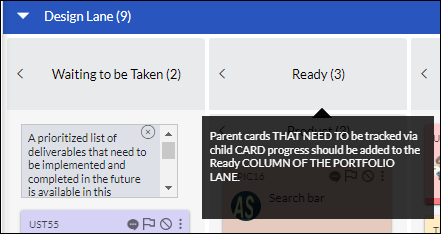
- Ready: Where you place the cards that are committed.
- In-Progress: Where cards are actively worked on.
- Completed and Waiting: Buffer column where cards are waiting to be pulled to the next column.
- Done: Last column where completed cards are placed. Only 1 Done type column is allowed for a lane.
Set the Next Column
Important Information: This field is only available if you have the SwiftKanban Enterprise license and also have enabled the Enable auto Movement of Parent card policy on the Board policies page.
When you enable the automatic movement of your parent card, then you can define what should be the next column for any given column. So, if we set column B as the next column of column A, then the parent card automatically moves from column A to column B provided the associated child cards of that parent card are all archived or moved to the Done column.
To know more about the auto movement of cards from one column to another, read this Help page.
Change/Turn Off WIP Limit
Change the WIP Limit by clicking the column header, or click the Configure Column icon and then click the icon![]() . In the Column Settings window, you can now change the WIP Limit for the column. Click Submit to Save.
. In the Column Settings window, you can now change the WIP Limit for the column. Click Submit to Save.
To turn off a WIP limit, enter ‘-1′ as the WIP limit.
You can define a WIP limit for child columns which need not sum up to the WIP limit of the parent column. If your board manages multiple lanes on your board, you can set WIP limits for individual Columns and child columns of each lane.
Set Cycle Time Threshold
Set the Cycle Time Threshold by clicking the lane or column header, or click the Configure Lane or Column icon and then click the icon![]() . In the Settings window, click the Cycle Time Settings tab, then define two thresholds and a maximum value in hours, days, or weeks for the column. Click Submit to save.
. In the Settings window, click the Cycle Time Settings tab, then define two thresholds and a maximum value in hours, days, or weeks for the column. Click Submit to save.
If your board has multiple lanes, you can set cycle time settings for individual Columns and child columns of each lane.
Click the Card Aging option at the left menu bar, it highlights the current status of the cards in a horizontal line based on the thresholds. Any card under threshold 1 is shown in green, between threshold 1 and 2 in orange, and beyond threshold 2 in red.
Note:
- If you have set the cycle time threshold for your Lane then it is labeled as “CardCT” on the card of your Kanban Board.
- If you have set the cycle time threshold for your Column then it is labeled as “ColCT” on the card of your Kanban Board.
- If you set a threshold for a Default card type then no matter the card type on the lane or column, the threshold will be defined over all the card types in the Lane and columns.
- If you set a threshold for the Default card type and you also set a threshold over another card type, for example, defect card type. In this scenario, except Defect card type the status of all the other card types will be calculated based on the Default card type threshold. For the Defect card type, the status report will be displayed as per the threshold defined specifically for the Defect card type.
You can also filter cards based on the cycle time threshold that you have set for the particular columns. To know more about the threshold filter, see the Filter by Cycle Time Threshold section.
Set Column Color
To set the color of a column, perform the following steps:
1. Click the Column header or click the Configure Column ![]() icon and then click the icon.
icon and then click the icon.
2. In the Column Settings window, click the square box of the Column Color and select a color.
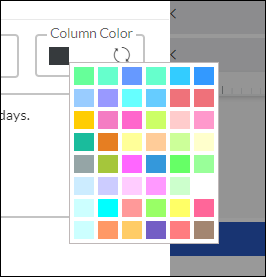
3. Click Submit.
Note: Click the reset icon ![]() to switch to the default color.
to switch to the default color.
Add a Column
You may need a buffer column or a hands-off stage before/after a column. To add new columns, click the Configure icon of the required column. Select the Add to Left icon to add a column before a column or select the Add to Right icon to add a column after a column.
You can then rename the new column, add a description, and define the column type, and the WIP limit by clicking the Column header, or clicking the Configure icon and then clicking the ![]() icon. Click Submit to save the column properties.
icon. Click Submit to save the column properties.
Adding a description for the column helps to identify the policy of the column (which is displayed by hovering over the column header) when cards need to be dropped on the board.
Split a Column
You may need to split columns horizontally or vertically to create to indicate sub-processes. To create a horizontal split, click the Configure icon of the required column. Select the Horizontal Split icon to create parallel sub-columns.
Example of a Horizontally Split Column (Ready Column)
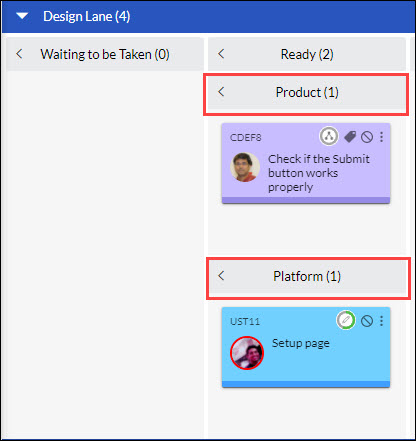
To create a vertical split, click the Vertical Split icon.
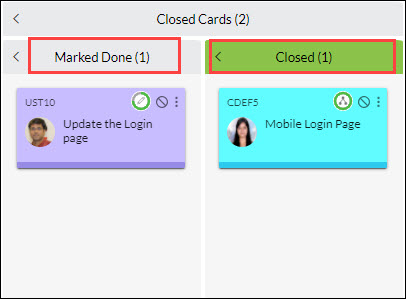
Example of a Vertically Split Column (Closed Cards column)
Move a Column
You can move an existing column to the left or right of a column. To move a column to the left, click the Configure icon of the required column. From the toolbar, click the Move Left icon and to move a column to the right, click the Move Right icon. If there are live cards, they will move accordingly.
Delete/Unsplit a Column
You may want to remove a stage at some point in time i.e. either delete a parent column completely or remove a child column.
You cannot delete a column having cards on the board. However, if the column is divided into child columns and the child column has live cards on the board, you can delete the child column. The cards will be moved to the previous child column.
To remove a column or merge a sub-column with the parent column, on your Kanban board click the Board Editor icon on the Side toolbar(see the Configuring Columns section), click the Configure icon of the required column, and then click the Delete icon. To save your action, click the Delete icon on the Side toolbar.
To delete an unsplit column having live cards, move the cards to the previous column on the board and then delete the column.
Modify Master Lists
These are the default Master Lists. These cannot be added, you can modify values in the predefined master list of Reason Code for Risk, Issue, and Block flags.

To Modify a Master List:
- To navigate to the Flag Master Lists page, click the Board Settings
 icon on the top menu. The Board Settings page is displayed.

- Under the Master List category, click the FLAG MASTER LISTS tile.
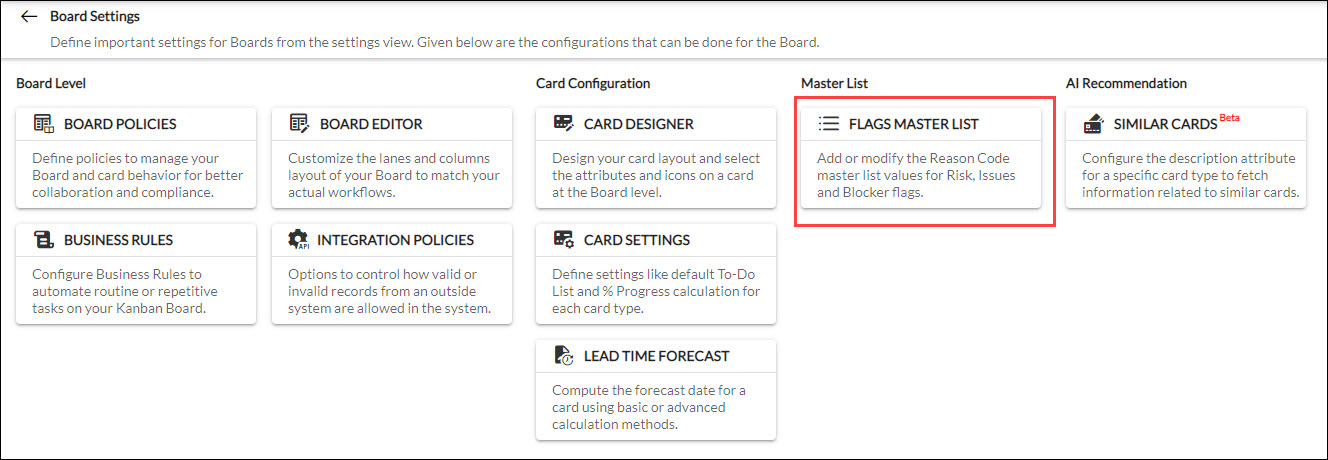
- You can modify the values for the predefined Master List.
- Click Save.