In this article, we will help you to understand how to view cards on the Workboard.
|
Skip Ahead to: |
Overview
In this article, we will get to know the different ways in which we can view cards on the Workboard and the different actions that you can perform on the cards.
On the Workboard, you can view your cards or action items in the:
List View
If you want to track your action items in the form of a listing then click the List View icon and you can view the action items listed. In the listing view, you can view all the details that you have entered during card creation such as Card ID, Retro Name, Title, Assigned To, Due Date, Priority, Tags, and Status.

Board View
To switch back to the Board view, click the Board View icon when you’re in the List View. It will take you back to the board view of your Workboard. Here, you can move your cards to the desired columns To-do, Doing, and Done to track the progress of each card. To move a card, simply drag a card from one column to the desired column. Also, you can perform operations on the cards.
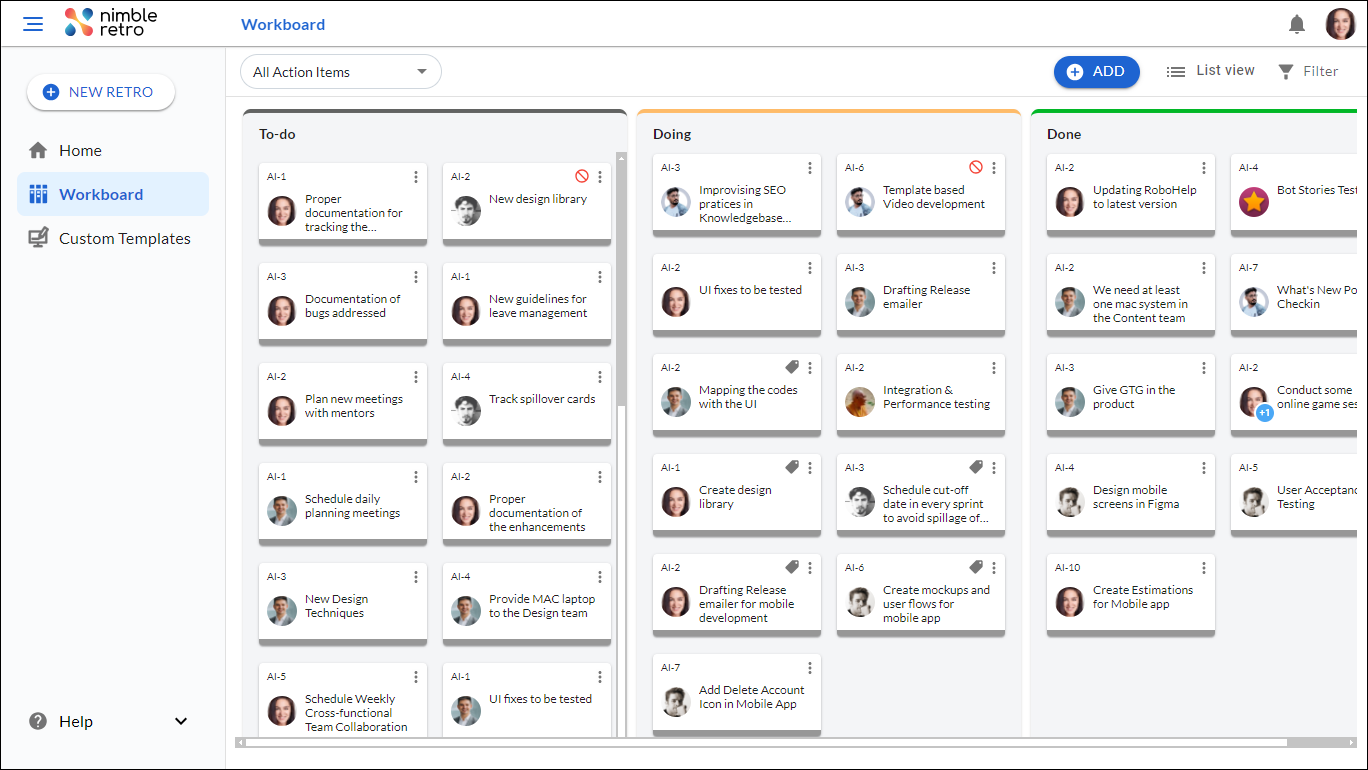
Operations to be performed:
- Archive Card: Archive or close a card when it reaches the last lane on the board to indicate that the work has been delivered. You may even archive a card from its current lane if you decide that the card need not progress through the remaining flow. Click the More Options on the card and then select the Archive Card option. Thus, the card will no longer be available on the board. However, you can view it from the List View as Archived.
- Assign Card: On clicking the Assign Card option, select the names of the respective card owners you can search with their names. Then, click the ASSIGN button. You can also select multiple owners for a card from the list of available users by simply adding a checkmark on the checkboxes beside the card owners to assign a card.
- Delete Card: To delete a card permanently, click the More Options icon on the card and click the Delete Card option. On confirmation, the card will be deleted permanently from the Workboard. You cannot delete blocked cards; first, unblock the card and then delete it.
- Block Card: Block car operation is used when you have a bottleneck. Click the More Options icon on the card and click the Block Card option. Then, you need to enter the blocking reason and blocking comments on the card and click SAVE. Then, the blocking icon will be there on the card sticky on the Workboard.
- Unblock Card: To unblock a blocked card, click the Blocked icon on a card and display the blocking reason along with the user who blocked the card. While unblocking a card, you need to click the Block icon again, enter the mandatory comment, and click SAVE. Note: You cannot edit or move a blocked card.
Page Scrolling Options
- To move from one listing page to another, click the various Page scrolling options.
- To reduce the number of pages, define the page setting. These are located in the Status bar.
- Navigate through multiple pages in the list view by clicking the First Page, Previous Page, Next Page, and Last Page buttons on the Status bar.
- To limit the items to be listed in a single view, you can select the Item Count in the Page setting option at the bottom right corner.
You can set the display items per page value from the list, which can be a maximum of up to 100. The list refreshes and lists items accordingly; the current page number against the total number of pages is displayed next to the Page Setting list, which changes when you modify the item count in the Page Setting option.
All Action Items/My Action Items
- All Action Items
In this view, you can view the action items assigned to all the members. This helps you to know the current state of each action item. - My Action Items
In this view, you can view the action items that are assigned to you only.