
In this article, we will help you understand the workings of master lists.
|
Skip Ahead to: |
Overview
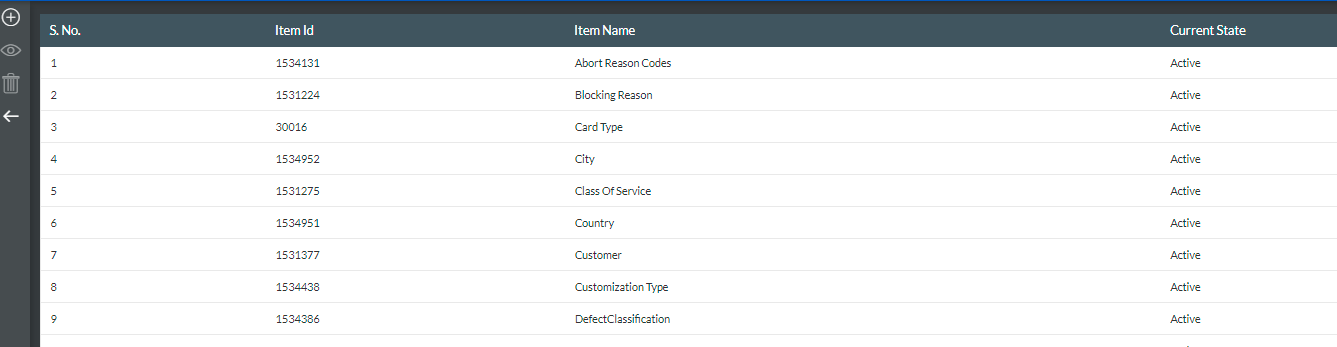
Master Lists are used to create a field, which will contain certain attributes related to this field. There are a few default Master Lists such as Class Of Service with values such as Expedite, Fixed Delivery Date, Standard Class, and Intangible Class.
You can create your own Master Lists with the list of values (LOVs) based on your needs. These fields and field attributes can be activated or deactivated based on your requirements.
Moreover, you can even map the relationship between two Master Lists by defining one as a Parent and another as a Child Master List. To know more about relationship mapping, jump to this section.
Note: You can also create Master List values for the Reason Code for Risk, Issue, and Block flags at the board level. To know more click here.
Tips: We have an exciting in-app Learning Enabler, called Challenges that would help you learn and create a Master List interactively. Please navigate to Help & Support > Challenges from the top-level menu and try out the Challenges.
Creating a Master List
From the top panel, click the More Options ![]() icon > Admin Settings. On the Admin Settings page, click the MASTER LIST SETTINGS tile. The Master List page displays the existing Master Lists.
icon > Admin Settings. On the Admin Settings page, click the MASTER LIST SETTINGS tile. The Master List page displays the existing Master Lists.
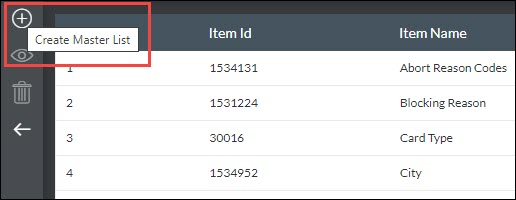
- Click the Create Master List icon on the side toolbar.
- On the New Master List page, enter the name of the new Master List.
- Click Save to save the new Master List.
- To add and update the attribute values to the Master List, see the steps for Updating the Master list.
You may make changes to the Master List such as changing the name of the Master List, adding or deleting an attribute value, deactivating an attribute value, and changing the name of the attribute value.
Creating Order for List of Values
The LOVs appearing in the drop-down field lists can be sorted alphabetically. In the Master List of the Field, set the position of the LOVs to zero.
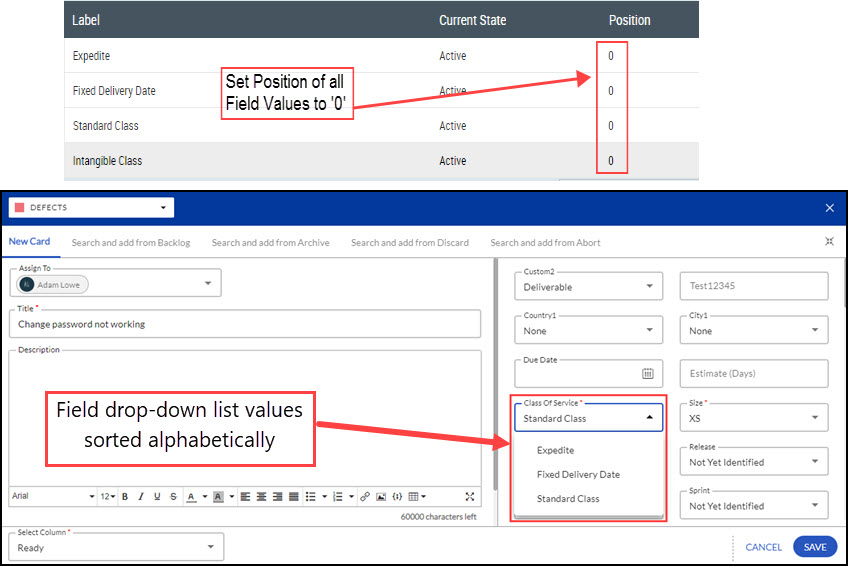
To display the LOVs in fields in the order you want, double-click the Position cell and enter the position value for that attribute value. Similarly, you can reorder the attribute values to appear in the fields of card types.
Updating the Master List
- On the Master List page, click the Master List that you want to modify.
- Double-click the required Master List. The Master List View displays two panes i.e. the Master List Details and LOV Details.
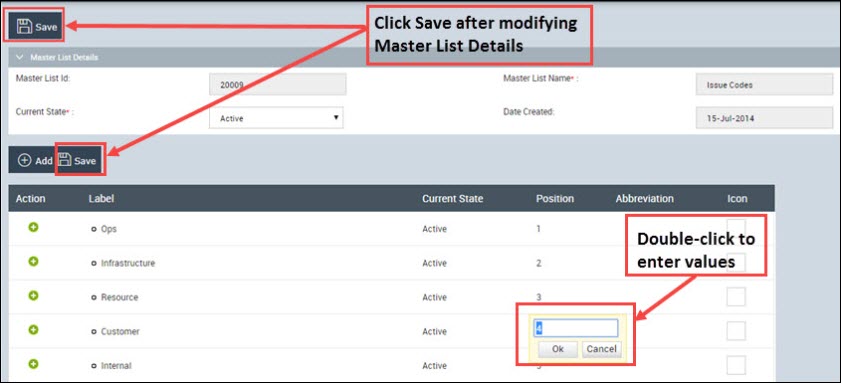
- To change the name of the Master List, edit the name and click the Save icon in the Master List Details pane. You cannot rename a system-created Master List but can add new LOVs to it, and update the system-created LOVs.
- In the LOV Details section, you may make the following changes, and then click Save on its toolbar:
- To add an attribute value to the field, click the Add icon on the LOV Details toolbar. A new Item row appears.
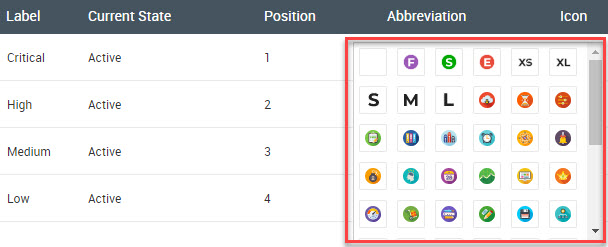
- Double-click the Label cell and enter the label that you want to display for a field.
- Double-click the Current Status to select Active to activate the attribute value.
- Double-click the Icon text box and select an icon that best represents the attribute value. Click OK to Save.
- To add an attribute value to the field, click the Add icon on the LOV Details toolbar. A new Item row appears.
- To delete an attribute value, double-click the Current State value for the required attribute value. Click the Deleted value from the list and click OK. An asterisk before a value indicates that it is deactivated if already used on boards.
- To modify an attribute value, double-click the label, make changes, and click OK.
To add a child attribute value, click the Add Child ( ) icon by the side of the parent attribute value. A new Item row is displayed. Double-click the label cell and type the label that you want to be displayed for a field. Double-click the current status to select Active to activate the attribute value. Click Save to save the child attribute value.
In the following example, attribute value Technology has been appended with the child attribute values like Complex Technology, which has further child value Tech Not Supported in the Master List.
After you set the above hierarchy of LOVs in the Risk Codes Master List, you can then select that child attribute value as a Risk Code for a Kanban card. Once you save that Risk Code with your comment on that Kanban card, the child attribute value appears with a comment as a hover text on the highlighted Risk icon.

Note: Currently adding a child attribute-value option is available for Risk Codes, Blocking Reason, and Issue Codes only. You can remove a child attribute value by clicking the Remove Child icon only before it is saved.
Export/Import Master List Values
Follow these steps to Export Master List Values in bulk:
- On the Master List page, click the Master List that you want to modify.
- Double-click the required Master List. The Master List View displays two panes i.e. the Master List Details and LOV Details.
- To export the master list values, click the Export icon.
- Choose the export format i.e., .XLS or .XLSX, and enter a file name.
- Then, the file with master list values gets downloaded to your system in the selected format.

Like exporting master list values, you can also import master list values:
- On the Master Listpage, click the Master List that you want to modify.
- Double-click the required Master List. The Master List View displays two panes i.e. the Master List Details and LOV Details.
- To import the master list values, click the Import icon.
- Refer to the master lists exported file and make the necessary changes.
- Make bulk updates to the existing values or add new values offline, and import them into the system. Note: You can only update the Label, Current State, and Position columns. Do not change the sheet label while importing it back.
- Once you’re done making the necessary changes, choose the file you want to import.
- Choose the import format i.e., .XLS or .XLSX. Then, click Submit. The imported values will get updated on the Master List Item page.
If the import fails, a summary dialog will display the details. You can review and correct any errors before re-importing.
Mapping the Master List
You can map a relationship between two Master lists and apply it to a custom or custom common field. This can be extremely beneficial if you want to populate separate combinations of parent-child field values for a card, like Country-State, City-Localities, and so on.
Note: You must have Admin access to access to map such a relationship.
To create a relationship between two Master Lists, perform the following steps:
- From the top panel, click the More Options
 icon > Admin Settings. On the Admin Settings page, click the DEPENDENT MASTER LIST tile. The Master List Mapping page is displayed.
- Click the Add Mapping icon on the side toolbar. The Build Relationship page is displayed.
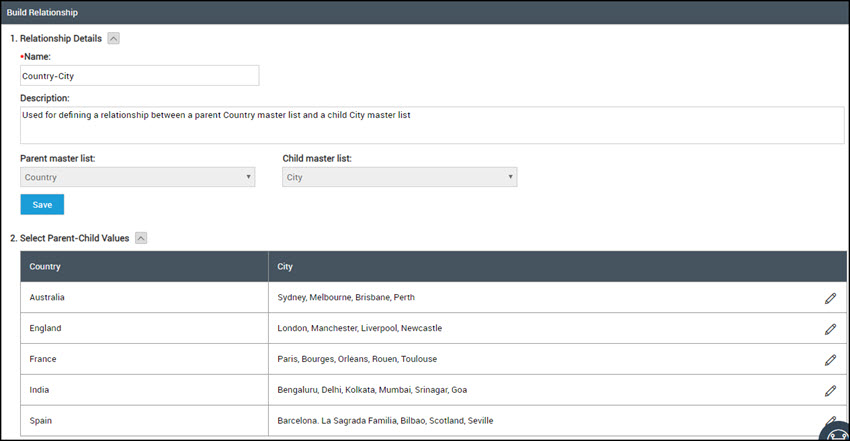
- Enter a unique name and description (optional). For example, let’s consider we need to build a Country-City relationship.
- Select the Parent Master list from the available list of master lists and assign a child master list to build a Parent-Child relationship. For example, let the Parent Master list by Country and the Child Master list by City.
- Click Save to set the parent-child master list and the second section of your screen gets updated.
- The values of the Parent Master list are generated in the first column of the table. In the second column, you have the option to link child values.
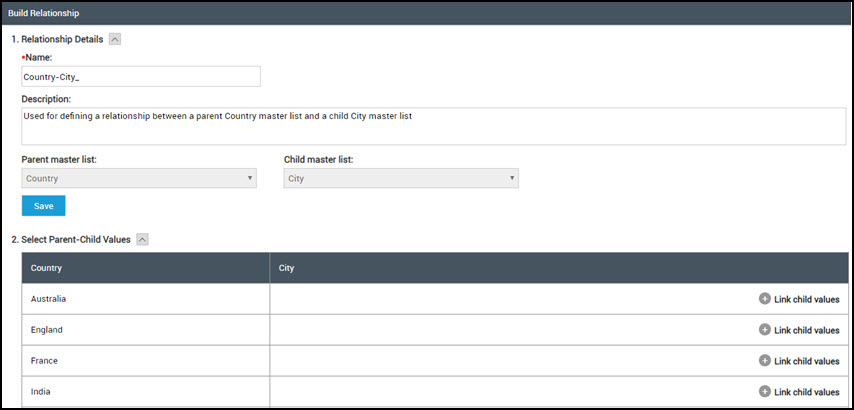
- To link child values to each parent value, click the Link child values icon.
- Select the child values from the available list that you want to link for the specific parent value and drag and drop the value in the empty box. For example, as shown in the following screen, all the parent master list values are listed in the first column. Now when you try to link the child values for the specific parent value India, all the city child values are listed from which specific city values of India can be drag-n-dropped in the empty box.
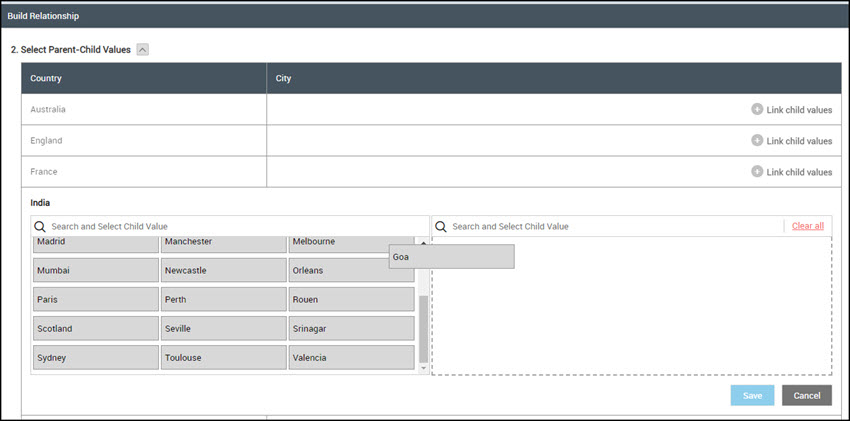
- Click Save and similarly set the child values for each parent value.
- Once the mapping gets created, apply the master list mapping to your card. To know more, refer to the Apply Master List Mapping section below.
Important Points to Remember
- The Master List Mapping option is not available if the Org-Sub Org license is enabled.
- Parent and Child master List cannot be the same.
- If any Master List is used in the Master List mapping, then it can not be deleted from the Master list page.
- Once a Master List mapping is created, then the Parent or Child Master List cannot be updated.
- Any value of a Child Master List can only be mapped to a single value of the Parent Master List.
- Once a value of a Master List is deleted, then the same will not be available for the Relationship Mapping.
- If you are de-selecting a value from the Child Value list in a Relationship Mapping and that value has already been used in any card, then it will be prepended with a * mark. Moreover, this value will no longer be available while adding or updating a card.
- If a field has a parent field via the Relationship Mapping, then this field cannot be set as Mandatory and no default value cannot be set for it.
- The relationship can be mapped only between Common fields or between Custom Common fields.
- If you delete the parent field, then its association with the child field will also be removed.
Apply Master List Mapping
- Open the fields section of the card type on which you want to apply the Master List Mapping.
- Select or create field labels, which you want to set as the Parent and child Master list.
Note: The parent-child linking feature works only for fields having their Input method as a Static list. - Next, set the parent master list on the Master List Name column for the field label that you want to consider as a Parent.
- Click Save.
- Set the child master list on the Master List Name column for the field label that you want to consider as a Child.
For example, let’s set the Master List Name as Country for the field label Country, which will be the parent for the field label City. Next, click the Link hyperlink on the Linked Field column of the child field label. In the Link Relationship window, the relationship name and the parent field are auto-populated. You can change it from the available lists.
Note:
Relationship Name is available only when the Master List selected for this custom field is used as a Child Master List in any of the existing Relationships.
Based on the selected Relationship Name, the Parent Field will display all those fields assigned with the Master List, which is used as a Parent in the selected Relationship Name. - Once the parent-child master list is mapped, you can validate it by navigating to your board and creating the card for which you have applied this mapping.