
In this article, we will help you understand the best use of SwiftKanban mobile.
|
Skip Ahead to: |
Overview
Get the collaborative, visual Kanban Board for Lean/ Agile teams on the go, anytime, anywhere. Leverage the SwiftKanban App to manage your SwiftKanban boards like adding cards, viewing their details, moving them to a different column, or performing actions like adding comments and attachments and many more.
Installing the App
If you are a free or paid subscriber of SwiftKanban, you can download and install its App from any of these places:
Google Play: https://play.google.com/store/apps/details?id=com.sdi.swiftkanban&hl=en_IN
App Store: https://apps.apple.com/us/app/swiftkanban/id1002320353
Specifications
The SwiftKanban Mobile App is compatible with the following specifications:
| Android | iOS | |
| Operating System | 5.0 and above | iOS 9 and above devices |
| RAM | 512 MB and above | 512 MB and above |
| Display | 5 inches and above | 4.7 inches display |
| Processor | 1 GHz and above | 1 GHz and above |
Adding Server URL
For the first-time user, you can add a server by tapping the SELECT SERVER URL link on the SIGN IN screen. You can add a new URL, or edit or delete an existing one.
To add a server, perform the following steps:
- Tap the SELECT SERVER URL link in the SIGN IN screen.
- Tap the icon placed at the top-right corner.
- Enter the desired URL, for example, https://abcd.swiftkanban.com
- Tap Add.
Note: While adding an SSO-enabled server, click the SSO Enable checkbox. Clicking it takes you to the third-party tool for authentication.
- To modify an existing server URL, double-tap the respective URL, type the changes in the URL, and tap Save.
- To delete a URL, swipe the respective URL to the left and tap the DELETE icon.
- To select a particular URL from the Server URL list, in the SELECT SERVER URL screen, tap the required URL from the list. The selected URL will then have a blue tick on its right.
Signing into the App
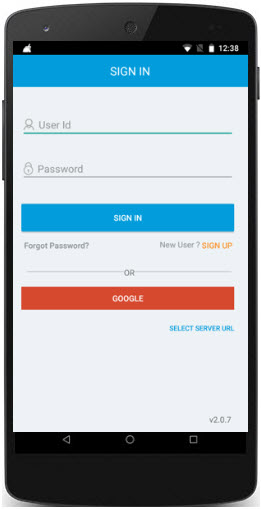 |
Sign in to the mobile app using your credentials. It opens with the list of Boards you have access to. Note: Sign Up or Sign In via Google is available to SaaS users only. |
Landing Screen
 |
Once you log in, the first screen you see is the list of all open Boards that you have access to. Read more about this screen here. |
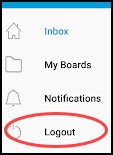
Drawer Menu
Using the Drawer menu you can view your Inbox, access your Boards, browse through all the notifications, and even log out from the App.
To open the drawer menu, tap the ![]() icon.
icon.
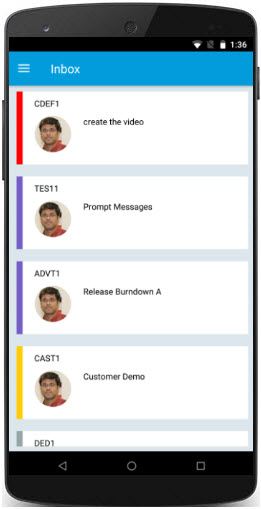
Inbox
|
The Inbox screen shows you the last FIVE cards that you have opened. Each card in the Inbox shows the Card ID, Title, and profile picture of the assigned user. |
Tapping any of them opens the edit view of the card where you can update the card details. |
 |
 |
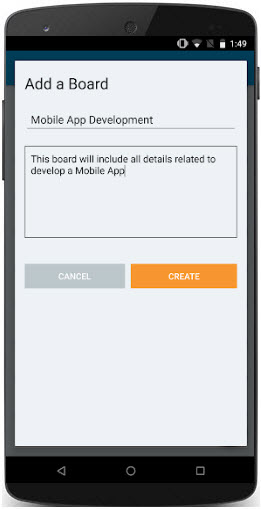
My Open Boards
|
My Open Boards screen shows the list of all the open Boards that you have access to. Tapping any of them takes you to the left-most column of the topmost swimlane of the Board. |
From this screen, you can also add a new Board by clicking the |
 |
 |
Notifications
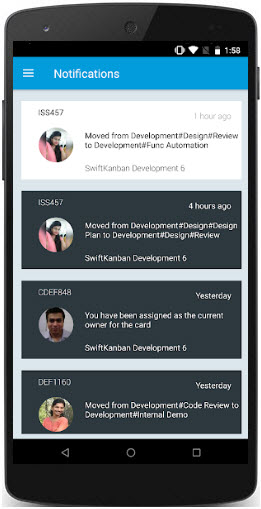 |
The notification shows all the notifications similar to what you see in the web application, but unlike the web, you cannot configure the settings in the mobile app. Tapping any notification will change its color to white indicating it is read. |
Logout
Viewing your Kanban Board
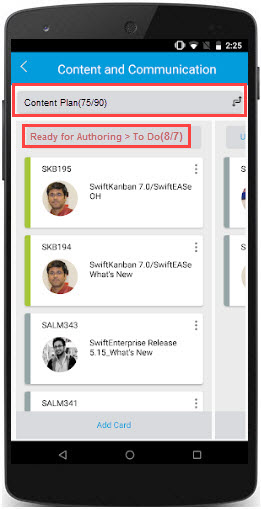 |
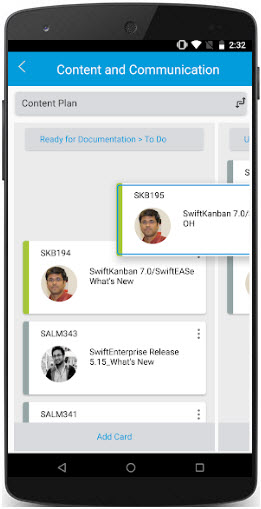
The layout of the Board has been designed to suit the App framework. When you tap a Board from the My Boards screen, it first shows the Board name on the top, followed by the name of the topmost swimlane and then the leftmost column or sub-column. For example, in the following image, Content and Communication is the Board name, Content Plan is the swimlane, and Ready for Authoring > To Do is the leftmost sub-column. You can swipe left or right to browse through various columns or sub-columns of the same swim lane and view the cards placed on them. Also, the WIP limit count is displayed for both Swimlane as well as the column header as configured on Web application. To know more, click here. |
 |
If you want to move to another swimlane of the same Board, tap anywhere on the swimlane header, select the desired swimlane, and view its cards. In this case, also, it will show the leftmost column of that selected swimlane. |
Managing Your Card
Using the mobile App, you can quickly perform a couple of important card operations like:
- Moving your cards across columns and swimlanes
- Updating card details
- Assigning An Owner
- Performing card operations
- Adding a card
- Archiving a card
Moving Cards across Columns and Swimlanes
 |
To move cards across columns of the same swimlane, long-press the card and then move it to another column, left or right. |
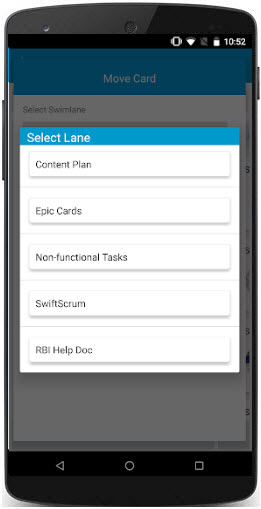
To move the card to a different swimlane, perform the following steps:
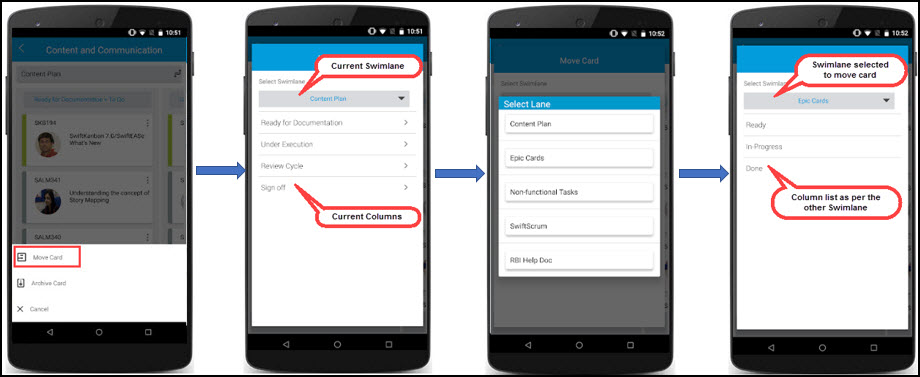
- Tap the Ellipses icon on the card and then tap the Move Card
- On the Move Card screen, select the swim lane by tapping the header.
- Tap the column under the selected swim lane to which you want to move the card.
- In case, that column has sub-columns, then tap the > icon to expand the list of sub-columns and select the desired sub-column.
Note: If the Enforce Value Stream for the Swim Lane Board policy has been enabled for the Board via the web application, then the card can be moved as per the settings defined for this policy. To know more about this policy, read here
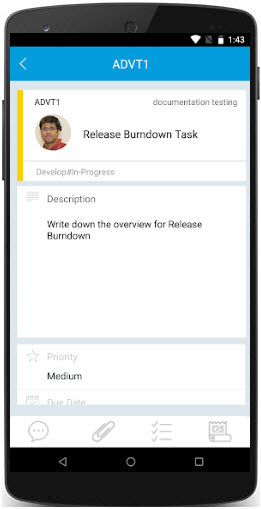
Viewing and Updating Card Details
Assigning an Owner
From the edit view of the card, you can check who it is assigned to. To Change the owner, perform the following steps:
- Tap the display picture or the Current Owner field on the card.
- In the Assign screen, tap the checkbox against the user(s) you want to assign.
- Tap the Save button.
Performing Card Operations
|
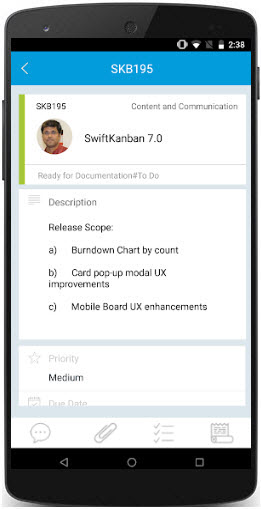
You can perform the following operations on a card. All these operations are placed in a panel at the bottom of the card. |
Adding Comments
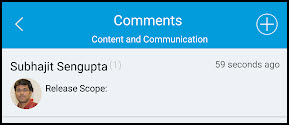 |
Tap the Comments icon on the card to navigate to the Comments screen. In this screen, you can view the comments, add a comment and reply to it. |
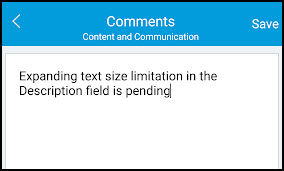 |
To add a comment, tap the |
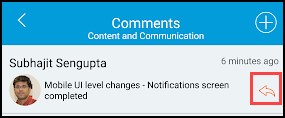 |
To reply to a comment, tap the Reply icon on the comment, and then add and save the texts. |
Viewing and Downloading Attachments
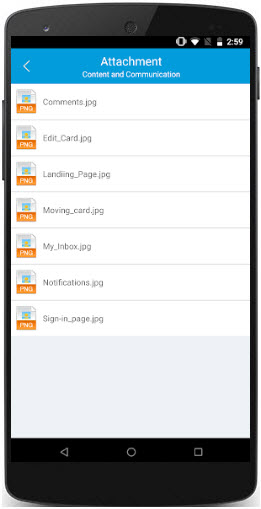 |
You can only view and download the attachment from the mobile app, but cannot upload it. |
Adding To-Dos
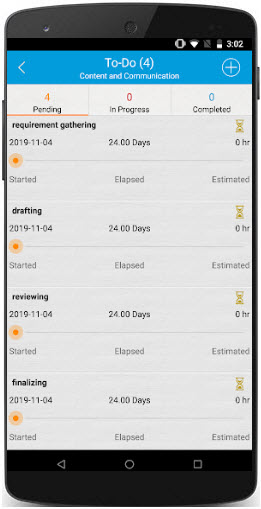 |
Tap the To-Do icon on the card to navigate to the To-Do screen. In this screen, you can view the existing To-Dos with its count in the bracket. To add a To-Do, perform the following steps:
|
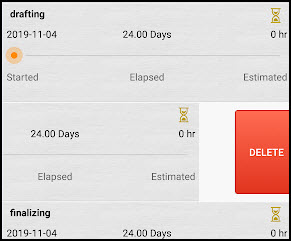 |
To delete a To-Do, swipe it to the left, and tap the DELETE button. |
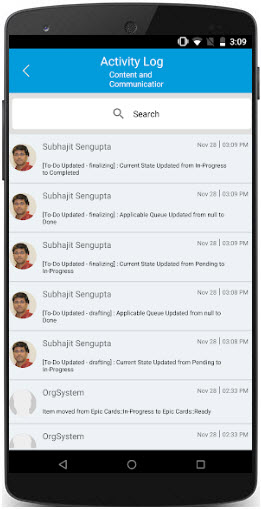
Viewing Activity Log
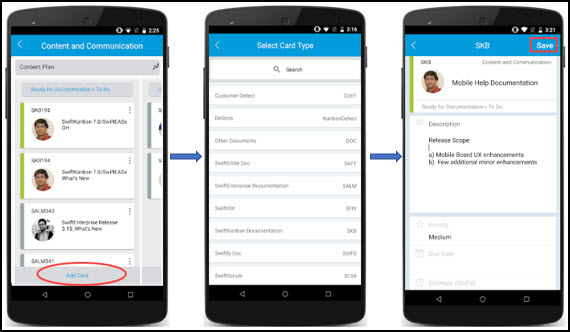
Adding a Card
You can add a card on any column or sub-column by performing the following steps:
- Tap the Add Card link at the bottom of the column or sub-column.
- Select a Card Type by tapping it. You can also search for a specific Card Type using the Search field.
- Enter the Card Title, Description, and other fields.
- Tap Save.
Archiving the Card
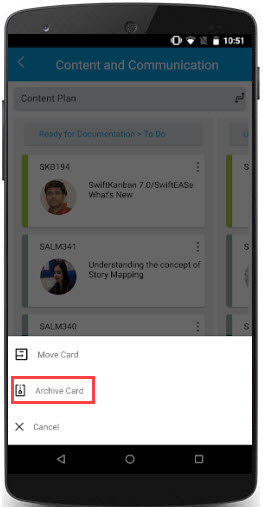 |
To archive a card, tap the Ellipses icon, then tap the Archive Card option. |
Board Policies and Admin Policies
When certain admin and board policies are applied in your SwiftKanban web application then the behavior of your Card movement and WIP limit calculations in your mobile app function the same way as in the web version.
The following board policies are functional in the mobile app:
- Make comment entry mandatory on card movement
- Track WIP limit violation reason
- Restrict column WIP limit violation
- WIP limit in terms of the estimate
- Restrict movement of the Parent card
- Set default card type as <select any of the card types configured on your board>
To know more about Board policies, click here.
The following admin policies are functional in the mobile app:
- Only allow the Admin and Board Manager to edit the cards in the Done column
-
Allow Reader to add comments on cards
To know more about Admin policies, click here.