
In this article, we will help you understand how to Work with External Work Requests.
Introduction
With our new External Work Requests module, collecting information from your users is now quick, and easy. You no longer have to rely on the traditional way of collecting work requests by using other tools and integrating them with our system to get the card created. Now, you can create a customized card form using External Work Requests and embed that form on your website. These forms can be accessed through clickable triggers (links) that are visible on your website. Users can raise their work requests by filling out and then submitting these forms. MS Outlook Mailbox users can raise a work request received from end-users email directly from their application using the MS Outlook Plugin that creates an add-in in the MS Outlook Windows application and MS Outlook Web application. For more details related to using the MS Outlook Plugin, click here. The submitted Forms are automatically classified based on their types and then saved as cards in the Backlog Board of their respective projects.

Pre-requisites
To use the External Work Requests feature in SwiftKanban, one must have the supporting license. Please contact us at [email protected] to know how to avail it.
Configuring External Work Requests
To configure the External Work Requests in SwiftKanban, you must enable the External Work Requests plugin. To enable the External Work Requests plugin, perform the following steps:
Note: You must have the Admin or Manager access to configure the External Work Requests feature in SwiftKanban.
1. Click the Admin Settings menu and select Plugins tile.
2. On the Plugins page, select the External Work Requests plugin and click Enable. The External Work Requests Setup window is displayed.

3. In the External Work Requests Setup, you can find the following details:
-
- External Work Requests UI Server URL: By default, it shows the front-end URL of the External Work Requests Service like https://issuecollectordevft.digite.com.
- External Work Requests Database Server URL: By default, it shows the back-end URL of the External Work Requests Service like https://issuecollectordevbk.digite.com/issuecollector.
- Swifkanban URL: It is the URL of the instance. By default, it will show the URL of the source system.
- Integration User Login ID: It is the Login ID of the Integration user for the logged-in account. This user will be used to communicate between the External Work Requests Board and SwiftKanban using REST API calls.
- Integration User Password: Password of the Integration user. Generally, you only need to enter this information in this setup dialog box.
Navigation
To open the External Work Requests page, select the External Work Requests option from the Main menu.
Creating External Work Requests
Now, let us understand how we can create an External Work request and embed it as a form on a website. For ease of understanding, we will take a scenario of creating a Work Request that will enable our users to report any defect through the Request Form embedded into a website. While understanding the feature, please refer to this scenario, so that you can understand the end-to-end process. Note: Whenever an External Work Request form is submitted by selecting the External Work Request Form Submitted event under the Boardwise Event section in Notification Settings you’ll get notified. To know more, click here.
First, we will begin setting the applicable Card Types.
Settings
Before creating an External Work Request, select the applicable Card Types for your External Work Requests by clicking the Setting icon. The selected Card Types in this settings window will be available for you against which you can create a Work Request. You can unselect the Card Types that you don’t want to use while creating your External Work Requests Form and click Apply.
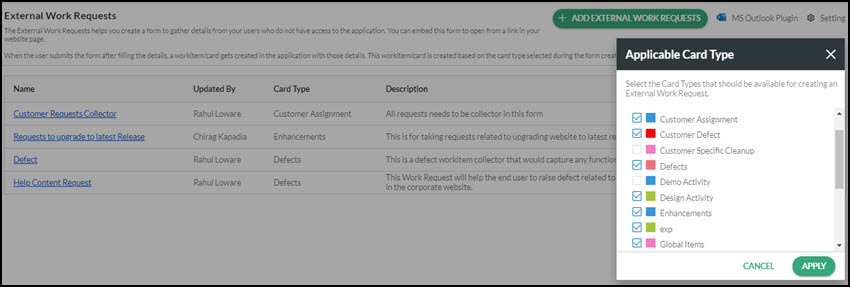
NOTE: By default, all Card Types that are available for card creation on your Board will be selected and listed in the settings window. This is a combination of factory shipped Card Types as well as custom Card Types.
Once we have selected the Card Types, we are now ready to create a Work Request.
Configuring External Work Requests screen
To create an External Work Request, perform the following steps:
- Click the ADD button.
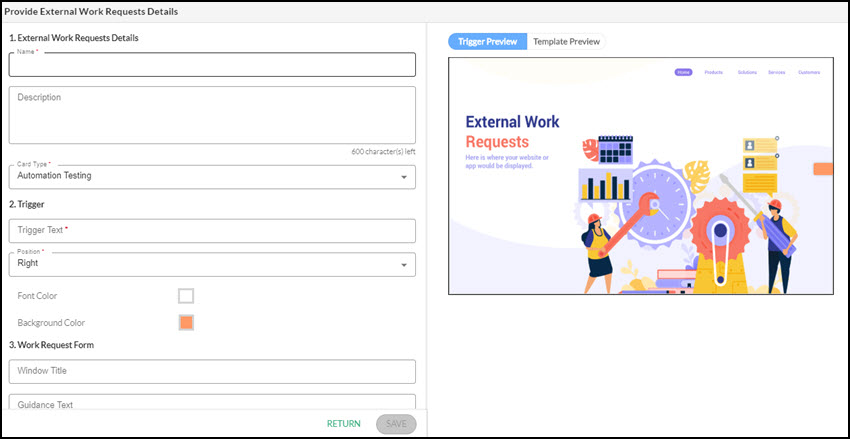
2. The Create External Work Requests User window comprises of the following sections:
1. External Work Requests Details
2. Trigger
2a. Trigger Preview
3. Work Request Form
3a. Template Preview
4. Embed Code (Only visible when editing an External Work Requests)
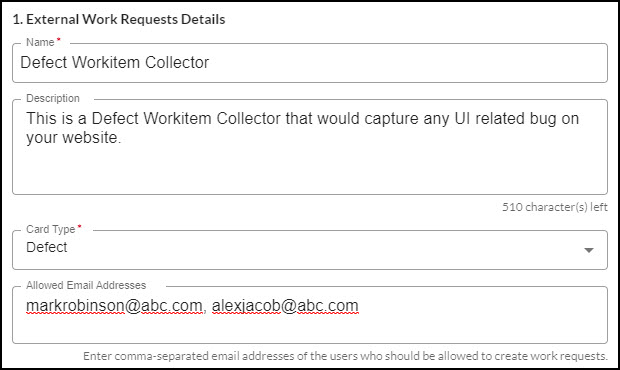
- Under the External Work Requests details section add details like Name and Description to provide a brief idea or purpose about this Work Request. Select an appropriate Card Type from the drop-down list depending on the above details. In the Allowed Email Addresses field, you can set permissions on who can use the External Work Request form for submission of work requests. This enhances the security and privacy terms of this feature.
For example, in our scenario, the purpose can be collecting the various Defects in the User Interface that our end-users have found and raised. So, we can fill in the details for Name, Description, select the Card Type and set the Email address who should be given the permission to submit the work requests, as shown in the following screenshot.
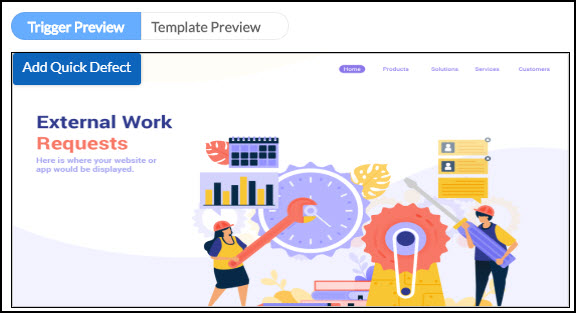
4. Create a custom trigger for your Form using the available format options. The trigger will appear as a clickable link clicking which the form will open. For example, let’s consider you want your trigger to be named Add Quick Defect and available on the right side of your website having specific font and background color using the color picker. You can do so by adjusting your settings and previewing the same as a sample on the right side of the screen.

5. You can preview your customized trigger on a sample webpage on the right side section under Trigger Preview.
6. Now, design your Form by filling in the required details in the Work Request Form section. The details like the Work Request title, Description and others you enter here will be visible to your users when they access your Form.
7. Enter the External Work Requests form Window title along with its Guidance text in the Work Request Form section. A list of fields is also available for you to select and drag-n-drop them into the Mandatory section and non-mandatory section as per your requirement. If you want your user to add an attachment in their feedback form, you can choose to enable or disable attachments from here.
For example, let’s consider you want the Work Request Form window title to be Defect Work Requests. Enter the title, provide a guidance text that would help the user to enter appropriate information related to the defect. The fields Work Request Title and Description are mandatory fields for the end-user to enter and will be available in the From.
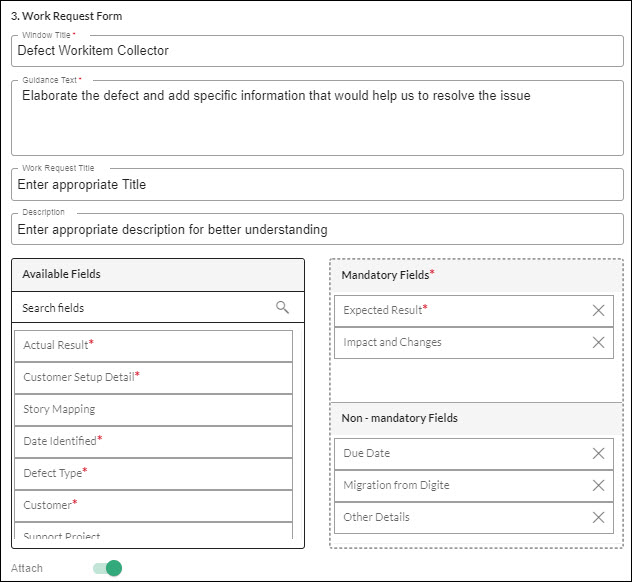
8. To help your end-users to provide more details about the work request they are raising, you can enable select custom fields from the source system and add them in the form as Mandatory or Non-mandatory fields. For example, in our scenario, adding fields like Release and Defect Type for the Defect Request Form can help the end-users to provide more accurate details of the problem.
Note: The custom fields like DateTime, email and single-line text fields are not going to be available for selection in the Work Request Form.
9. If you want the end-user to add an attachment in the Form, enable the Attach functionality by clicking the slider. All these customizations can be previewed under the Template Preview section on the right.

10. Click the SAVE button to save your changes. In the next step, we are going to learn how to embed a Work Request into an HTML or Javascript.
Embedding an External Work Requests into your Website
After clicking the SAVE button to save your new External Work Requests, a page containing code snippets is displayed. Use the code and information provided to embed your new External Work Request in the HTML or JavaScript code of the target website. You can even embed your code as a link in your mail domain by selecting the Embed in Hyperlink option.
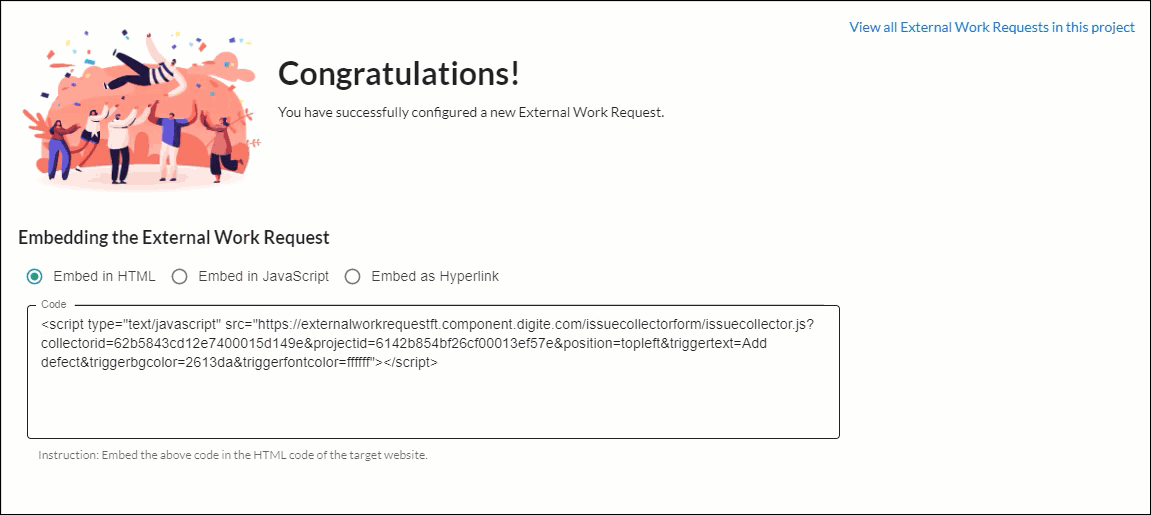
NOTE: If you want to view all of the external work requests of your project, you can navigate to the screen by clicking the View all External Work Requests in this project.
Editing External Work Requests
After you create an External Work Request, you can perform the following actions on the listing page:
Enable a Work Request: You can enable a Work Request by clicking the slider button under the Status column. Similarly, whenever you want to deactivate any of them, just click the slider again to disable it.
Edit a Work Request: If you want to make any changes to the existing External Work Request, click the Edit icon under the Action column, make the required changes in the External Work Request and click Save.
Once it is saved successfully, go to the right side of your External Work Requests, click the Embed Code tab and use the updated code to embed your External Work Request in the HTML or JavaScript code of the target website. Also, an option to embed your code as a link to the form in emails is available. This way, you can gather requests by clicking on the links in emails too!
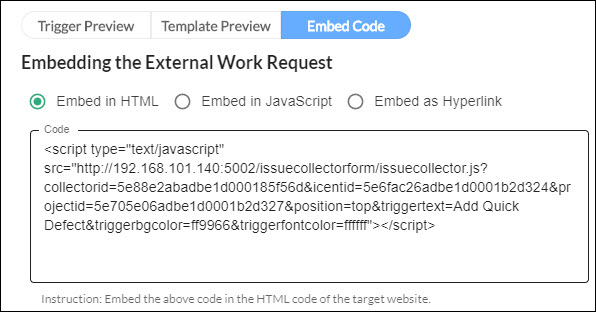
NOTE: Click the More Instructions link to get a detailed understanding of how to embed code in HTML or JavaScript or Email.
Set Default Values for Fields in External Work Request Form
You can set the default values for any text fields like Name, Email address when External Work Request form loads for the user. Use the following instructions to set the default value:
- For any custom text field: You need to add a key for the custom text field key. The key should have the same name as the field. If the field name has any spaces then replace them with an underscore. In this example, a custom field, called Application Version is added as a custom text field with an underscore in between the words and set to a default value, “description not provide”
![]()
- For “Name” field: You need to add the Name key and set it to a default value. For example,
![]()
- For “Email address” field: You need to add EmailAddress key and set it to a default value. For example,
![]()
Note: The above URL parameters are not provided by default. You need to set them in the URL you are using for External Work Request inside your website.
Viewing the External Work Request Form on a Website
Once you have successfully created an External Work Request and embed its code on a website, the targeted end-user can now view them as a link and click it to raise a Work Request. In our scenario, a user will do the following:
- Click the link to raise UI-related defects.
- Enter all the details in the specific fields on the form.
- The text type fields like Name, Email Address, and drop down values if set during creating the form then the values will be auto-populated in the form.
- Moreover, they can also attach an image to the Description field from the device, from a URL or simply by taking a screenshot and copying in the Description field.
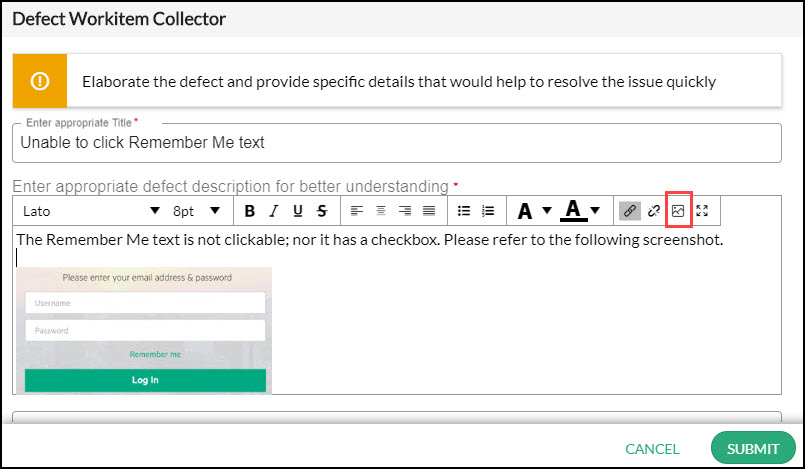
- Once the form is duly filled, the user clicks SUBMIT to raise the Work Request successfully.
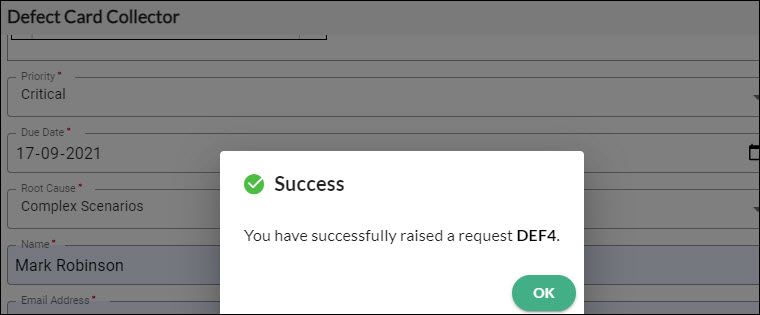
- On submitting the work request, you will return back to the application or website from which you had accessed this form.
An email is sent to the end-user as an acknowledgment for the receipt of the raised Work Receipt. The email includes all the fields listed on the External Work Request form.
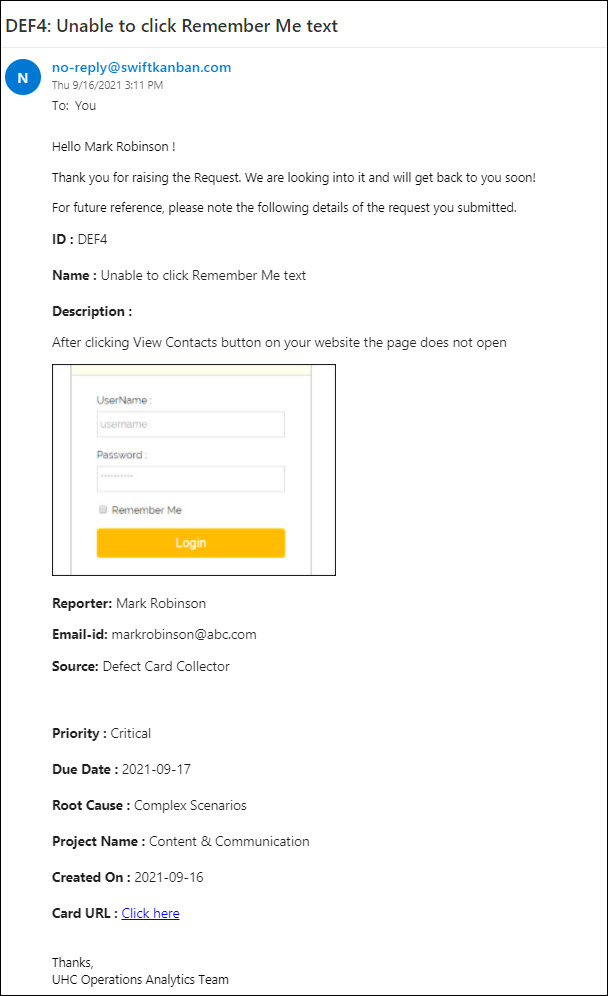
Note: The email includes only the Attachment name and not the attachment.
- Next, depending on the Card Type (in our scenario, it is Defect), a new card gets added into the Backlog of your Kanban Board. If the Admin policy Show ID in the Card Title of the External Work Requests is enabled, then the card ID prepends to the title of your cards, which results in a quicker search.
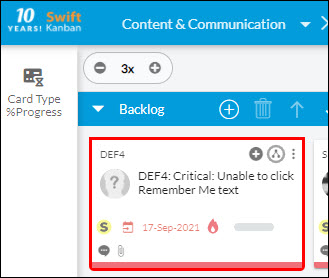
- Open the Card details to check the information related to the defect logged by the user.
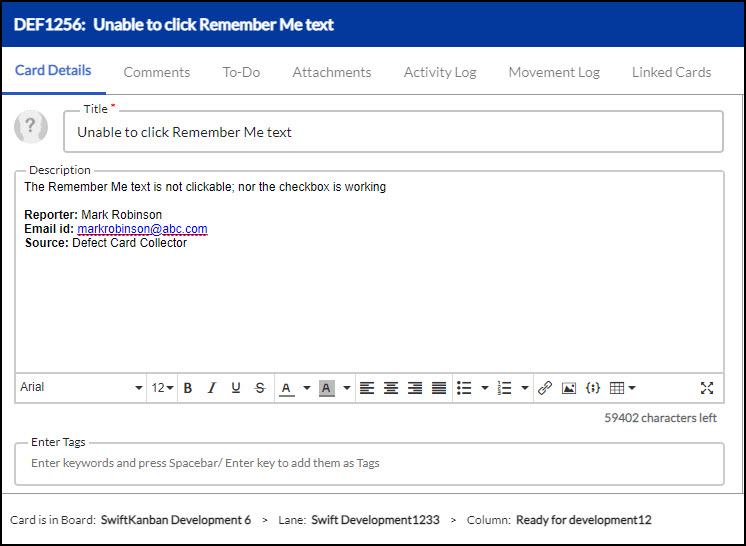
Note: To identify if the card is created via the External Work Requests Form, check the comments of that card. The comments will have details like “This card has been created via the External Work Requests. Mandatory fields and validations upon card creation may have been skipped.”

Creating Work Requests directly from MS Outlook Application
You can raise a work request received from end-users in your MS Outlook Windows or Web application by using the MS Outlook Plugin option. When you use our Plugin, it pulls information from the selected email and pre-populates the Title, Description, Name, and Email address fields in the External Work Request form, thereby leaving only the remaining details to be added. This results in faster work request creation.
Steps to Generate MS Outlook Windows Plugin and Install Work Requests into MS Outlook Windows Application
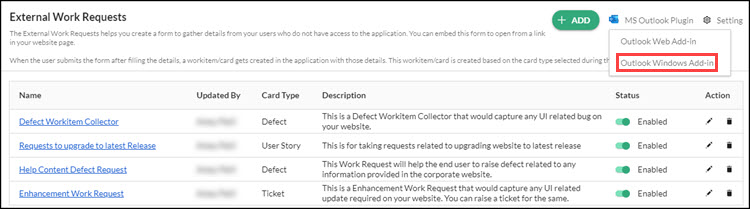
- Click MS Outlook Plugin option and select Outlook Windows Add-in option. A window opens listing the list of available external work requests in the current project and other projects in which you are a member.
- A window opens listing the list of available external work requests in the current project and other projects in which you are a member. Select the work requests that you want to add to your MS Outlook Windows application and click GENERATE.
NOTE: Only the selected Work requests will get installed in your Outlook application. So, if you have any work request already installed in your add-ins then it will override or replace the list with the new ones.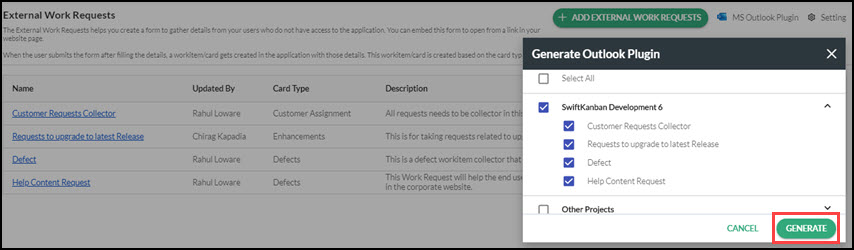
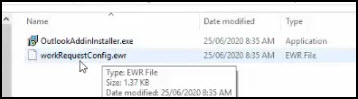
- A zip file gets downloaded into your system that includes the EXE and encrypted JSON file (includes the list of work requests selected in the EWR screen).
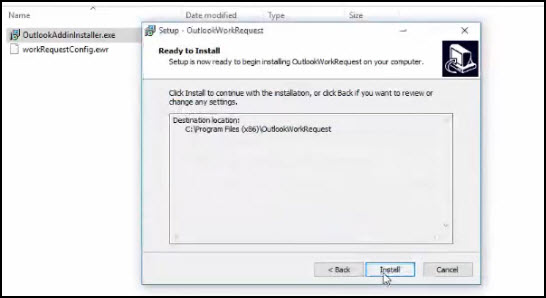
- Double-click the EXE file and finish the installation process of the plugin. Once the plugin is installed the JSON file gets deleted from the folder.
NOTE: It is recommended to keep the MS Outlook application closed while installing the plugin.
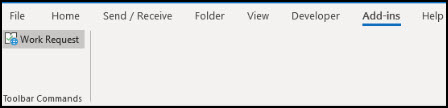
- Open the MS Outlook Windows application and navigate to Add-ins to check for the Work Request option added under your Outlook Add-ins.
Working with Work Request Add-in in MS Outlook Windows Application
- Select the email using which you want to raise a work request and click Work Request option from Add-ins.
- The list of work requests along with its project names gets listed in a pop-up window.
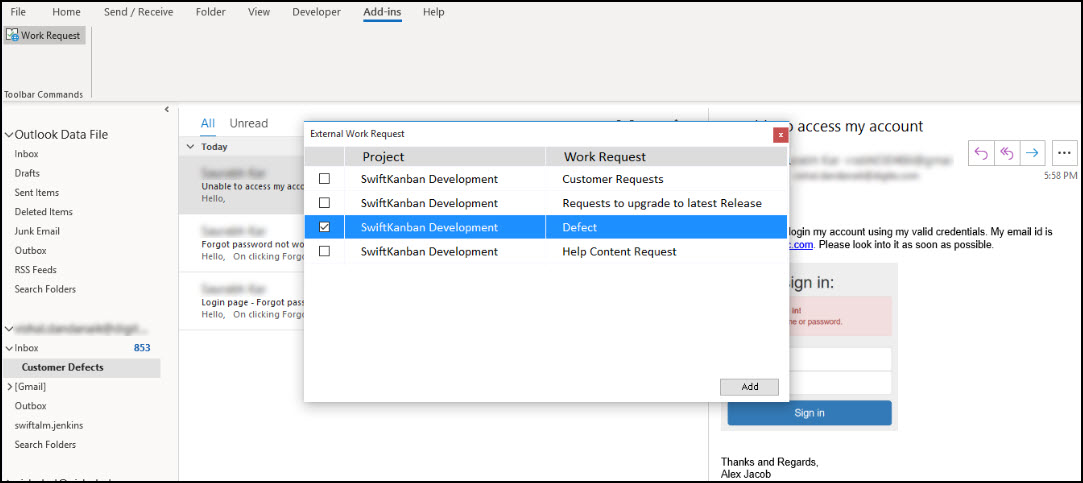
- Select the specific work request type and click Add.
- The External Work Requests form opens in your browser having the Title, Description, Name, and Email address fields pre-populated.
NOTE: If you don’t select an email and still use the Add-in to open a work request, it will open an External Work Request form but only the Name and Email Address will be pre-populated. - The Title field displays the email subject line, the Description field has the body of the email message, the Name field displays the specific name set in your MS Outlook general settings, and the email address field displays the email address at which the user has received the email.
NOTE:
It will pick up the first 2000 characters from the body of the email message as a description of the External Work Request form. For the RTF description field, we currently don’t support pre-populating the Table formatting and images. - Add the remaining details and click Submit.
- An email is sent to the end-user as an acknowledgment for the receipt of the raised Work Receipt. The email includes all the fields listed on the External Work Request form.
NOTE: The email includes only the Attachment name and not the attachment. - Next, depending on the Card Type (in our scenario, it is Defect), a new card gets added into the Backlog of your Kanban Board.
To know about installing and using MS Outlook Web Add-in, click here.