In this article, we will help you understand the Risk Module.
|
Skip Ahead to: |
Overview
One of the key elements of Enterprise Services Planning and related disciplines of Portfolio, Program/Project, or Release Management is Risk Management. Without having a concrete risk analysis and mitigation framework, it is impossible to plan and manage a Portfolio of Projects Initiatives or Product Features effectively, as one needs to have full visibility and a common understanding of the risks involved in not doing something or delaying something in favor of another and so on.
SwiftKanban’s Risk Assessment module provides a comprehensive and configurable framework for Portfolio Managers, Service Delivery Managers, IT Managers, and Business users as well as Product Managers. The framework enables you to define the Risk Assessment Framework in terms of Risk Categories and Values at the Board level for each card type, where a card may represent one of the portfolio items – a project, a corporate initiative, a product feature, etc. Portfolio Managers and other users mentioned above can then assess individual items on the risk model for the project/ card-type combination. Finally, based on the risk assessments made, managers can make an informed choice about which cards should be taken up next for execution.
The Risk Assessment module enables you to:
- Create an extended set of risk categories and their values by card type at the enterprise level
- Select and, if needed, customize the risk categories from the above choices at the individual board level based on their unique requirements
- Create or modify the values of each risk category for each card type
- Viewing the multivariate risk data of various such cards in a spider chart. This helps you to visually correlate and contrast the risk data over its diverse aspects.
Using the Risk Assessment Module
Prerequisite
- The Risk Assessment Module is only available for subscribers of the SwiftKanban ESP module, which is available with the SwiftKanban Enterprise License. Please make sure you have the Enterprise license if you wish to use the Risk Assessment as part of the ESP module. (For more information on the SwiftKanban ESP features, see here. If you are a SwiftKanban Team or Group License subscriber and would like to use the Risk module, you will need to upgrade to the SwiftKanban Enterprise License and purchase the ESP module. For more information, please refer to this page.
- After purchasing the Risk Assessment module, you need to enable the Risk Framework plug-in. To know more about enabling the plug-in, see this section.
- In order to configure the Risk Assessment module, you must have admin access to create the risk dimension and its LOVs in the Risk Codes Master List.
- You must have the Manager-level access to:
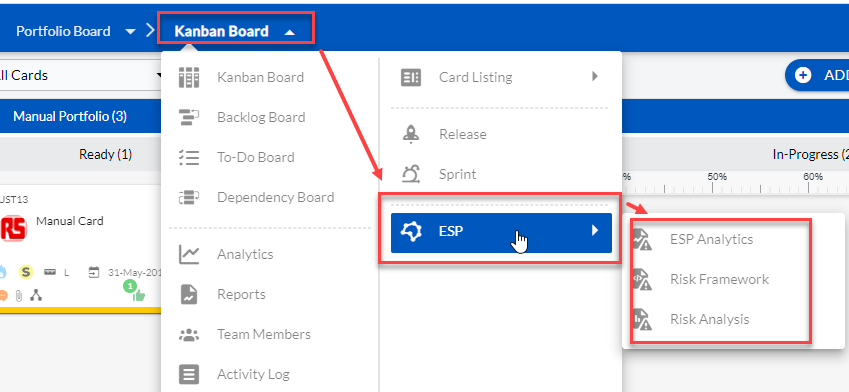
Navigating to the Risk Module
From the Kanban Board menu, go to ESP > Risk Framework or Risk Analysis.
To add the risk categories, customize them at the board level, assign risk category values of each of the risk-enabled cards, and assess the risk levels of multiple cards, follow the steps provided on the links below:
- Add the Risk Dimensions in the Master List
- Customize the Risk Dimensions for the individual board
- Assign the Risk Probability Values of a card
- Compare the Risk Profiles of multiple cards
Adding Risk Categories in Master List
To add one or more Risk Categories, do the following:
- From the top panel, click the More Options
 icon > Admin Settings. On the Admin Settings page, click the MASTER LIST SETTINGS tile. The Master List page displays the existing Master Lists.
 - Search for Risk Codes and double-click them.
- In the Risk Codes master list, add the Risk Dimension as a label. To learn how to add a label, refer to the MasterLists topic.

Customizing the Risk Dimensions for an Individual Board
To customize the Risk Dimension at a board level:
From the Board menu, navigate to ESP > Risk Framework. The Risk Assessment Framework page is displayed.
- Under the Risk Dimension Available pane, you can either select an existing category (as added in the Risk Codes master list) or create your own custom category by clicking on the Add Dimension button.
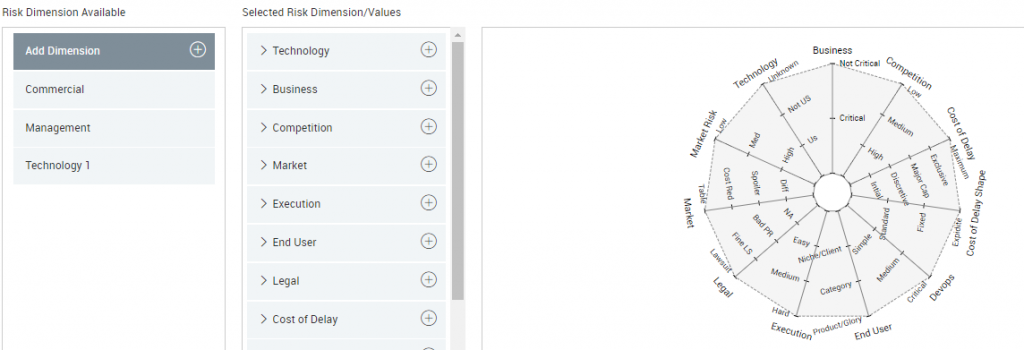
- Drag and drop a Risk Dimension to the Selected Risk Dimension/ Values pane.
- To add values to a newly created Risk Category, click the Add icon against the dimension in the Risk Category Selected pane.
- To delete an existing value, click the Delete icon against that value under the dimension in the Selected Risk Dimension/ Values pane.
Note: You cannot delete a Dimension once it is added in the Masterlist or in the Risk Dimension Available pane. But if you don’t want to use any Dimension listed in the Selected Risk Dimension/Values pane, drag it back to the Risk Dimension Available pane.
Assigning Risk Category-specific Impact Values to a Card
- To assign the risk values to a card, take the following steps:
- Open the card in the edit mode, and go to the Risk Profile tab.
 Only those card types for which you have enabled Risk Categories on the Risk Assessment Framework page will display the Risk Assessment tab.

- On the Risk Profile spider chart, assess that specific card’s risk profile by dragging the spider-chart line along each category’s values in the chart.
Viewing Comparison of Risk Profiles
Assessing the Risk Profile of the various cards on your board is typically a period activity since the risk associated with a project or an initiative or a feature can change over a period of time. Based on your context, the frequency of assessing the risks associated with each card on your backlog or Ready column will vary. You can do it once a week or a month or even a quarter for larger (more complex) initiatives.
Once you have set up the risk profile for various cards (of the same card type), you compare the risk profiles of these cards. The typical scenario when you want to compare a card’s risk profiles is at the time of deciding which cards to pull onto the Kanban Board – that is, deciding which initiative to move forward, which feature to develop next, and so on.
- On the Backlog or the Ready column, press the Ctrl key and select the cards for which you want to view their risk profiles. The selected cards will be identified with the yellow tick mark.

- Right-click and select the Compare Risk menu option.

- On the Compare Risk page, hover over the selected cards to view its chart in a unique color-coding.

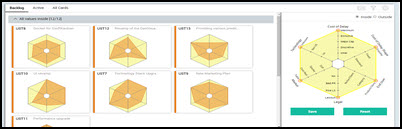
Tile view
With the Tile View, you can now get to see the Risk cards as a tile grouped and placed horizontally in a linear format. You can view them based on Backlog or Active Cards, or view them all.
Moreover, you can click and toggle to the detailed Tile view which has information like Risk Dimensions and Custom Attributes of the cards embedded into each of the rectangles.
We have also introduced a filter on the Tile view which lets you refine your view based on various parameters like Card Size, Card Type, Priority, and Class of Service.

Note: Exclusively available to SwiftKanban ESP module subscribers.
Demand Shaping
You can use the Demand Shaping view to refine the Risk Cards based on the values of Risk Dimensions.
You can drag the slider of each dimension, and set the range of the dimension values, the Risk Cards matching your requirement are displayed in the collapsible panes, where each of the panels has a certain number of cards either falling inside or outside of the set range.
So, you can group them based on cards falling inside or outside of your chosen range.
The demand shaping helps you understand the demand analysis of Risks using the outcome-driven (ODD) design approach, and take a quick, informed decision on the risk trade-offs.