
In this article, we will help you understand how Applying Flags on Cards.
|
Skip Ahead to: |
Overview
SwiftKanban offers you various types of flags as listed below; you can use one or more as appropriate:
Manual: If you want to simply highlight a card for discussion.
- Risk: If you identify a risk with a card.
- Issue: If you identify an issue with a card.
- Block(or Blocker): If you are stuck for any reason while working on a card are effectively blocked from making progress, and want to inform others for any help needed. It is marked as ‘Blocked’ until you unblock it.
- Vote: If you want to show the relative importance of a card over other cards. Later you can prioritize the cards as per the number of votes.
You can apply flags in two ways:
- Single Flagging – Applying a flag on a card.
- Multiple Flagging – Apply a flag multiple times on a card with different Reason Codes.
Single Flagging
You can apply a flag by clicking on the respective flag. Let’s understand the steps of applying and removing different types of flags.
Using the Manual Flag:
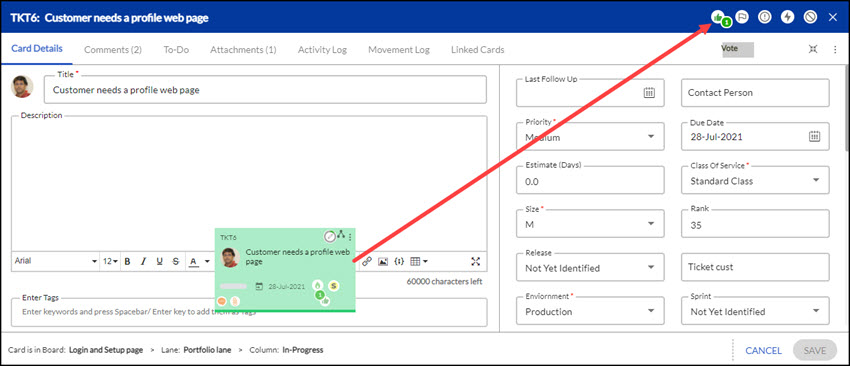
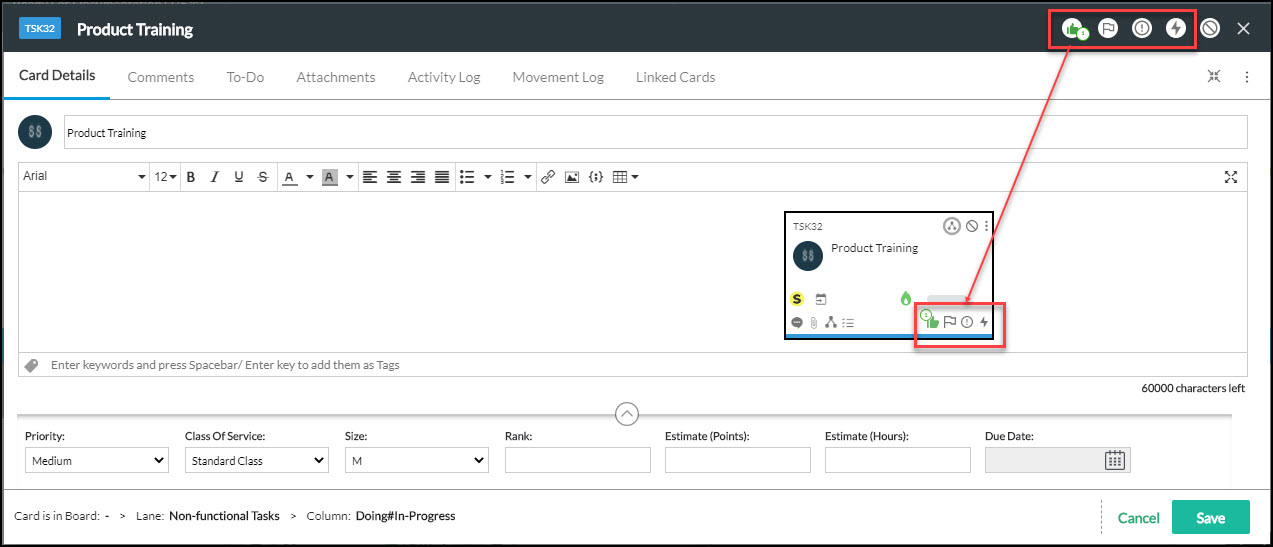
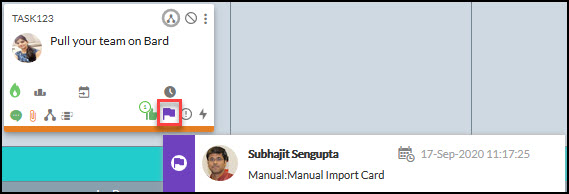
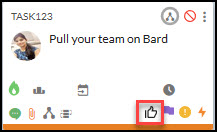
1. On the Kanban Board and Backlog Board, you can mouse over the required card to display all the flags.
2. To activate the Manual flag, click ![]() icon, enter a comment, and then click Save.
icon, enter a comment, and then click Save.
This will highlight the flag![]() , which indicates that the card needs to be discussed.
, which indicates that the card needs to be discussed.
Note: Any team member can raise a flag, however, only the same team member is able to remove the flag.
3. Once the discussion is completed, the owner can unflag the card anytime. To unflag, simply click the flag again, comment and then click Save.
Note: Any comment that was entered while activating or removing the manual flag is recorded in the Comments and Activity Log tab.
Mouse-hovering the flag displays the name by whom it is flagged.
To Flag a card with an Issue:
1. On the Kanban board and Backlog Board, mouse over the required card to display all the flags.
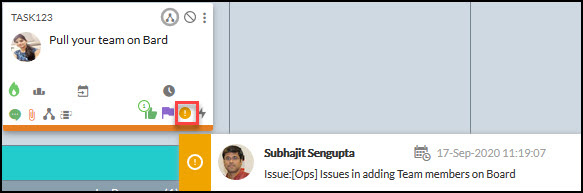
2. Click ![]() to activate the Issue flag.
to activate the Issue flag.
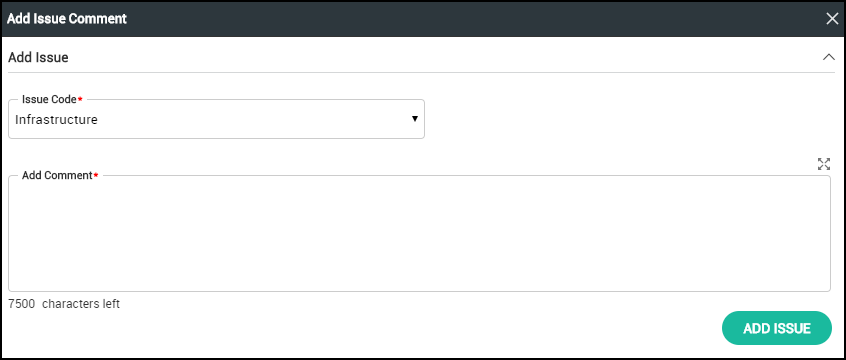
When you click the Issue flag, SwiftKanban allows you to capture the Issue Code as well as Comments about that issue using the “Add Comment” pop-up.
3. From the Issue Code dropdown list, select the appropriate issue code.
Note: The Issue Code list can be defined as Master List under SwiftKanban Settings under the Admin menu. For more information on defining master lists, refer to the Define Master Lists article.
4. Enter any comments for flagging this card to describe the Issue. This is a mandatory field.
5. Click Save, to save your comments.
This will highlight the flag![]() , which indicates there’s an issue associated with the card. Mouse-hovering the flag displays details such as User Name, Date and Time when it was flagged, Issue Type, and Issue Description.
, which indicates there’s an issue associated with the card. Mouse-hovering the flag displays details such as User Name, Date and Time when it was flagged, Issue Type, and Issue Description.
6. To remove the Issue flag, click the highlighted Issue flag again, enter the comment, and click Save.
Note: Any comment that was entered while activating or removing the Issue flag is recorded in the Comments and Activity Log tab.
To Flag a card with a Risk:
1. On the Kanban Board and Backlog Board mouse over the required card to display all the flags.
2. Click ![]() to activate the Risk flag.
to activate the Risk flag.
When you click the Risk flag, SwiftKanban allows you to capture the Risk Code as well as Comments about that issue using the “Add Comment” pop-up.
3. From the Risk Code dropdown list select the appropriate risk code.
Note: The Risk Code list can be defined as Master List under SwiftKanban Settings under Administration. For more information on defining master lists, see the Define Master Lists page.
4. Enter any comments for flagging this card to describe the Risk.
This is a mandatory field.
5. Click Save, to save your comment.
This will highlight the flag![]() , which indicates there’s a risk associated with the card. Mouse hovering the flag displays details such as User Name, Date and Time when it was flagged, RiskType, and Risk Description.
, which indicates there’s a risk associated with the card. Mouse hovering the flag displays details such as User Name, Date and Time when it was flagged, RiskType, and Risk Description.
6. To remove the Risk flag, click the highlighted Risk flag again, enter a comment, and click Save.
Note: Any comment that is entered while activating or removing the Risk flag is recorded in the Comments and Activity Log tab.
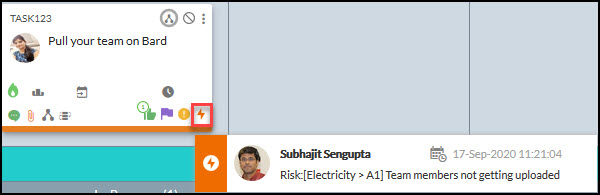
To Flag a card as a Blocked Card
1. On the Kanban Board and Backlog Board, mouse over the required card to display all the flags.
2. Click ![]() to block a card.
to block a card.
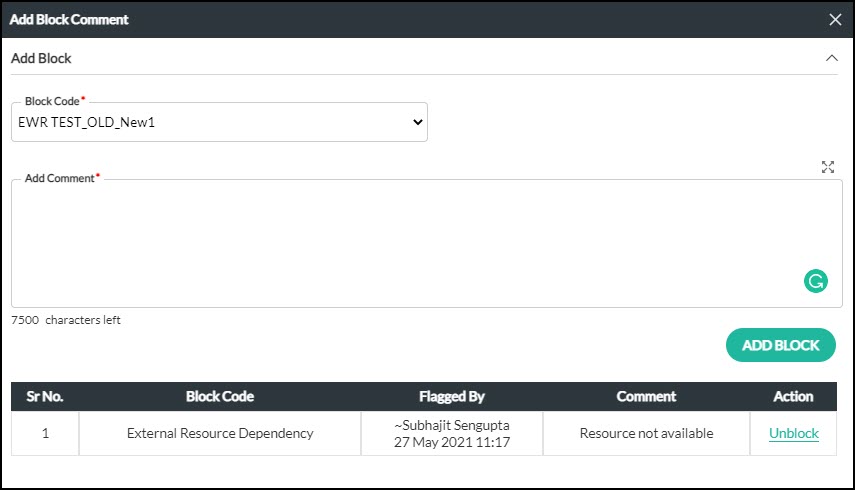
When you click the Blocker flag, SwiftKanban allows you to capture the Blocking Code as well as Comments about why you are blocking the card using the “Add Comment” pop-up.
3. From the Blocking Reason dropdown list select the appropriate reason code.
Note: The Blocking Reason Code list can be defined as Master List under SwiftKanban Settings under Administration. For more information on defining master lists, see Define Master Lists
4. Enter any comments for why you are blocking this card to describe the problem you may be facing. This is a mandatory field.
5. Click ADD BLOCK to save your comment.
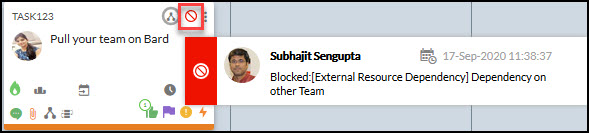
This will highlight the flag![]() , which indicates that the card is being blocked. Mouse-hovering the flag displays details such as User Name, Date and Time when it was blocked, and Blocking reason. Moreover, the Block card watermark is also displayed on such cards so that you get clear visibility of them on your Board at any zoom level.
, which indicates that the card is being blocked. Mouse-hovering the flag displays details such as User Name, Date and Time when it was blocked, and Blocking reason. Moreover, the Block card watermark is also displayed on such cards so that you get clear visibility of them on your Board at any zoom level.
Note: This watermark is available in the new card layout only.

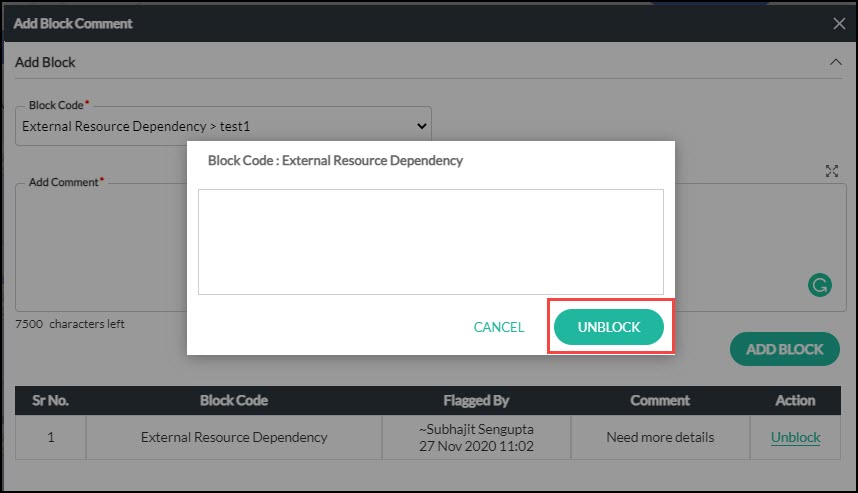
To Unblock a Card
This is the only flag type where you also need to enter comments when you remove the flag (unlock the card). This is because Blocking is a significant event as it indicates that all work has stopped in the card. When a blocker is resolved, it is important to describe how it was resolved.
1. On the Kanban Board and Backlog Board, mouse-hover the required card and then click![]()
Add Un-Blocking Comment pop-up appears.
2. Enter any comments about why you are unblocking the card.
3. Click the UNBLOCK button to save your comment.
This will again grey out the highlighted flag.
To use the Vote:
1. On the Kanban Board and Backlog Board hover over the required card to display all the flags.
2. Click ![]() to put your vote on the card.
to put your vote on the card.
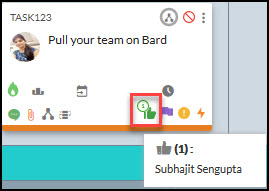
This will highlight the vote, which indicates that the card has been voted.
Note: Any team member can vote, however, the same team member can remove the vote also.
3. Multiple team members can vote for a card. Hovering on the Vote icon displays the number of votes.
Multiple Flagging
You can apply the same flag multiple times on a card provided each instance of the flag has a different reason code.
Note: To enable this feature, you need to enable the Allow Person to add multiple flags on the policy of the card in the Admin Policy.
Adding Multiple Flags on A Card
Let us consider applying an Issue flag![]() :
:
- On the Kanban and Backlog board, mouse over the required card to display all the flags.
- Click to activate the Issue flag.
- In the Add Issue Comment pop up, select an Issue Code from the drop-down list.
Note: The Issue Code list can be defined as Master List under SwiftKanban Settings under the Admin menu. For more information on defining master lists, refer to the Define Master Lists article. - Enter any comments for flagging this card to describe the Issue. This is a mandatory field.
- Click Add Issue.
- This will highlight the flag, which indicates there’s an issue associated with the card. Mouse-hovering the flag displays details such as User Name, Date, and Time when it was flagged, Issue Code, and Issue Description.
- To add another issue on the same card, click the highlighted Issue
 icon on the card and repeat the step 3 to 5.
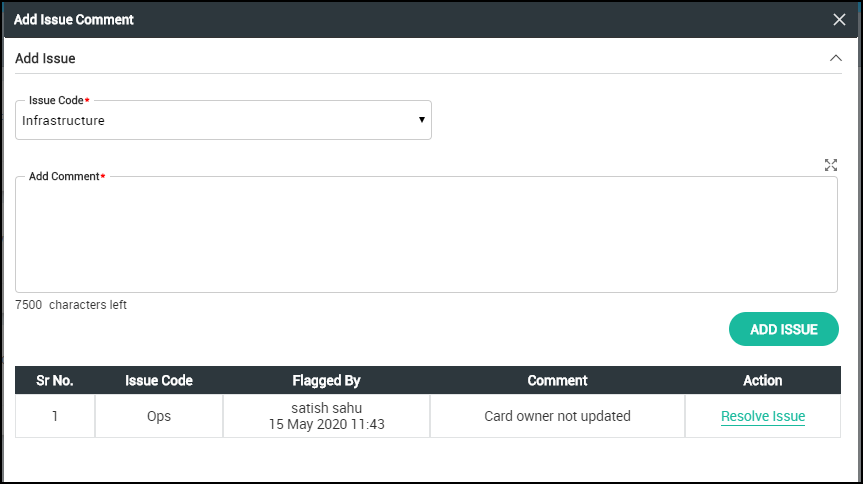
Note: Multiple people can add an issue with the same issue code. - All the added issues are shown in the Existing Issues table. While hovering over the issue icon on the card, the latest added issue is displayed.
In a similar manner, you can apply multiple Block, Risk, and manual flags on a card.
Removing Multiple Flags from a card
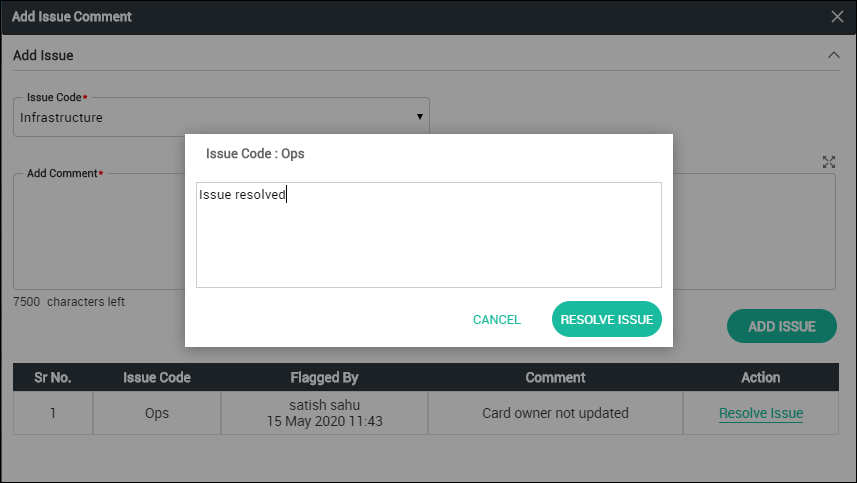
Let us consider we have multiple issues and we want to remove a couple of them.
-
- Open the Add Issue Comment pop-up window by clicking the highlighted Issue Flag.
- In the Existing Issues table, click Resolve Issue at the end of the row for the required issue.
- Enter a resolve comment, and click Resolve Issue again.
- Open the Add Issue Comment pop-up window by clicking the highlighted Issue Flag
In a similar manner, you can remove multiple Block, Risk, and manual flags from a card.
Note: Any comment that was entered while activating or removing the Issue flag is recorded in the Comments and Activity Log tab.
Transferring Flags to Another Board
When you transfer a card from one Board to another, the Vote, Manual Flag, Issue, and Risk flags applied on that card are also transferred to the new Board. For example, The card shown in the following image has been transferred from another Board to the Content & Communication Board. While the card got transferred to the destination Board, the Flag that was applied on the original Board was also transferred along with the Flag comment.
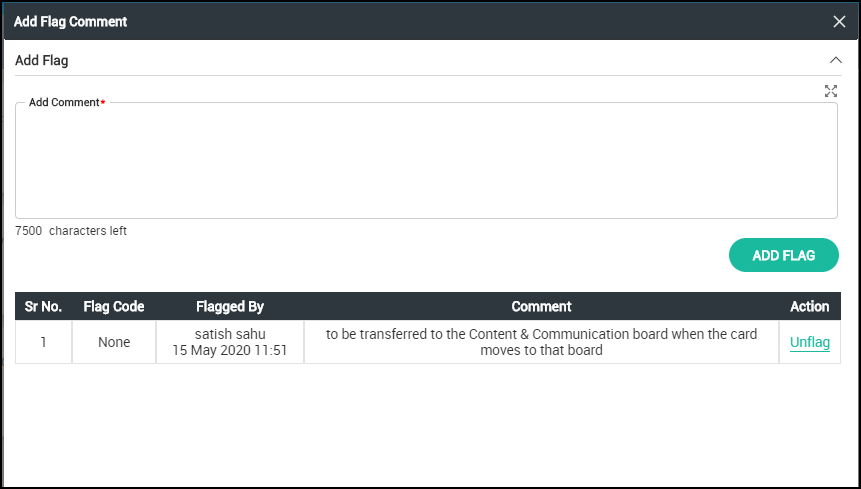
Note: If the Reason code, which was selected while applying the Flag, was not present in the destination Board, then that Flag will not be transferred. In place of that, the comment used for that Flag in the original Board will be added to the transferred card.