
Business Rules enable teams to define the basic rules that automatically keep your Boards updated, giving you more time to do your real work! Business Rules are designed to automate repetitive card updates as per your business needs.
|
Skip Ahead to: Advantages of Using Business Rules Layout of Business Rules Listing Page Defining Dynamic Data Conditions or Actions for Complex Scenarios |
Automation has always been a great time and effort saver as it eliminates the need to perform repetitive or manual tasks. While working on a Kanban Board in SwiftKanban, many a time you might have wanted to automate certain routine tasks that consume much of your time and effort. With the Business Rules, you can now configure and execute Business Rules to automate repetitive tasks. Business Rules allow you to automate actions within your Board based on the criteria that you set.
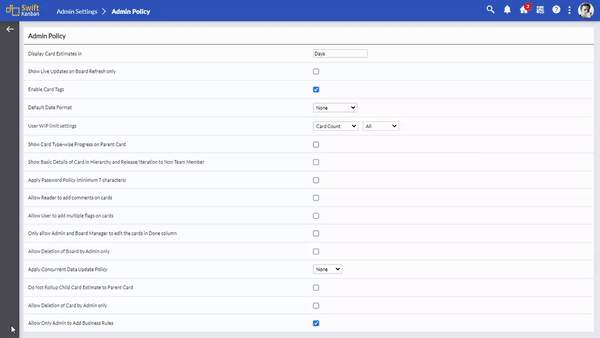
To streamline the approach to Business Rules there is an Admin policy, Allow Only Admin to Add Business Rules. If this policy is enabled, only an Admin has the control to create a Business Rule. The Manager role will have access to modify the Business Rule, ensuring your team can streamline the processes with precision. Whereas, Reader and Member role will not be able to add, view, or modify the Business Rule. Also, an Admin has the control to create a Copy of the Business Rule.
Automation rules are made up of four parts: triggers that kick off the rule, conditions that refine the rule, actions that perform tasks in your application, and frequency that schedules the execution of your rule. Triggers, conditions, actions, and frequency are the building blocks of automation. Simply combine these components to create rules that can do anything from blocking cards to updating cards on a Board.
For example, consider a simple scenario where if the priority of a card is set to ‘High’, then it should be moved to the ‘Ready’ column and assigned to one of the users automatically so that the card can be worked upon as soon as possible. So in this example –
- Updating the card is the trigger.
- The priority of the card being set to ‘High’ is the condition.
- Moving the card to the ‘Ready’ column and assigning it to a user is the action.
Advantages of Using Business Rules
- No coding or scripting is required.
- Reduce the manual work and fasten the day-to-day processes.
- Saves time for team members so that they can focus on other important things.
- Set a frequency for the number of times the rule gets executed in a planned scheduled format.
- Creating Business Rules in SwiftKanban is easy as while creating the rules you can visualize the flow of the rule which helps you understand the triggers, conditions, actions, and frequency in a better way.
Prerequisite
To use the Business Rules feature in SwiftKanban, one must have a supporting license. To know more about it, please contact us at [email protected].
Navigation
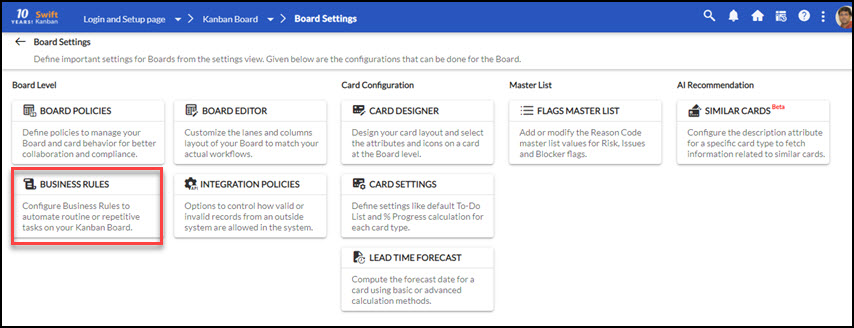
- Click the Board Settings
 icon on the top menu bar. The Board Settings page is displayed.
- Click the BUSINESS RULES tile.
Layout of Business Rules Listing Page
The Business Rules page displays the list of Business Rules. You can use a maximum of up to 10 active/enabled Business Rules across multiple Boards at a time in a user account.
Your Business Rules appear listed in a sequential manner depending on the date of creation. If you add a sequence number to the rule, then the list of Business Rules is sorted in ascending order and gets executed as per that order. If the sequence number is not defined then the Business Rules are executed from oldest to latest as per their date of creation.
Note:
- If you define a sequence for a certain number of Business Rules, then these rules are listed in ascending order at the top of the list and are executed first. The remaining rules without sequence numbers are listed below and later executed as per their date of creation.
- If the same sequence number is assigned to more than one Business Rule, then the listing and execution of the Business Rule will occur as per its date of creation.
- If the sequence number is not defined for any of the Business Rules, then they are listed and executed in a sequence as per their date of creation.
- Only a maximum of 3 digit numbers can be entered in the Sequence field for a Business Rule.
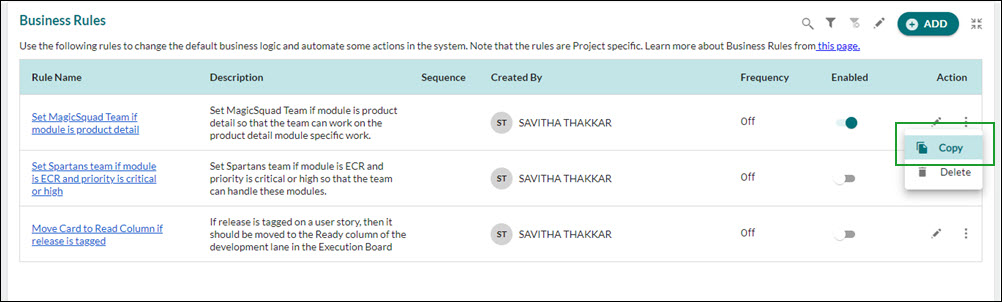
At the top panel of the Business Rule page, you have the following icons:

Search option: Type a few characters of the rule name that you want to view or edit from the list of available Business Rules.
Filter option: You can apply the filter on the Created By, Frequency, and Enabled columns. Using this option you can narrow down the list of Business Rules based on criteria like created by, whether the rule is enabled or disabled, and frequency is set or not.
Clear Filter: This icon is enabled only when you have applied the filter option. On clicking this icon, all applied filters will be cleared.
Edit Sequence: Clicking this icon will let you define a sequence for your rule to be executed. Once you define the sequence to your rules, click the Save icon. The rules get sorted in sequential order.
Maximize option: This icon maximizes the page to full-screen mode.
Other operations on the listing page.
Enable/Disable Business Rule: Click the Toggle button on the Enabled column to enable or disable a Business Rule.
Edit Business Rule: Click the Edit icon on the Action column to modify a Business Rule.
Delete Business Rule: Click the Delete icon on the Action column to delete a Business Rule.
Copy Business Rule: Click the Copy icon on the Action column to copy and create a new Business Rule.
Export Business Rule: Click the EXPORT button to export the details of Business Rules in CSV format.
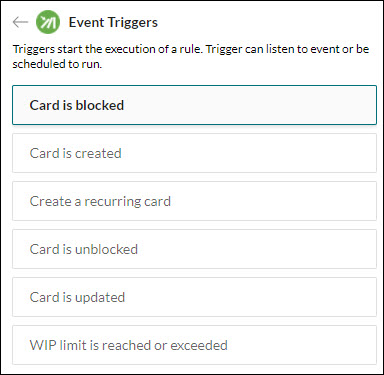
Triggers
Every custom rule starts with a trigger. They start the execution of your rules. Triggers will listen for events in SwiftKanban, such as when a card is blocked or when an attribute of a card is updated.
- Add a recurring trigger or a non-recurring trigger.
- To define a recurring trigger, you need to define the frequency for the rule to be executed.
- In case of a non-recurring trigger, you can enable or disable the frequency as per your requirement.
For more information related to the recurring trigger, click here.

List of available Triggers
The list of available triggers is as follows:
Card is created: The Business Rule will be executed if a card is created. This trigger is supported by all the cards.
Note: If you create or add cards quite frequently using the Quick Add feature and you have defined a business rule using the Card is Created trigger, then please read this section carefully.
Card is updated: The Business Rule will be executed when a card is updated. For example, when the card owner is changed or the card is moved from one column to another, etc.
Note: The Update trigger will not run if a card is blocked or closed but it will work on archived cards.
Card is blocked: The Business Rule will be executed when a card is blocked. All product attributes and custom attributes are supported by this trigger. You can use this trigger on a card type together with conditions and set an action when the condition is met. For example, when a parent card-type Theme is blocked by having a condition set on its priority attribute as Critical, perform the action to block all the child cards linked to it.
Card is unblocked: The Business Rule will be executed when a card is unblocked. All product attributes and custom attributes are supported by this trigger. You can use this trigger on a card type together with conditions and set an action when the condition is met. For example, when a parent card type Theme is unblocked having a condition set on its priority attribute as Critical, perform the action to unblock all the child cards linked to it.
Card is flagged: The Business Rule will be executed when a card is flagged. All product attributes and custom attributes are supported by this trigger. You can use this trigger on a card type together with conditions and set an action when the condition is met. For example, when the Due Date of a card type Defect is next week and its Priority is High, then the card should be flagged so that the team members can pay due attention to the card.
Card is unflagged: The Business Rule will be executed when a card is unflagged. All product attributes and custom attributes are supported by this trigger. You can use this trigger on a card type together with conditions and set an action when the condition is met.
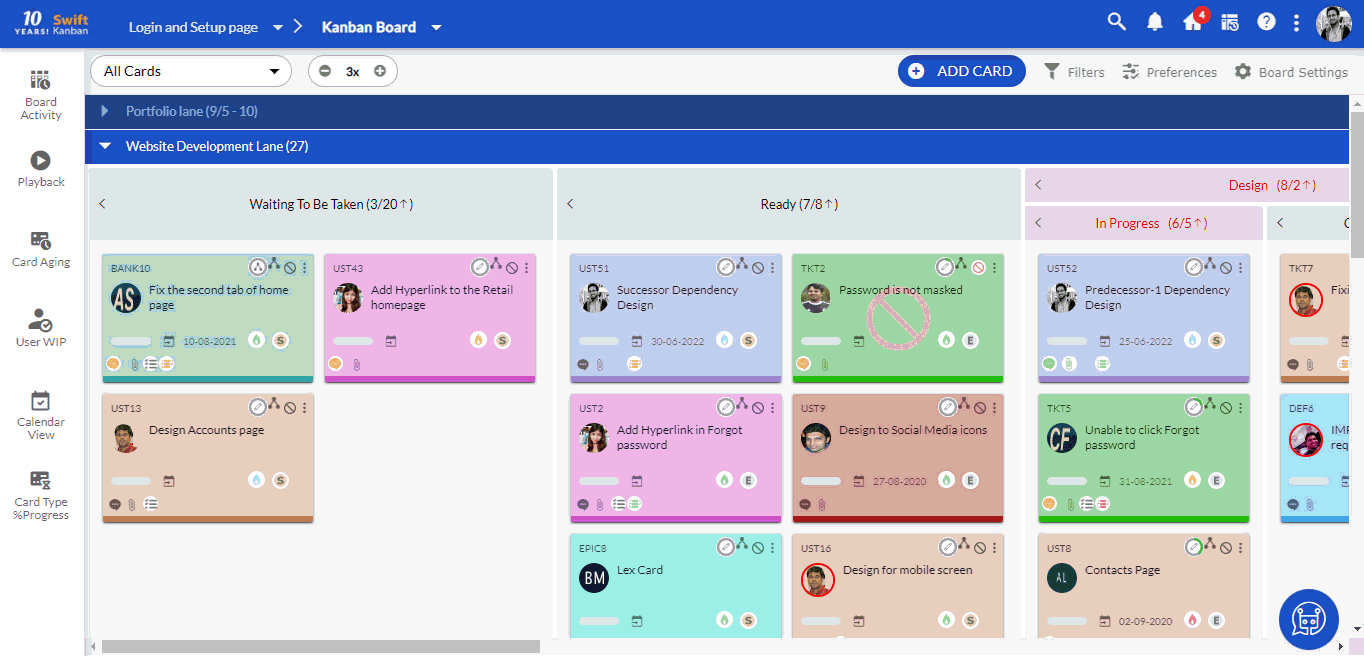
WIP limit is reached or exceeded: The Business Rule will be executed if the WIP limit on any lane and column in the Kanban board is reached or exceeded its defined limit. When you configure a “WIP limit is reached or exceeded” rule, then any column of a Portfolio lane or any Percent Progress column of a Non-portfolio lane is not displayed as a Context in the Condition of that rule. As the WIP limit cannot be applied to any of such columns, they can’t be used in a condition of a Business Rule.
- For the User WIP, the Business Rule will be executed if the WIP limit of any active user on any open Kanban board under the app account is reached or exceeds its defined limit.
- For the User WIP limit, you need to first enable the “User WIP Limit Settings” under the Admin Settings.
An email notification is sent to the user whenever a WIP limit exceeds or reaches the limit. - Note: if the WIP limit of a column/swimlane/user is changed in the settings and the changed WIP limit violates the existing column/swimlane/user limit, then in this scenario, the email notification will be sent to the user on the next movement/assignment of the card and not on just changing the settings for the WIP limit.
- Note: In the Data Condition for WIP limit, columns under Portfolio lane and Percent Progress columns are not listed.
Create a recurring card – Use this trigger if you want to execute a rule frequently on a fixed date or day of a week/month/year without meeting any conditions. You can also define the start and the end date when a rule with this trigger should be executed.
Note: All the triggers listed above are non-recurring triggers; except the “Create a recurring card” trigger.
Conditions
Conditions let you refine the scope of your Business Rule. They must be met for your rule to continue running. Conditions can be like when an attribute in a particular card type has a defined value. For example, if priority is high, or a card is blocked, or Class of Standard is Expedite, etc.
You can select single or multiple conditions for a Rule. For example, a Rule should be executed if the Priority is High and the Card Owner is Unassigned. Or a Rule should be executed if the card is in the Backlog, Size is L, and the Due date of the card is the next week.
The conditions can be applied to attributes like Card Owner, Overall Status, Actual Effort, Release, Name, and many more.
Note, that all the custom attributes are also supported by the Business Rules.

To set a condition for a rule, you need to first select the card type and then the value for its attributes. So if the selected card type will have the value (set in the condition), then the condition will be fulfilled and the rule will be executed.
Note: Rules will be executed only if the set condition is met for that card type.
Note: If you are using dynamic data conditions (for example if Due Date = Planned Start Date +3), then read this section on the dynamic data conditions.
Actions
Actions are the doers of your rule. They let you automate your activities and make changes within your Board. They allow you to perform many activities, such as editing the attributes of a card, sending a notification, blocking/unblocking the cards, creating a new card, and so on.

The list of Actions supported for performing Business Rules are:
- Block Card – You can block a card by providing the blocking comment and blocking code in the Business Rule.
- Unblock Card – You can unblock a card by providing the blocking code blocking comment or both in the Business rule.
Note: If you have a multi-block policy enabled in your account, then a card can be blocked or unblocked multiple times. - Updated Card – You can update a card by providing the card type, the attribute of the card that should be updated, and the value that should be set on the execution of the Business Rule. You can update more than one attribute of a card at a time.
- Create Card – The create card action helps you create the new traced card on the execution of a Business Rule.
- Send Notifications To (available only when the trigger is selected as the WIP limit is reached or exceeded)
- Flag Card – You can flag a card by providing the flagging comment in the Business Rule.
- Unflag Card – You can unflag a card by providing the comment that was used to flag the card. The system will find the flagging comment and unflag that particular flag only.
Note: If you are using dynamic actions for a Business Rule(for example, set Planned End Date = Planned Start Date +15), then read this section on the dynamic actions.
When a Business Rule is triggered (be it a manual update, import, or REST API) and the defined actions are performed on a card, then a notification is shown on the left bottom of the screen for the same. The Notification includes the card ID (of the card that got updated) and the name of the business rule that was executed on the card(s).

Defining Dynamic Data Conditions or Actions for Complex Scenarios
You can define a wide variety of options for your conditions and actions so that you can trigger the execution of business rules for complex conditions with ease. All these when used together become a powerful way to trap any complex data condition and take action as per the business need. You can define dynamic conditions and actions with –
- And, Or and 3 levels of parentheses () to define multiple and nested conditions.
- Is, Is Not, Before, After a user-specified date or (+/-) range in comparison to another Date field to define the dependent values and range of values.
- Is Equal To, Is Not Equal To, Greater Than, Lesser Than a user-specified number or (+/-) range in comparison to another Number field to define the dependent values and range of values.

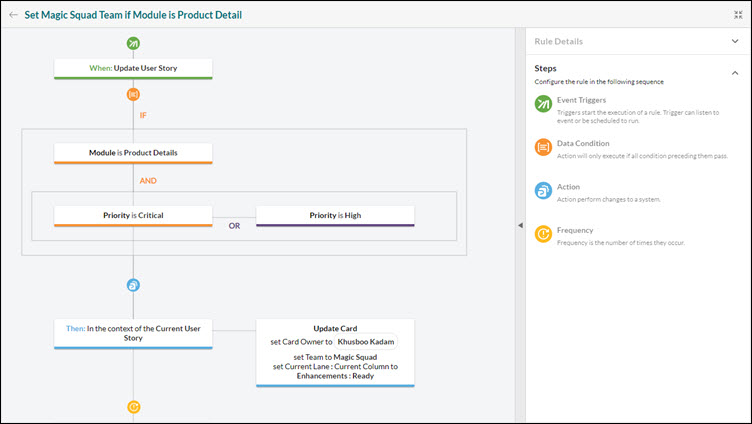
For example, as shown above, if you want to define a condition where the Planned End Date should be exactly 5 days after the Planned Start Date of the card then it can be defined as Planned End Date = Planned Start Date + 5. Similarly, if you want to define multiple conditions/actions like Priority = High and Module = Analytics and either the Due Date is this week or the Planned End Date is 5 days after the Planned Start Date then it can be defined using the multiple parentheses and And/Or operators. And if you want to define a specific value (user input), like Due Date is equal to ’31 July’, or Estimate >= 7 story points then this and more can be done using the Dynamic Data Condition or Actions in Business Rule.
If you want to know more about how to add dynamic data conditions or actions in a Business Rule, see this example.
Context
Select the Context in which the action should be performed like current card, child or parent card, traced card, user, or role. For example, if the context is the Child Card and the action is blocked, then all the child cards of the card (on which condition is met) would be blocked.
Note: If the context is set as a child card or parent card, then the action is performed on the immediate child or parent card and not on the entire hierarchy.
A list of contexts in which actions can be performed are:
Current card – If the context is the Current card, then the action would be performed on the current card (on which the Business Rule is triggered).
Parent card – If the context is the Parent card, then the action would be performed on the immediate parent card of the current card (on which the Business Rule is triggered).
Child card – If the context is the Child card, then the action would be performed on the immediate child cards of the current card (on which the Business Rule is triggered).
Traced card – The traced card context helps you create new cards and trace them to the existing card (on which a Business Rule is triggered). Note: If the context is traced card, then the action can be the Create card only which means you can only create a new trace card and can’t update or block/unblock an existing traced card. To know more about the Traced card, read here.
Users – This context is available only when the trigger is selected as the WIP limit is reached or exceeded. It will send notifications to the users if the WIP limit is reached or exceeded for a swimlane/column/user as configured. To know more about the WIP limit, read here.
Role – This context is available only when the trigger is selected as the WIP limit is reached or exceeded. It will send notifications to the selected Roles (like Manager, Reader) if the WIP limit is reached or exceeded for a swimlane/column/user as configured. To know more about the WIP limit, read here.
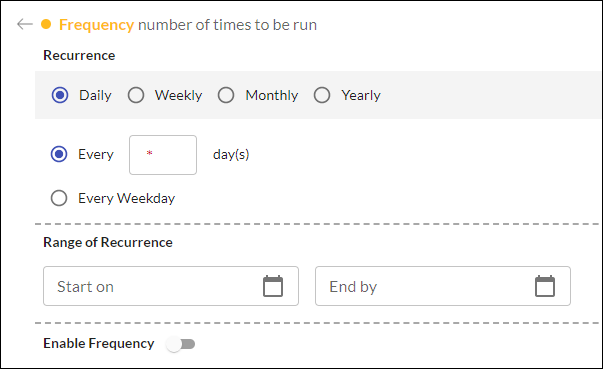
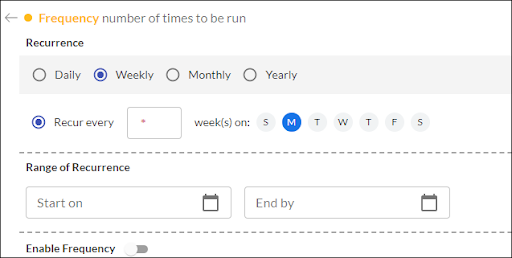
Frequency
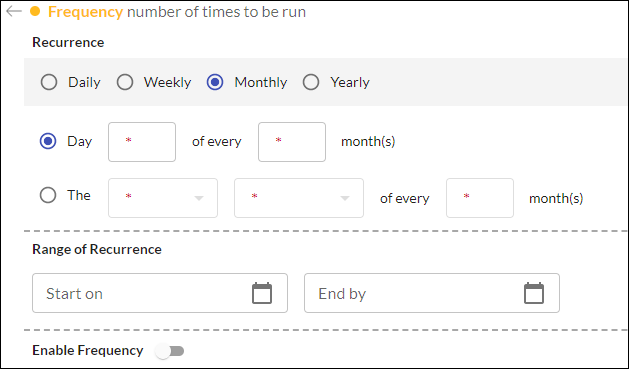
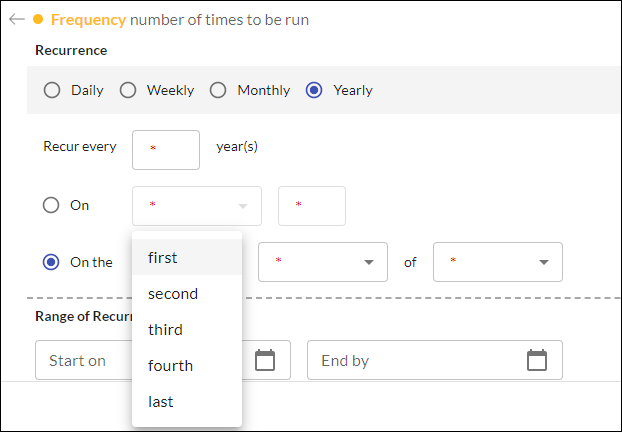
Frequency is the number of times a Business Rule gets executed in a recurring manner. You can set the scheduler or recurrence to run Daily, Weekly, Monthly, or Yearly. The Date range is common across all the options, which sets the interval in which you want the rule to get executed. You (card owner of the card which is updated due to the frequency-enabled Business Rule) will also receive an email notification for frequency-enabled Business Rules on a nightly basis. Depending on the option selected, your screen modifies and displays other options as shown below.
Recurrence is set as:
- Daily: On selecting this option, you can set the frequency to run the rule on every “1, 2, or…” day, where 1 would be every day, 2 would mean every alternate day, 3 would mean every 3 days or you can select every weekday, which is from Monday to Friday. For example, if you create a Business Rule on 1st April 2021, and set the recurrence to execute every 3 days. In this case, the rule will be executed on 4th April 2021.
- Weekly: On selecting this option, enter a value indicating the number of weeks after which you want the rule to get executed in a recurring manner. Also, select the specific day of the week. For example, if you enter the value as 2 in the Recur Every attribute and select M for Monday, then the rule will get executed every 2 weeks on Monday.
- Monthly: Here, you have got two options. Selecting the first option, lets you set the frequency on a particular day of a month. For example, 3rd Day every 2 months. Similarly, you can select the second option, where you can set the specific day of the month as per the requirement. For example, the second Monday of every 2 months.
- Yearly: Here, you have two options. In the first option, set the recurring year, the month, and the day of the month, when you want the rule to be executed. In the second option, set the frequency to be executed in the first week on a particular day of a particular month. For example, execute the rule on the first week of the selected day of a specific month.
Note: As soon as you set the Start Date for the frequency, the system will start the execution of the rule from the Start Date itself.
- The Enable Frequency toggle button is available for all triggers; except the “Create a Recurring Card” trigger as in this trigger, the frequency is mandatory.
- For a non-recurring trigger, if you set a frequency as Daily, then the rule is only executed once the condition is fulfilled. For example, you create a rule in which you add a condition that when a parent card is blocked, then the action to take place is that the child cards get blocked. Now, if you set the frequency on 26 March 2021 and define the recurrence in such a way that the rule should be executed every 3 days. In this case, once the condition is met, say on 27th March 2021, then the action for the rule will be executed after 3 days on 30th March 2021. Next time again the rule is executed only once the condition is met with an addition of 3 days to it.
- For a recurring trigger (Create a recurring card), depending on the frequency set for the rule to be executed, the action will take place. For example, if you build and save a rule on 26th March 2021, which says to create user stories, every 3 days, then the rule will get executed exactly on 29th March, next on 1st April, and so on, depending on the end date. To learn about how to create a recurring rule, click here.
- The best practice to use Frequency would be to have minimum overlap between set frequencies to avoid too many frequencies being executed.
Email Notifications for Frequency-enabled Business Rules
You will receive an email notification for frequency-enabled Business Rules. Since the Action of these rules is executed on a particular defined day, tracking those executions can be a daunting task for the user unless he or she gets a proper notification. So, the card owner(s) set on the card or the current user who triggered the Business Rule receives an email notification on the day that is defined in the frequency. The email includes all the cards on which the frequency-based Business Rules were executed that day.
Note:
- In case the card owner or current user is not assigned, then the email notification is sent to the user who has last triggered the Business Rule.
- For WIP limit-based Business Rules where a frequency is defined, in the email notification, only the details related to the first card that violates the WIP limit are provided to the user.
- For example, consider that you have defined a Business rule using the “WIP limit is reached or exceeded” trigger and the Business Rule should get triggered Every Monday. Now, whenever a card is moved or added to a specific column and reaches or exceeds the WIP limit, an email notification should be sent to the card owner. But, since the email notification is sent only for the first card that violates the WIP limit in that defined period (in this case Monday to Sunday), an email will be sent to the user for the first card that violates the WIP limit between Monday to Sunday.
To know more about how to create Business Rules in SwiftKanban, read this topic.