
Start with the video first to get a better grasp of the SwiftKanban Café!
|
Skip Ahead to: View Badges on Profile Picture
|
Overview
The Café elevates user experience by bringing everything together in one smart, seamless space. With effortless collaboration, structured card management, and flexible customization, staying organized has never felt this easy. Let’s explore our intuitive collaboration hub.
Navigation
Access SwiftKanban Café from the top-right corner by clicking the Home icon, and toggle the Enable Café to gain access to the SwiftKanban Café.
Steps to Add a Cover Photo
You can customize your Café, by adding a profile picture and a cover image of your choice. Add a default Cover Photo that suits your taste and adds flair to the Café. Follow these steps:
To Add a Cover Photo, follow these steps:
1. Click the Edit icon.
2.Choose Select Image, pick a stock image, and click the tick mark to save.
3. If you want to add a different photo of your choice, click the Upload photo option-+ and browse to select the required image from your computer.
4. Use Reposition to drag and adjust the image until it looks just right.
5. Click Remove to delete the cover photo anytime.
Steps to Add Card
Café allows you to create a card on any Board. To add a card perform the following steps:
- Click on the Add Card icon.
- Next, fill in the following parameters to add a card:
- Select the Board.
- Select an appropriate card type.
- Enter the name of the card.
- Set an Owner to assign the card.
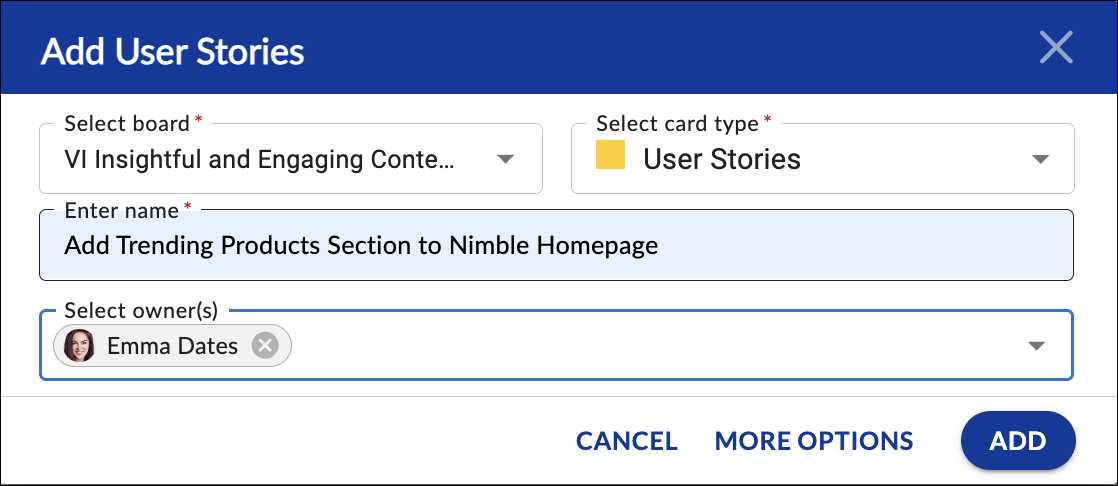
- Click the ADD button to create the card. With that, your card gets created in the desired board.
- Card Overview: Once the card is created, it offers a one-stop solution for efficiently managing assigned cards. It displays details like Name, ID, Board Name, and Priority in a clear and organized manner. Thus, keeping you informed.
Actions on a Card post:
- Like
- Comment → add comment, see count of comments, and read comments.
- Attachment → add, download, delete attachments.
- Block/Unblock:
- Click Block/Unblock
- Add block code and a blocking comment, click ADD BLOCK, then set Blocking Reason.
- Cannot block/unblock closed workitems.
- Move To:
- Use the Move To icon to select a new column and MOVE the card.
- Cannot move closed workitems.
- More Options → ToDo to open the ToDos segment and add ToDos and related details.
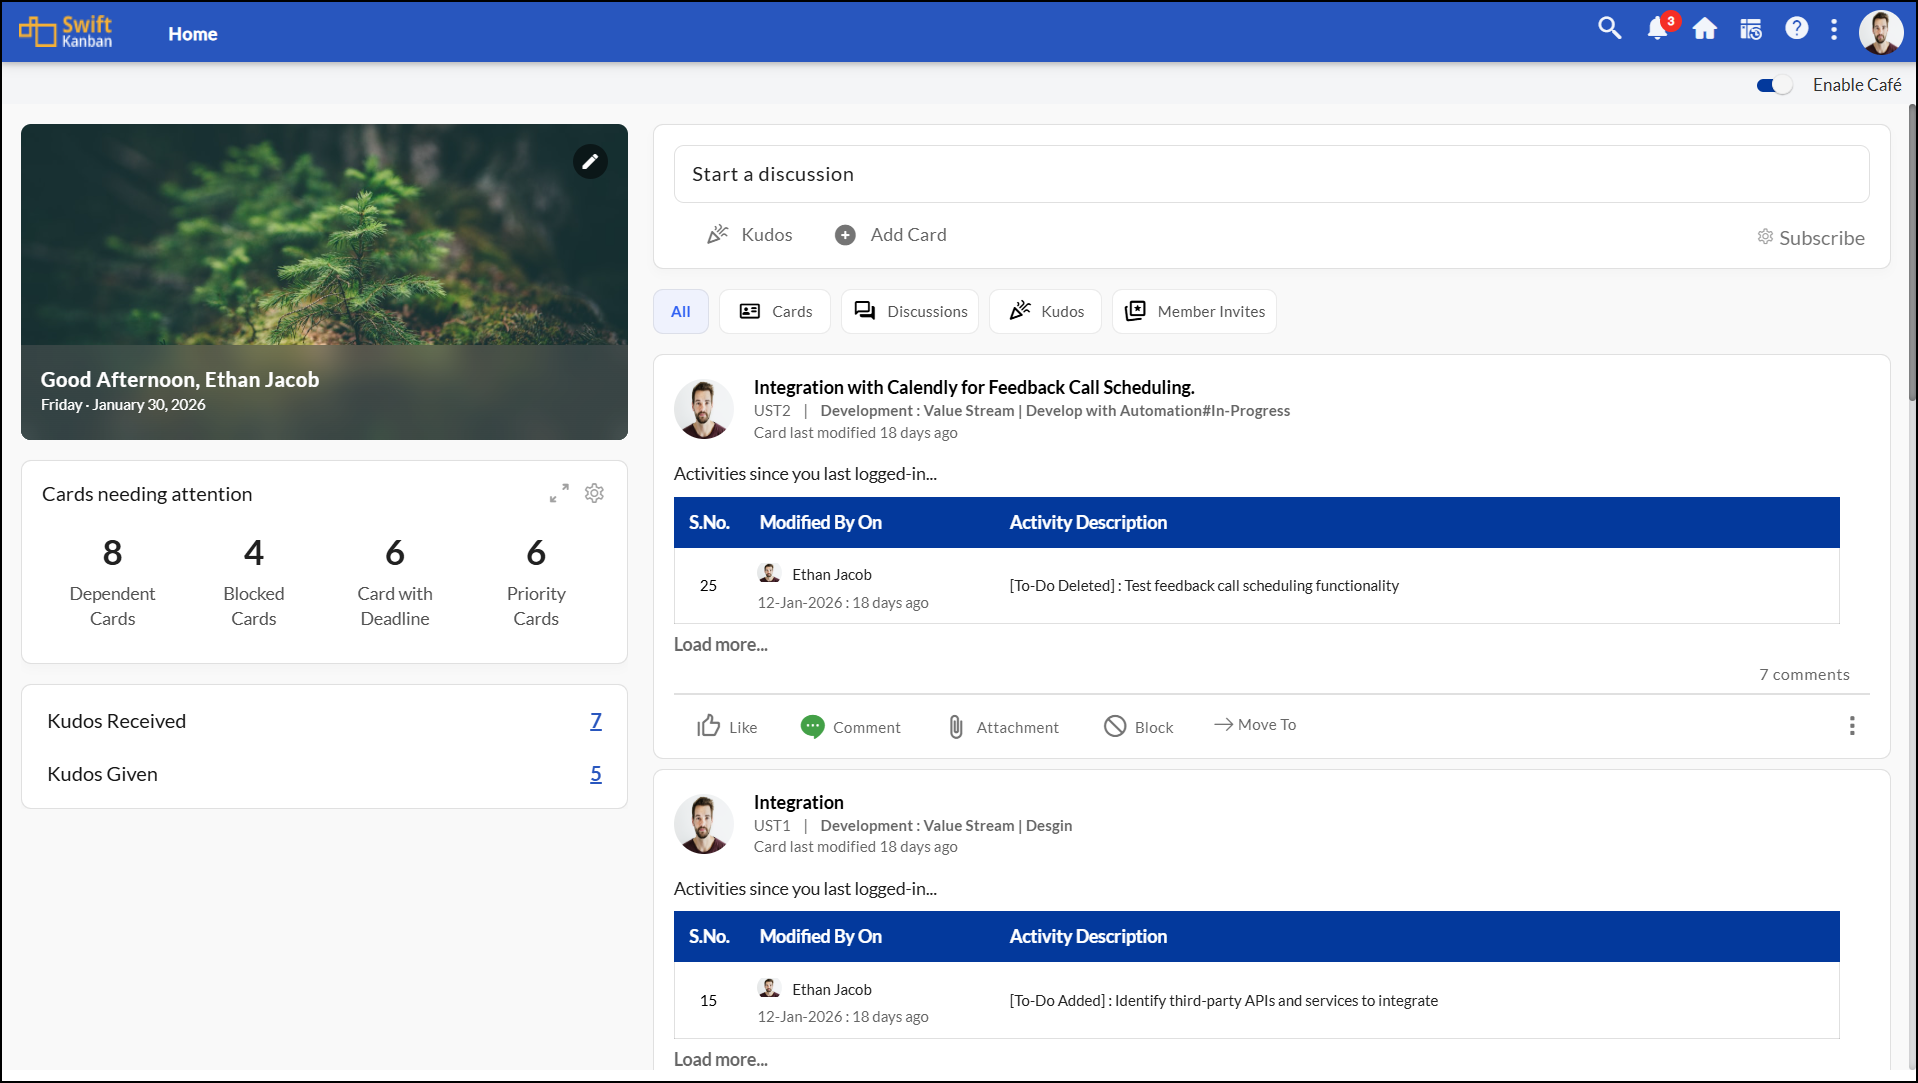
Show Cards Only Toggle
The Show Cards Only toggle lets you view only card-related posts and hides all other activities. This helps you track work faster without distractions. Disabling the toggle restores the full activity feed, including discussions, mentions, and other non-card updates.
How to Start a Discussion?
You can initiate discussions directly from the Café with individuals, team members, or Board members for seamless collaboration. You can simply start a discussion in the Café.
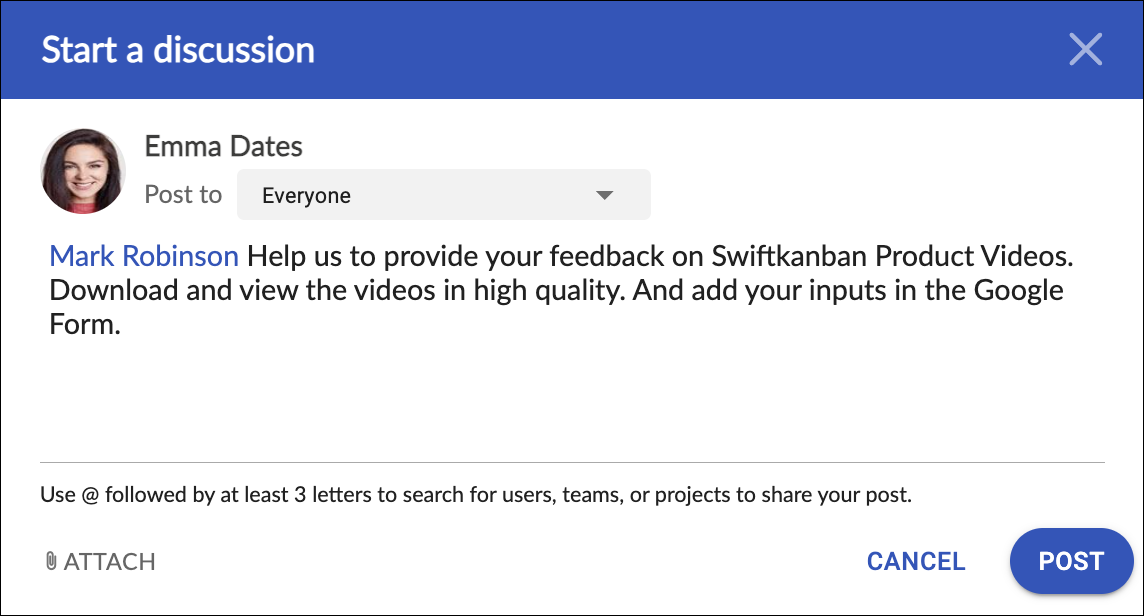
- Click Start a Discussion to open the discussion window
- From the Post To section, you can select members, teams, or Boards that should be able to see this discussion post.
- Enter your discussion topic and use @ to tag people, teams, or Boards.
- Add files using the Attach option and set one as a cover image if needed.
- Then, click the POST button to make your post visible with the added cover image.
You can later edit the post body via Edit Post, but Post To remains read-only. You can view all the discussions in the Discussions panel.
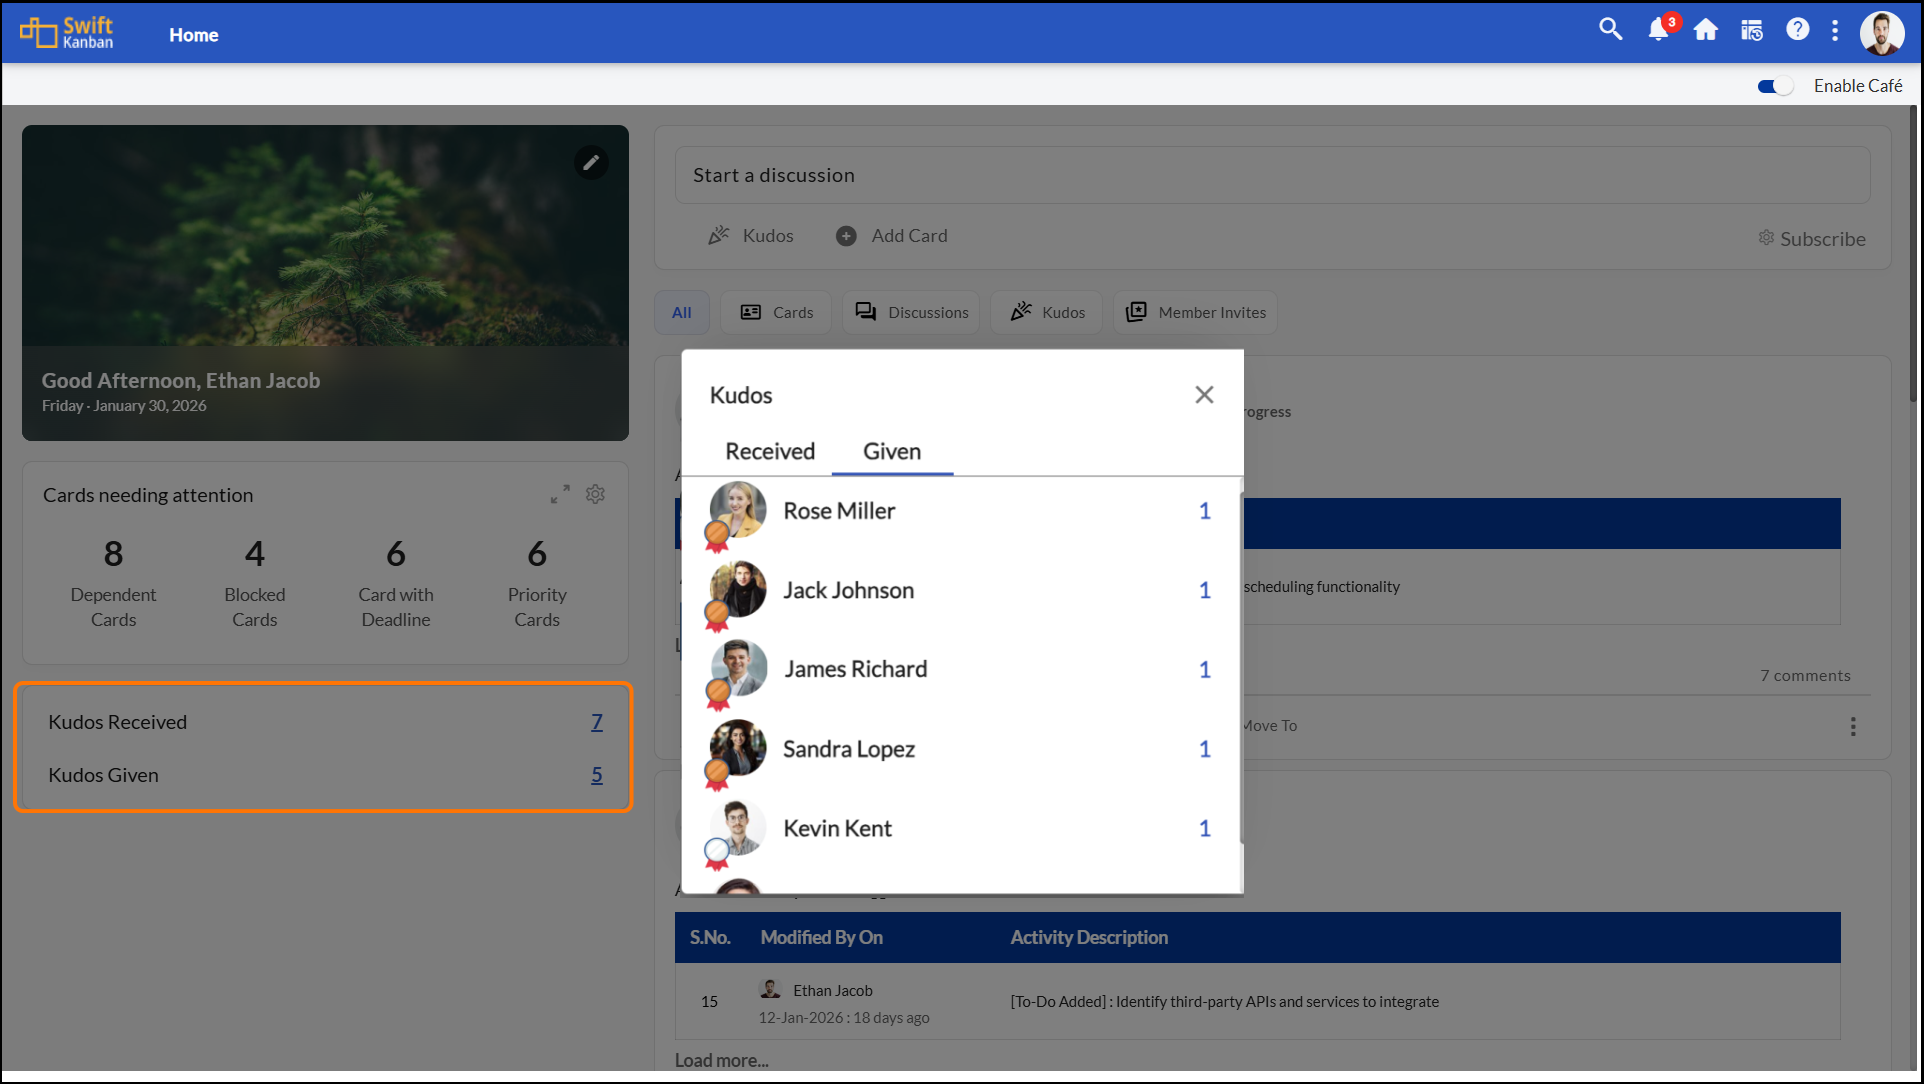
Kudos Widget
- The Kudos Widget in SwiftKanban lets you easily keep track of your kudos activity in a clear and accessible manner.
- Initially shows “Give your first Kudos” until you send one.
- After that, the widget shows two separate counts providing a quick way to view your kudos activity they are :
- Kudos Given — clicking on Kudos Given brings up a pop-up listing the team members you’ve sent kudos to, and
- Kudos Received — while Kudos Received shows who has given kudos to you.
- This removes the need to go through detailed pop-ups or switch to other sections, making it simpler to stay informed about team appreciation.
Send Kudos
Express appreciation by sending Kudos to individuals, team members, or Board members.
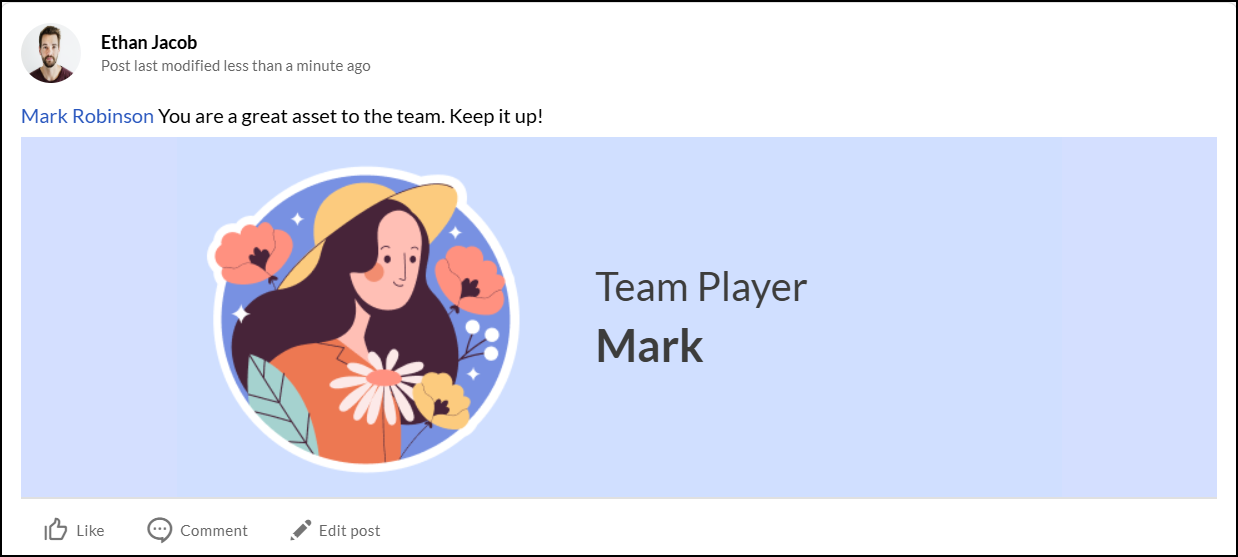
Follow these steps to send kudos:
- Click Kudos.
- Select the individual, team members, or Board members to whom you want to send Kudos.
- Like Start a Discussion, here also you have the Post To section, in which you set the post visibility settings.
- Ensure the relevant preference is enabled if you want it visible to everyone.
- Customize the message text.
- Add a Custom GIF :
- Default templates like Great Job, Team Player, etc.
- When using a Kudos image, Attachment icon is disabled.
- To use a Custom GIF, click the Custom GIF option, search for the perfect GIF, and select it.
- Click PREVIEW to review.
- Click POST to share.
Actions on a Kudos / discussion post:
- Like
- Comment (add comment and click ADD COMMENT)
- Attachment (add / download / delete / set as cover image). Note:This is available only for discussions.
- Edit Post (body only; Post To remains read-only)
Filter
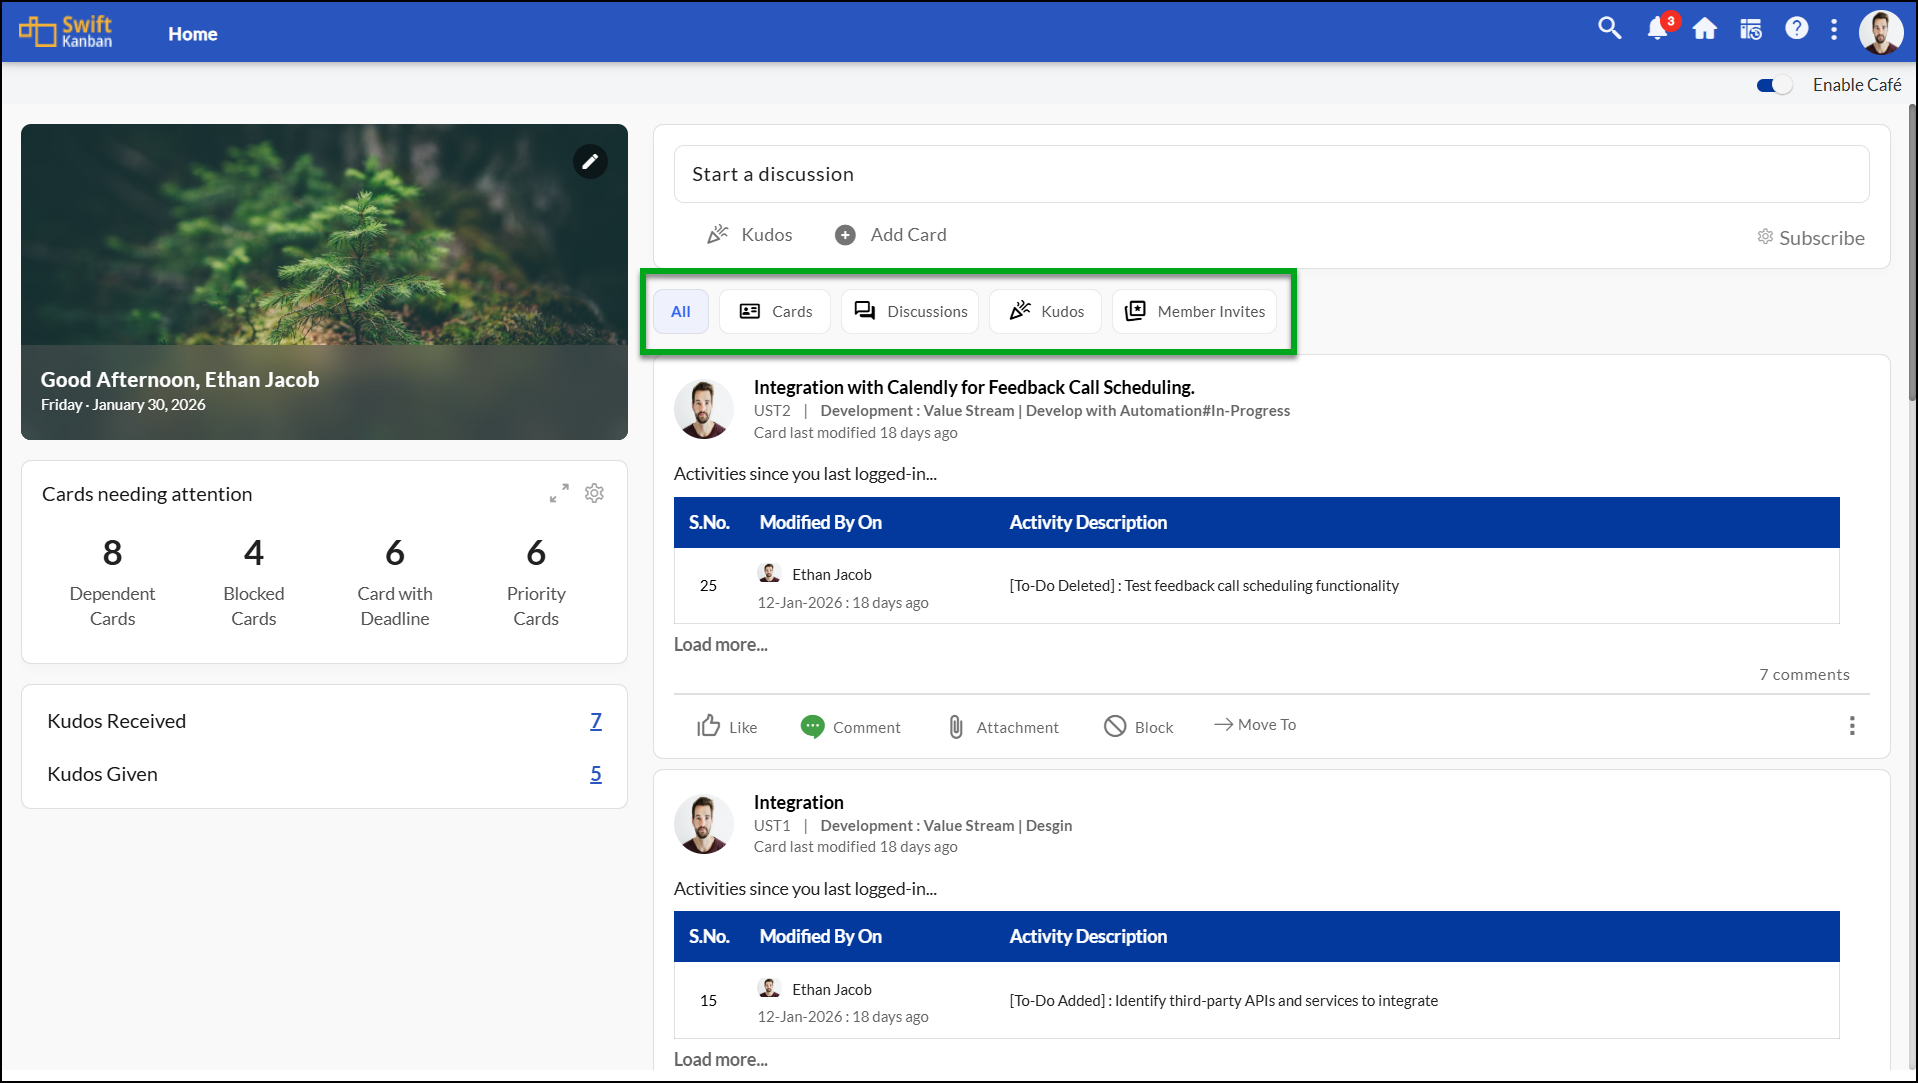
The Café Feed in SwiftKanban offers a flexible Filter that helps you control what appears in your activity feed. You can filter the feed using the following options:
- All : Displays the full activity feed, including card updates, discussions, mentions, and other non-card activities.
- Cards: Shows only the posts which are related to cards making it easy to track your updates.
- Discussions: Shows only posts related to discussions, helping you stay on top of all discussions.
- Kudos: Displays posts where members have given or received appreciation.
- Member Invites: Shows posts related to inviting new members.
This allows you to focus on the most relevant information and reduce distractions.
Subscribe
- Click Subscribe.
- Choose Team news / Project news topics.
- Click Apply to start receiving notifications on those topics.
View Badges on Profile Picture
- 2 points for each Kudos you send.
- 10 points for each Kudos you receive.
- If Kudos is sent to a team, each team member gets 10 points.
- Also, the card owners get 10 points whenever they complete a card assigned before the Due Date.
Based on total received points, badges appear on your profile picture:
- Gold: Top 5% of users by Kudos received.
- Silver: Next 15% (6–20%).
- Bronze: Next 30% (21–50%).
- No Badge: Not in the top 50%.

| Note: Badges rely on the nightly scheduler to function correctly. If you experience any issues with badges, ensure that the nightly scheduler is running as intended. |
- These badges are visible in the different areas of the SwiftKanban application for showcasing your achievements.
- View badges on your profile picture on your Kanban Board, Backlog Board, To-Do Board, Dependency Board, Board Filter, user profile panel, etc.
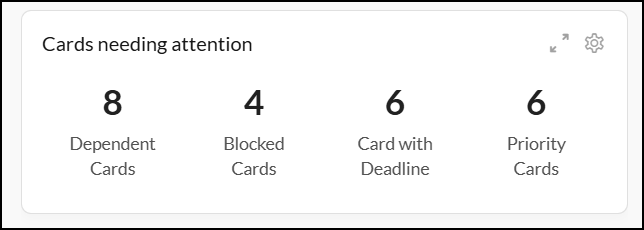
CNA(Cards Need Attention)
CNA settings give you a quick overview of blocked, dependent, priority, and deadline-based cards. Use Maximize to view the related cards easily.
- Blocked Cards: all open cards that are blocked.
- Dependent Cards: Fetches details of successor cards that have a dependency.
- Cards with Deadline: open cards with due dates.
- Priority Cards: cards with Priority (Critical, High, Medium, Low).
- Class of Service: Categorizes the cards based on Business impact.
Cards Needing Attention Settings
Based on your requirements, to be displayed on your Café Cards Needing Attention (CNA) section, you can enable it using the Settings option.
Note: The Dependent Cards (Successor Card) are due in, Card is blocked, Cards with a deadline, and Cards with Priority options are enabled by default in the Settings window.
The settings window has the following options:
- Dependent Cards (Successor Card) are due in
- Default: successor cards due in 5 days
- You can change the number of days.
- Card is blocked
- When enabled, it counts open blocked cards.
- Cards with deadline
- When enabled, you can select:
- Project – List of boards from which you can choose.
- Card type(s)– Drop-down from which you can select multiple Card types.
- Date attribute (due date field)- By default, the attribute is Priority and it is a non-editable field.
- Value (days into the future; 2-digit max)- Select the value from the drop-down.
- System shows all open cards due within that period, plus any overdue ones.
- Default: all projects, all card types, Due date attribute, 5 days.
- For example, if you enter ‘3 days’ on April 1st, 2024, the system will display all open cards due until April 3rd, 2024. This includes cards due on April 1st, April 2nd, and April 3rd, as well as any open cards with due dates preceding April 3rd, 2024, such as a card with a due date of March 27th, 2024. The CNA widget will then present the total count of these cards.
- When enabled, you can select:
- Cards with priority
- Default: Critical priority for all card types in all projects.
- Configure:
- Project
- Card types (multi-select)
- Attribute: Priority (fixed)
- Values: selected priority levels.
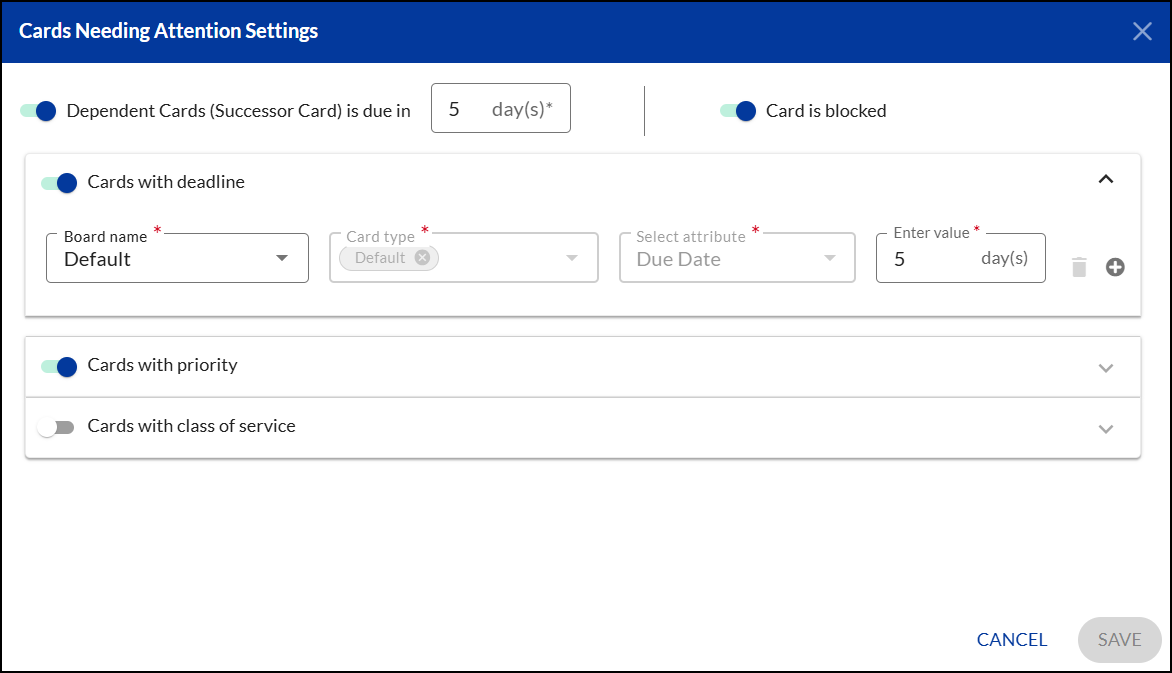
- Cards with Class of Service:
- Disabled by default.
- When enabled, you categorize by Class of Service (business impact).
- Defaults: all projects, all card types, value = Expedited.
- Configure:
- Project
- Card types (multi-select)
- Attribute: Class of service (fixed)
- Value: common CoS values across projects/card types.