
In this article, we will help you understand how Importing Cards.
|
Skip Ahead to: |
Overview
SwiftKanban enables importing of workitems along with their attributes into SwiftKanban at one go using the Import capability. You can import new cards and update cards into SwiftKanban using MS Excel or any Text Editor application.
With the import capability, you can:
- Import cards created in other systems into SwiftKanban for executing work in SwiftKanban.
- Import cards through a single file without having to add cards one by one in SwiftKanban.
- Work in your friendly interface to quickly add or update cards offline.
Pre-requisites for Importing Cards
- You should have a ‘Manager’ or ‘Team member’ role on the board to import. Users with the ‘Reader’ role will not see the Import on the toolbar of the List view.
- Open and edit the file in MS Excel if you have downloaded the Import template in MS Excel format. If you have downloaded the template in CSV format, open and edit the file in any Text Editor such as Notepad++.
- Ensure that you add the date in the ‘Date Identified’ field i.e. when the story or defect was identified to view accurate metrics for the card, especially the Lead Time.
- The date field format should be the date as per the date format set in your profile. For example, if the date format set in your profile is DD-MM-YYYY then you need to enter the date as 06-02-2024 in the date field. The date formats supported in the user profile are DD-Mon-YYYY, DD-MM-YYYY, MM-DD-YYYY, and YYYY-MM-DD.
- You can only import cards to an Active Board.
Tips: We have an exciting in-app Learning Enabler, called Challenges that would help you learn and import the cards interactively. Please navigate to Help & Support > Challenges from the top-level menu and try out the Challenges.
To import the File or download the Import template in MS Excel/CSV format:
- Click the Main menu, select Card Listing, and select the card type. The list view of the card type is displayed.
- Click the Import icon on the Side toolbar.
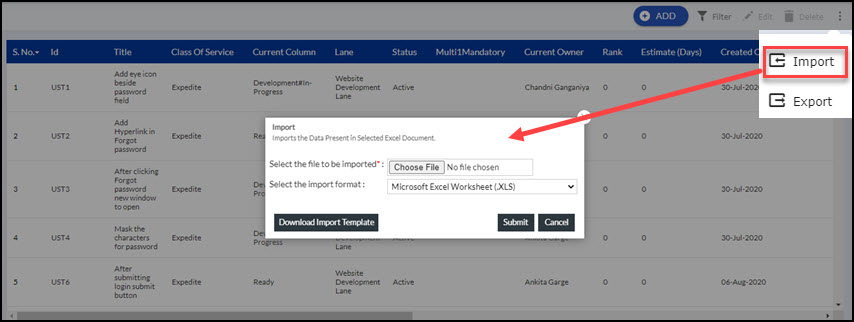
- To import the exported file into SwiftKanban, in the Import window, browse through your system to select the file. Select the same format in which you downloaded and updated the file. Click Submit. The file imports items which can be viewed in the List view on successful import. If the import fails, a mail will be sent to you along with the file that contains the error details. If you want to download the template for adding cards and then import, click the Download Import Template button. Depending on the browser settings, the file will be downloaded on your system automatically in the default folder you set in your browser, or you need to save the file to the required folder. The file exports columns in the selected format (MS Excel/CSV) which can be viewed in your preferred application. The Lane column is editable and you can modify its details. You can effortlessly specify the desired Backlog custom lane when updating the lane column of your card or adding a card using Import/export. Simply set the Lane as <Backlog: Lane name> and the Current Column as Backlog. Note that you need to select the UTF-8 character set when saving in CSV format. See the Adding and Updating Cards for more details.
If you have imported the exported file to add more or update existing cards, the existing cards will be updated and new cards will be added to SwiftKanban.
Important Things to Remember about the Excel Template:
- The List of Values(LoV) for all attribute fields like Card Type, Priority, and others is now available as a drop-down list. These values are derived from the Master List. So, while adding or modifying an entry in the Excel sheet, you can select the values from the drop-down list.
- Add cards directly to a particular column in the board using this template. Previously, you could only add them to the backlog.
- If the sheet is in XLS or XSLM format, you can then select the column name from the drop-down list itself.
- If the sheet is in XLSX or CSV format, then define the column for a card in this format: <Lane>:<Column>#<sub-Column>#<…>
- Some of the default field values will automatically be filled in if you leave them blank.
- Validation of data is performed on save and errors are thrown as a pop-up message.
- Hovering over the column header in the Excel sheet will show the type of field and’s and Don’t for entering information in those columns, such as the header in red is a mandatory field, whereas those in light orange are Read Only fields. Green-colored fields are optional editable fields.
- Currently, the template is functional only for a particular card type, and not for all cards.
- To use this template, you must first enable all macros in Microsoft Excel. To do that, go to Options > Trust Center > Trust Center Settings > Macro Settings > Select Enable all macros.
- While importing, do not tamper with the data in the GUID column. Also, do not remove or rename any other mandatory column.
- To update cards, see the Adding and Updating Cards in an Exported File below. Similarly, you can add cards into SwiftKanban using the exported file after the last row in the file. The exported file restricts inserting rows or columns.
- While exporting Kanban cards to the selected format, only the latest 10 comments in a card get exported and the rest is ignored.
Importing Workitems from Other Systems
To bring in work items from other systems into SwiftKanban, download the template of that work type and then enter data formatted to the columns in the template. This will allow the smooth import of cards i.e. without any errors.
To import cards from other systems into SwiftKanban:
In the Export window, click the Download Import Template button. Depending on the browser settings, the file will be downloaded on your system automatically in the default folder set in your browser, or you need to save the file to the required folder. Note that you need to select the UTF-8 character set when saving in CSV format.
Import Failures
If any data cannot be imported into SwiftKanban, you will receive alerts on your screen. Check your mail which provides reasons for import failures. It also has an attached file along with reasons in the last column. You can correct the errors in the attached file and import the same file in the same format.