
For a better understanding of the steps to create a Business Rule, we have explained 2 different scenarios of using the Business Rule.
|
Skip Ahead to: Business Rule with Single Condition and Action Business Rule with Multiple Conditions or Actions Creating the Recurring Business Rules |
Business Rule with Single Condition and Action
Consider a scenario where a parent card (Epic) is blocked with a condition set on its Size attribute as XL, then all its child cards (user stories, technical stories, and so on) should be blocked automatically.
This process can be automated easily! Here, blocking the parent card (epic) having the Size attribute set as XL is the condition.
When this condition is fulfilled, a Business Rule (let’s say – Block Child Cards upon Blocking of Parent Card) will be triggered and as a result, all the cards tagged to that epic will be blocked automatically. Here blocking of the child cards is the event.
Steps to Build this Business Rule
- Click the Add button to create a new Business Rule.
- The page is divided into two sections. The left section shows a step-by-step visualization of the Business Rule that you are building by adding the details on the right section of the page.

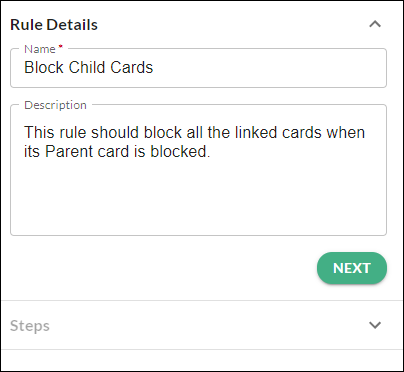
Note: You can expand any of these sections by clicking the small arrow placed in between of both these sections as highlighted above. - Add Name and Description to the Rule that would help you to refer whenever a rule gets executed and click Next.
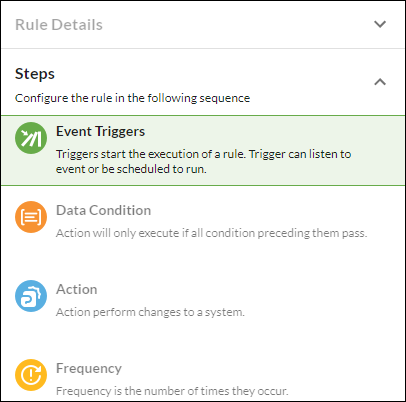
- The steps section expands, which includes the 3 stages of your rules as shown below.
- In the first stage, you have the option to select the trigger.
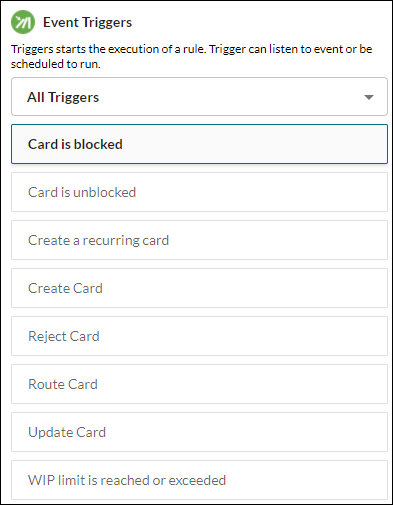
- For the first scenario, as we want the Business rule to trigger when the card is blocked, select Card is blocked trigger.
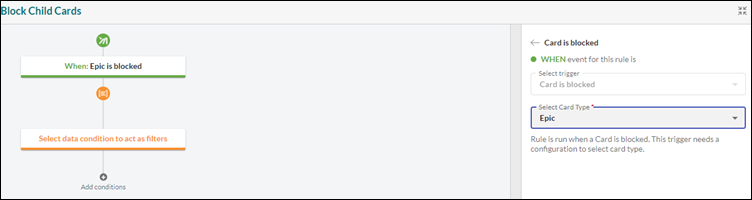
- Select the Epic card type, and click Next.
- Now, add the conditions in the second stage of the rule.
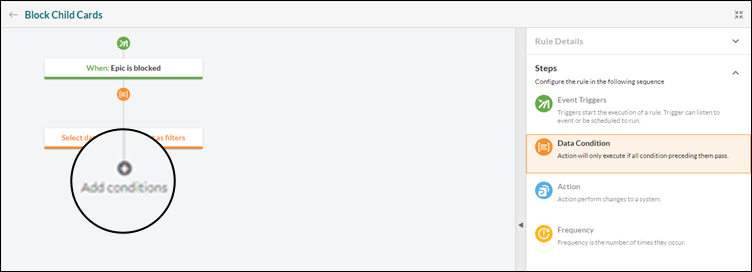
- Select the Data Condition that expands the right section as shown below. Note: When the Recurring Card option is selected then the Recurring Card is based on a Reference Card. In this case, if there is no description added to the newly created Recurring Card, then the description of the Reference card gets added to the description of the Recurring Card by default.

- For our scenario, select the Size attribute which “is” set as “XL” and click Next.
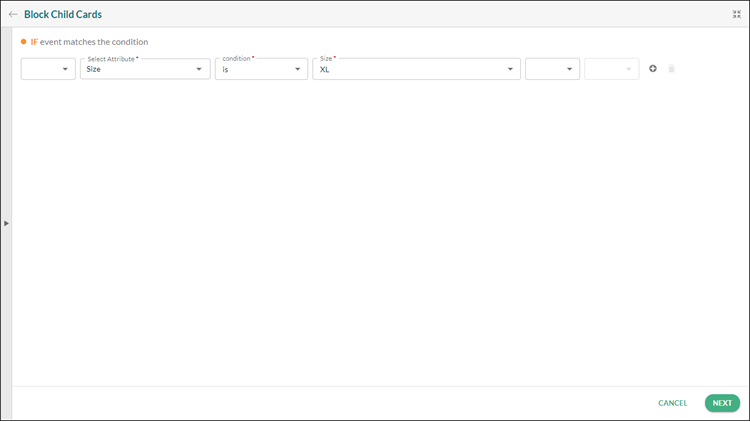
Note: The “{” open bracket, “}” close bracket, “OR”, “AND” operators, available in the screen are explained in the second scenario, where we are adding multiple conditions. For the current scenario, these options are not required. - Now, you need to set the action that needs to be performed once the trigger and condition is full-filled.
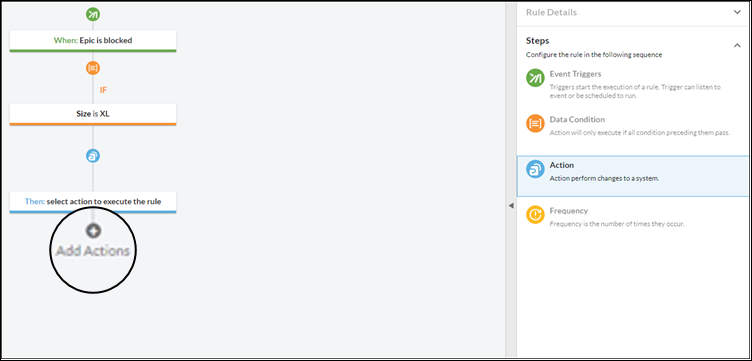
- Select the Action on the right section that expands the right section as shown below.

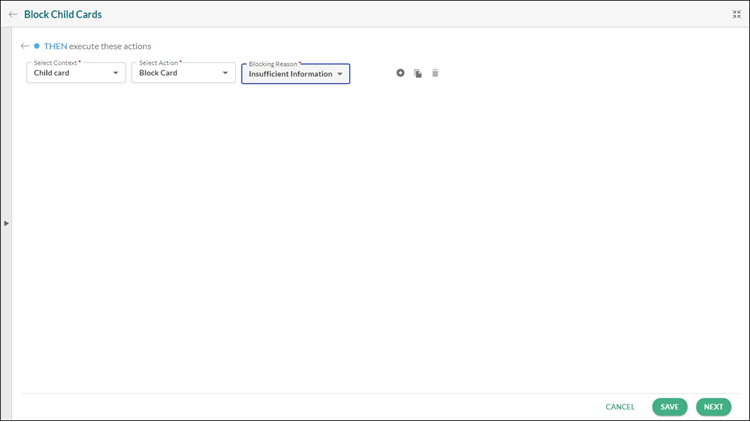
- For our scenario, we want to have the “Child Card” context to set the action as “Block Card” adding “Insufficient Information” as the Blocking Reason, and click Save or Next to set the frequency. In this scenario, we are not setting a recurring trigger.
- Lastly, if you want to set the frequency, select the frequency stage.
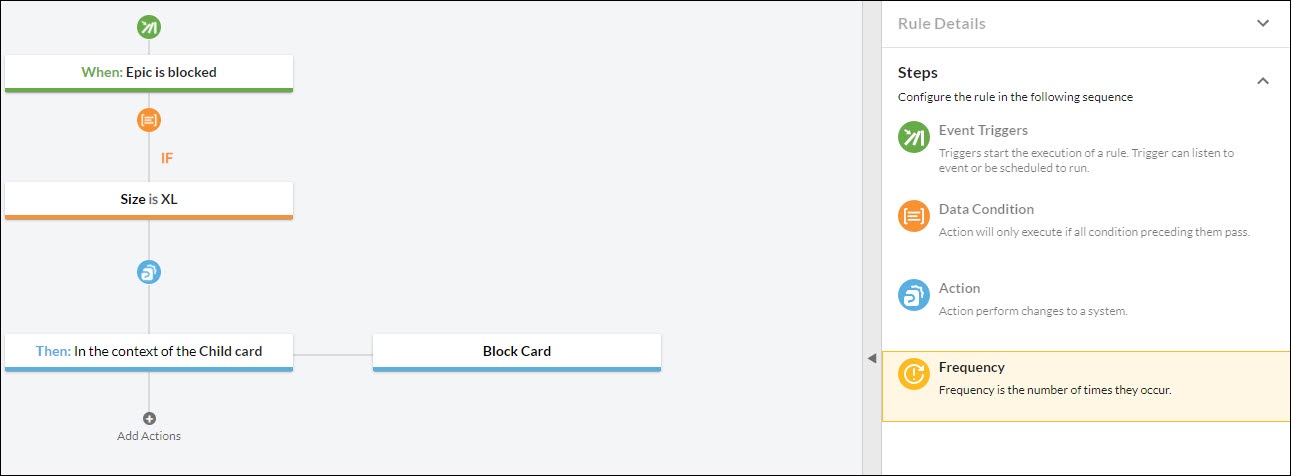
- In our scenario, we are not selecting the next step of frequency so the frequency will be kept Off for this Business Rule. Finally, click Save and navigate back to the Business Rules listing page.
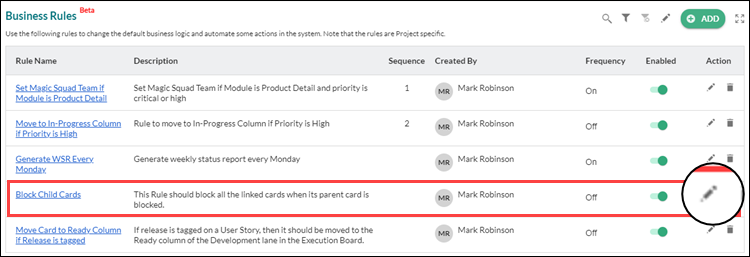
- The newly created Business Rule gets listed on the listing page. By default, the rule is enabled. If you want to edit or make any changes in the rule, click the Edit icon. Also, the frequency is kept Off.
Next, let’s check the execution part of the above rule on the Execution Board of your Board.
- Consider we have an Epic card EPC236 having two user stories linked to UST1419 and UST1420.
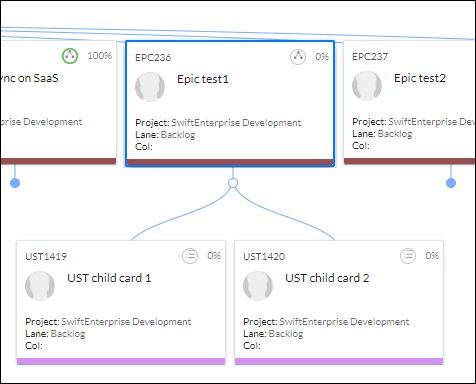
- The Epic card has the Size attribute set to “XL”.
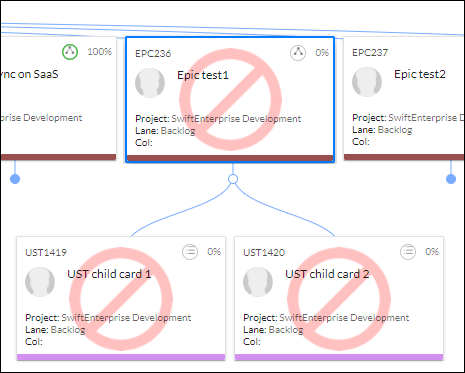
- Now, once you block this epic card, you will be able to see the linked child cards UST1419 and UST1420 get blocked.
Note: To unblock all child cards at one go, you can create a new rule and perform similar actions as explained above. Use the Card is unblocked trigger, and select the same card type EPIC, having the same condition, which is the Size attribute set as XL. In this case, the action will be to unblock all the child cards.
In the below GIF, we have demonstrated the configuration and the execution of a simple Business Rule.
Business Rule with Multiple Conditions or Actions
A Business Rule can have multiple conditions or actions in it. To understand the configuration of a multi-condition / multi-action rule, let’s consider another scenario.
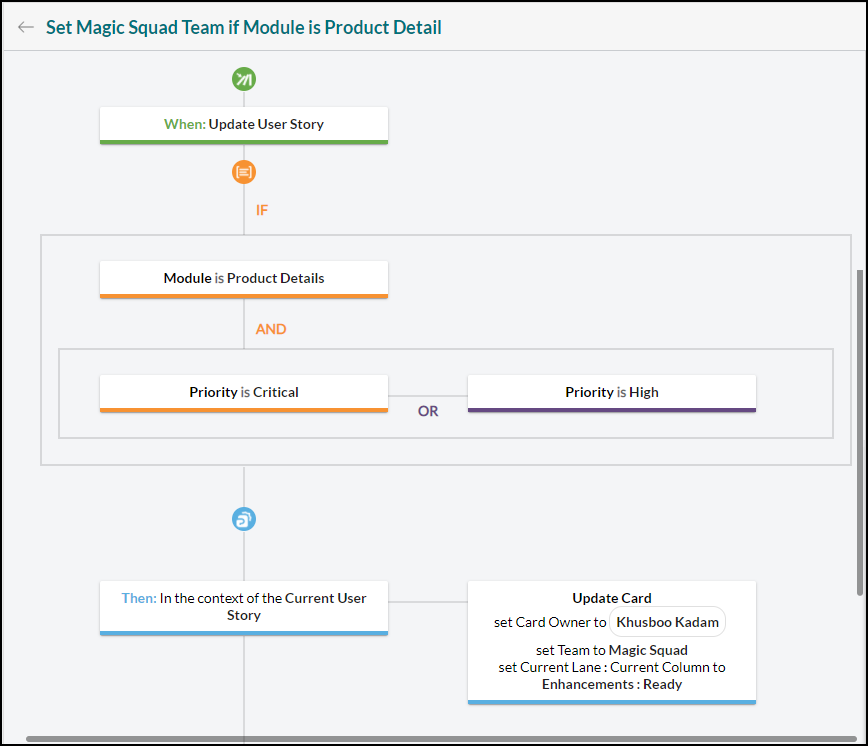
For example, if the Module of a defect is Product Details and the priority is critical, then the card should be assigned to a specific team member (having expertise in that attribute) and also should be moved to a specific column in the Kanban Board.
So for this Business Rule, we have multiple conditions and actions as shown below –
Conditions
When Module = Product Details and Priority = Critical OR Priority = High
Actions
Set Card Owner = Khushboo, Team = Magic Squad, lane = Expedite, and Column = Ready
Steps to create this rule
- In the Business Rules screen, click the Add button to create a new Business Rule.
- Under the Rule Details, enter the Name and Description for the Rule.
Note: The name of the Rule should define the condition and the action of the rule so that by seeing the Rule in the Activity log, Comments section, or notification for a card, you will understand the possible changes in the cards. Although this is not a must, you can name a rule as you want. - Click Next and click Event triggers to select the trigger for your Rule. For our scenario we want the card to be updated so the trigger would be the Update Card.
- Select the Defect Card Type on which the condition will be checked and fulfilled.
- Click Next and click Data Condition to define the condition for the Business Rule.
- The Data condition expands towards the right side and covers the full screen.
- Since we have two combinations of conditions with AND and OR operators, we will use curly brackets ({) to define the conditions as shown below –
- Select ‘}’ in front of the drop-down list.
- Click the Add icon and select the And operator from the drop-down list before the Add icon.
- Select ‘{’ front of the drop-down list.
- Select Attribute as ‘Priority’, Condition as ‘is’, Priority as ‘Critical’. Select the ‘}’ from the drop-down since the first condition is completed.
- Click the Add icon and select the Or operator from the drop-down list before the Add icon to add the second condition.
- Select Attribute as ‘Priority’, Condition as ‘is’, Priority as ‘High’.
- Since our condition is completed, select the ‘}}’ from the drop-down to close the second condition as well as the entire condition.
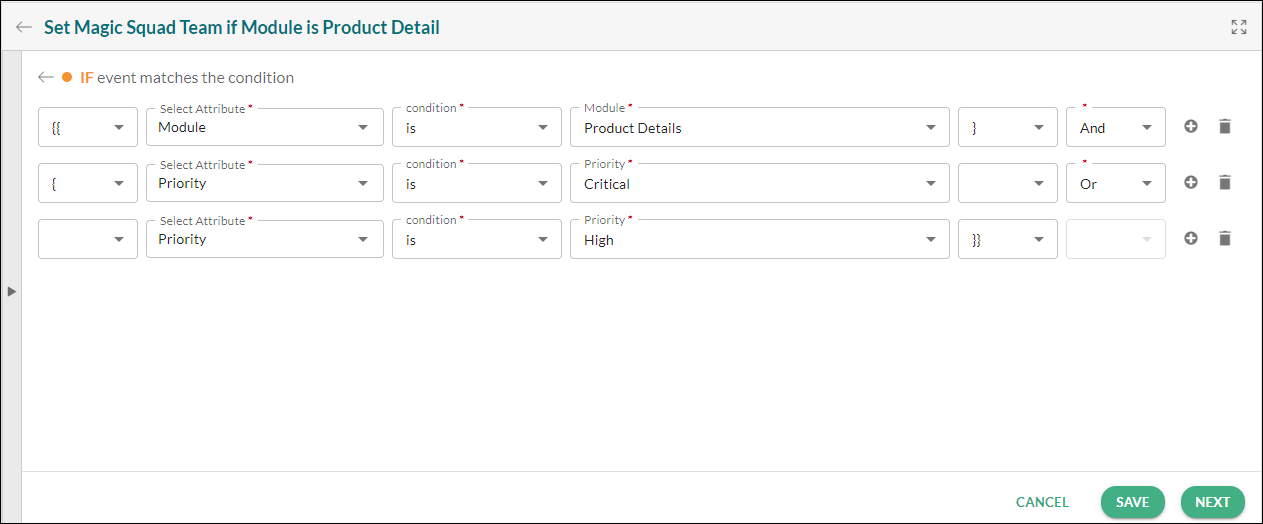
Note: You can add or delete any condition by clicking the Add or Delete icon at the end of every condition row. If you add a new row, you have to define the And/Or operator for the new condition. Select ‘{{‘ from the first drop-down list, Attribute as ‘Module’, Condition as ‘is’, Module Name as ‘Product Details’.
8. Click Next and click Actions to define the actions for our Rule as shown below –
-
- Select Context as ‘Current Card’, Action as ‘Update Card’, Card Type as ‘Defect’, Attribute as ‘Card Owner’, and Card Owner Name as ‘Khushbu Kadam’.
- Since the context, action, and card type for our action will be the same, you can click the Copy Action icon on the right side to copy these three values in the new row.
- In the next row/action, select Attribute as ‘Team’ and Team Name as ‘Magic Squad’ and click the Copy Action icon to add a new row.
- In the next row, select Attribute as ‘Lane: Column’ and Lane: Column value as ‘Enhancement: Ready’.
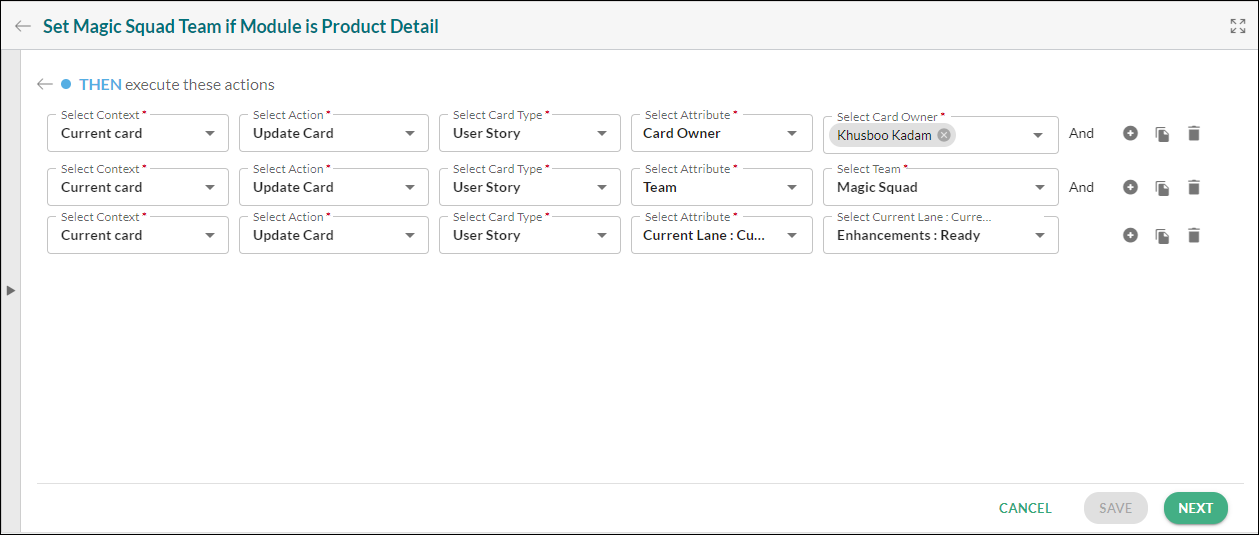
- Since we don’t want this Rule to be run after a specific period of time with Frequency, click Save to save this Business Rule.
- The Business Rule is created successfully and you can see the visualization of the rule on the right side to see the holistic flow of the rule as shown below.
Once the Business Rule is saved, it becomes enabled by default and will be triggered if the set condition is met. You can disable this rule by clicking the Enable/Disable toggle on the Business Rules screen.
Note: The Business Rule will be saved and work only if all three sections – Event trigger, Data Condition, and Action are defined and saved in one flow. If any one of them is not available or saved, the rule will not work.
Creating the Recurring Business Rules
In SwiftKanban, you can execute a Business Rule repeatedly and frequently on a fixed date or day of a week/month/year without meeting any conditions. This will help you perform repetitive tasks automatically like the generation of a Weekly Status Report on a particular day, updating some information on cards every month or quarter, etc.
To define a recurring rule, you need to specify the time period for the rule to be executed as mentioned in the steps below. For creating a recurring card, you need to define the frequency. For more details related to frequency, click here.
Steps to define a recurring rule:
- In the Business Rules screen, click the Add button to create a new Business Rule.
- Under the Rule Details, enter the Name and Description for the Rule.
- Click Next and click Event triggers to select the Create a recurring card trigger.
- Select the Card Type on which the rule will be triggered.
- Click Next and click Data Condition to define the condition for the Business Rule.
- The Data condition expands towards the right side and covers the full screen.
- In the Data Condition, either select the existing card by entering the 3 letters of that card or create a new card by selecting the Create a new recurring card option from the drop-down.
With this, a new card will be created with the name you have given here after the defined time like 3 days, 1 week, etc. - Click Next to select the action to be performed on the selected card type when the rule is triggered.
- If you have selected an existing card, then it will by default show the mandatory attributes (Name, Card Owner, Current Lane: Current Column) of that card and its values. It means when the rule is triggered, a new card will be created with the given name and attributes set in the Action.
Note: If Name, Card Owner, Current Lane: Current Column are selected as mandatory attributes on a card then these attributes will be pre-populated in the Action screen. - If you have selected the Create a new recurring card option in the Data Condition screen, then you can select the new attributes and values for the card that will be created on the set date/day (when the rule will be triggered.)
- Click Next to select the frequency for the Business Rule.
- In the Frequency screen, select the frequency when the rule should be executed as described here.
Note: The recurring rule gets executed on the defined day/date no matter what, so you won’t get the Frequency Enabled option for a recurring rule. While in a non-recurring rule (with frequency enabled, you get the option to turn On or Off the frequency as per your business need.) - Click Save. The Business Rule is created successfully and you can see the visualization of the rule on the right side to see the holistic flow of the Business Rule.
Activity log and Comments section
When a Business Rule is triggered on a card and performs the defined actions on it then the execution of the Business Rule is recorded in the activity log of the card to let the user know about the execution of the rule.
Also, if a Business Rule is triggered but the given action is not performed for any reason (like if the attributes on the card or value in the attribute of the card are invalid OR when a Business Rule is trying to block an already blocked card) then a comment for the same is published in the Comments section of that card. The comment includes the name of the rule and the reason due to which the Business Rule couldn’t be performed.
Best Practices
- When you create a card where you are expecting under certain conditions certain actions will take place other than the create card trigger, you will also need to create the update card trigger in a sequence.
- Any Business Rule you want to run on the Create card trigger should also be written for the Update card trigger. As in the case of quick add (creating a Kanban card by right-clicking), a Kanban card gets created with the title and card type only. Adding any other information to that card is considered as the Update card and not as the Create Card. So we suggest you to write the Business rule for Create Card as well as Update card so that it can work in the case of quick add.
- The best practice to use Frequency would be to have minimum overlap between set frequencies to avoid too many frequencies being executed.