The card anatomy is designed to provide you with more flexibility to choose and display flags, actions, and attributes that you use frequently on your card. We have organized these icons in such a manner that you can use more icons on a card in a clutter-free and organized way and quickly perform the most required actions.
The Card layout can be seen on the following pages –
- Release and Sprint
- Backlog Board
- Playback board
- Personal/Flag/to-Do/Due date board
- PI/Sprint/Release Board
- Calendar View
- Board Activity Log
Card Color:- The color of the card on the card type indicates whether it is a User Story, Defect, or an Issue. The legend is available on the Kanban Board Side toolbar.
This is just a sample card to show you how the different icons look you can change their position as per your business need.
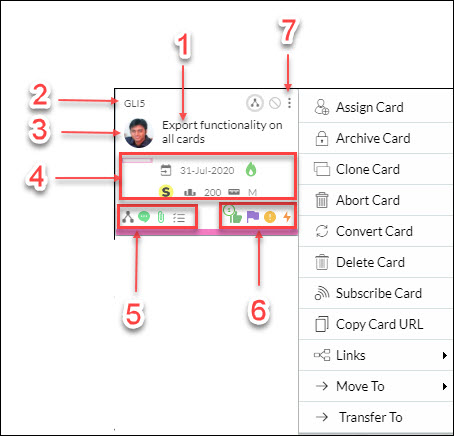
- Title Text:- This is the card title. On clicking, it opens the card for editing the details, Adding/tracking comments, updating to-dos, and adding/downloading/deleting attachments.
- ID:- View Card Details by clicking the card ID on the top bar of the card.
- Avatar or Picture Profile: Your picture or Avatar on the card helps to easily identify the card owner and reassign the card to one or more team members. You can also select multiple owners for a card from the list of available users by using <Ctrl + Click> or <Shift + Click> in the Microsoft® Windows or <Command-Click> on the Mac OS®. In the case of multiple owners, the profile picture will show the initials of one user and the number of additional team members below it.
Note: If the card owner is inactive, then the Tilde (`) sign will be shown before the Avatar. - Card Attributes:- Card attributes are displayed on the card which can be scrolled through by clicking the Next and Previous arrows on the right. The Estimates, Rank, and Class of Service appear as entered in the card. You can configure what attributes you want to see on the card carousel and in what order.
- Actions – Actions on the card can be used to perform the most required actions quickly by clicking the icon on the card. These actions include Comments & Attachments, To-Do, hierarchy, tags, and Percent Progress. Actions are shown on the left side of the bottom bar. To view or add comments to the card, go to the Comments & Attachments section. If a new comment or attachment is added to the card, the icon turns green for the next 24 hours, and after 24 hours, it always remains orange color. If a card has no comment or attachment on it, then the icon remains in grey.
- Flag:- Flags on cards can be used to draw attention to specific cards where a Risk or an Issue is identified, or attributes are updated by card owners. To enable or disable a card, click the flag icon. Flags are shown on the right side of the bottom bar.
Note: Any team member can raise a flag, however, only the same team member can remove the flag. - Options:- Click the Options icon and select from the menu:
- Archive Card:- Archive card that you can pull to the board later.
- Clone Card:- Create a duplicate card that copies the card attributes, To-Dos, and attachments.
- Convert Card: Convert the card to another card type. For example, User Story to Defect.
- Delete Card:- Delete a card permanently from a board.
- Linked Cards: View the card relationships with other cards and establish new links.
- View Log:- View Log of the card movements that happened on the Kanban Board by clicking the View Log icon that flips the card.
- Move to Backlog: Move the card from the board to the backlog if you do not want to continue to work on it, and pull it to the board later if required.
- Move To (Another Lane): Move the card from the current lane to another lane. On hovering over the ‘Move To’ option, another menu appears displaying Lanes available on the board and on hovering over the Lanes, the different columns on the Lane are shown. Click the required column/lane to which the card has to be moved.
- Transfer to (Another Board): Moves card from the column of the current board to the desired column of another board.
Following are the steps to move the current card to another board:
Hover the mouse on the ‘Transfer To’ option. It displays the list of all the boards you are a part of.
Hover on the desired board and it displays the list of its respective lanes followed by respective columns.
Select the column to which you wish to transfer the card and confirm the transfer.
Important:
You can move cards to only those boards of which you are a member.
The card will always get transferred in your name.
If the Lanes of the target board are defined as per card attributes, then depending on the attributes of the current card, target lanes will be displayed for selection.
For example: Let’s assume that Lanes of the target board are defined as per the size and the size of your current card is L. Then while transferring; only the ‘L’ lane option will be available.
Note: You can configure the actions, flags, and card attributes through the Card Designer at the Board or Admin level.
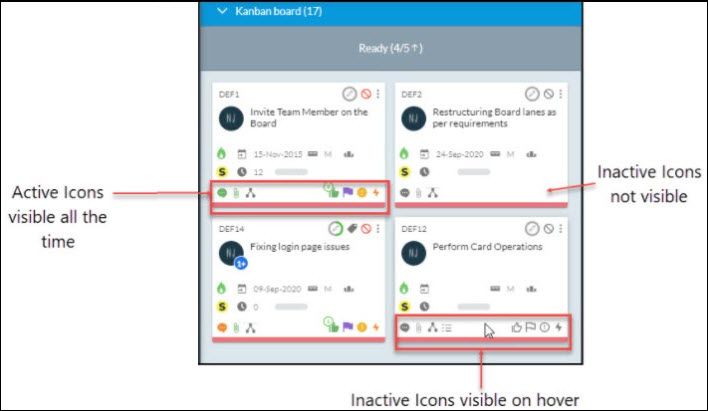
In the card layout, any inactive icon (except Block, Comment, Attachment, and LinkCard) on a card will not be visible all the time. You can view these icons while hovering over the card. But, once you use any of these icons on a card, it will be visible on the card and its value can be seen as a hover-over text.