
Lanes are value streams that can be defined for managing work classified based on various default card type attributes (such as Priority, CoS, etc.), team members, and even custom labels, such as any ad-hoc values you want. The board will then have Lanes representing the values associated with these attributes. For example, when you define a Lane based on Class of Service (CoS), the board will have one horizontal lane for each value of the CoS attribute.
Thus, when you add a new card or pull from Backlog/Archive to the board, the team members can move the card through a particular lane, which may have a different workflow.
Importantly, with a lane-enabled board, you can move cards across lanes, which reset the attribute value accordingly and even automatically place a card if you update the attribute value for a card on your own. For help on enabling lanes on your board, see the Defining Lanes topic.
You can refer to the appropriate section for help on card movement across lanes.
- Lanes Configured based on Card Attributes
- Lanes Configured based on Team Members
- Lanes Configured based on Card Type
- Lanes Configured based on Custom Labels
Lanes Configured based on Card Attributes
When you define lanes based on card type attributes such as CoS, Priority, and size, the board will have as many lanes as their attribute values.
For example, for CoS, there will be four lanes representing every value-Expedite, Fixed delivery Date, Standard Class, and Intangible Class.
Let us see an example of a lane defined based on the CoS attribute.
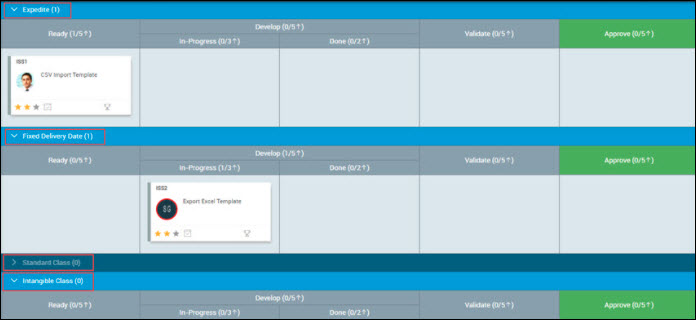
To add a new card to the ‘Expedite’ Class of Service lane, select ‘Expedite’ in the Class of Service list and select ‘Ready’ under the ‘Expedite’ lane appearing in the Add To list. In case you are pulling from Backlog/Archive, select the first column, for example, the ‘Ready’ column, under the lane name that shows up based on the attribute value.
Similarly, if you defined lanes based on Size, the board will have lanes representing XL, L, M, S, and XS. And if you define based on Priority, the board will have lanes representing Critical, High, Medium, and Low.
Once added to the appropriate lane (say, Expedite), you can move the card through the value stream in the ‘Expedite’ lane.
If you move the card into another lane, for example, from the ‘Expedite’ lane to the ‘Fixed Delivery Date’ lane, the attribute value for the card will change to ‘Fixed Delivery Date’.
You cannot change an attribute value from the Edit view (either from the board or the Backlog) of the card if the lanes have different value streams, as the card will be tied to a particular attribute value.
Lanes Configured based on Team Members
When you define lanes based on Team Members, there will be a dedicated lane created on the board representing each card owner on the board, for example, Derek Brian, John Smith, Peter Williams, and so on.
The board will also have an ‘Unassigned’ lane that will contain all the cards not yet assigned to any team member.
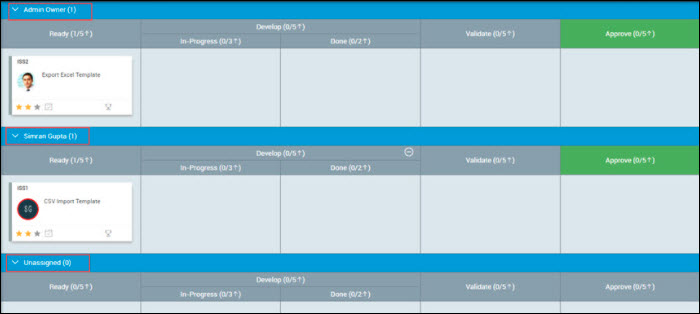
To add a card to the required card owner lane, select the owner, for example, ‘Derek Brian’, in the Owner list. When you add a new card and select any Specific Team Member, the ‘Add to ‘ list will only show you the lane defined for that team member. This changes if you select another team member in the ‘ Owner’ list for the card. In case you are pulling from Backlog/Archive, select the first column, for example, the ‘Ready’ column, under the lane name that shows up based on the card owner already selected.
Once added, the card is placed in the lane specific to the current owner of the card (say Derek Brian). The team member can move the card through various vertical lanes and take it to completion. For example, the ‘Derek Brian’ lane.
Note that if you move the card into another lane, the ‘Current Owner’ of the card gets re-assigned to the lane where it has been moved to. For example, if you move a card from the ‘Derek Brian’ lane to the ‘John Smith’ lane, the owner of the card will change to ‘John Smith’; that is, the card will be assigned to ‘John Smith’.
When a card is owned by multiple owners, it is placed in the lane represented by the first owner selected in the Owner list of the card.
The smart logic is applied to make it easier to work when you have team members who work on different value streams. It is possible to disable the lane and just create lanes which have Team Member names as labels and not smart logic,. Thus, you’ll be able to add any card in any lane and can interpret the card individually, i.e., which card is in which lane. You can freely move the card across lanes.
Lanes Configured based on Card Type
When you define lanes based on Card Type, there will be lanes on the board representing each card type on the board, for example, User Stories, Defects, Issues, and custom cards, if configured on your board.

To add a new card to the required Card Type lane, select the appropriate card type, for example, ‘User Stories’ in the Card Type list. In case you are pulling from Backlog/Archive, select the first column, for example, the ‘Ready’ column, under the lane name that shows up based on the attribute value.
Once added to the appropriate lane (say User Stories), you can move the card through the value stream in the ‘User Stories’ lane.
You cannot move cards across one Card Type lane to another, as these lanes are tied to a particular Card Type. For example, you cannot move a card from the ‘User Stories’ lane to the ‘Defects’ lane.
Lanes Configured based on Custom Labels
When you define lanes based on Custom Labels, you can create workflows for different groups you want to monitor. For example, you may want to create lanes for different customers, or departments in your tea,m such as Marketing or Support.
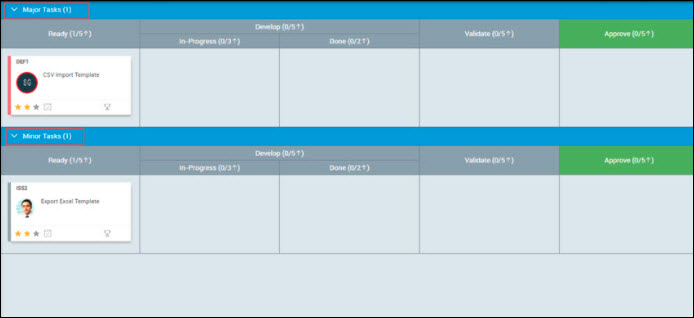
To add a new card to the required custom lane, select the appropriate custom lane in the Add To list, for example, the ‘Ready’ column under ‘Major Tasks’. In case you are pulling from Backlog/Archive, select the first column, for example, the ‘Ready’ column, under the required lane name that shows up based on the custom labels.
Once added to the appropriate lane (say Major Tasks), you can move the card freely across all lanes; the attribute values of a card will not undergo any change as the lane definition is not based on any attribute value.
For example, you can move a card from the ‘Major Tasks’ lane to the ‘Minor Tasks’ lane, if required.
Setting Default Card Type for Lane
To define a default card type for a lane, open the Board Editor screen and then click the lane heading for which the default card type needs to be set.
In the Smart Lane Settings pop-up window, select the default card type from the Card Type drop-down menu and click Submit.
Note: This feature works only when you have defined the lanes based on custom labels.