
This article explains how to easily assign or unassign resources in tasks.
|
Skip Ahead to: Steps to Assign Resources to Tasks |
Overview
After you create a task, assign resources (team members invited into your project) to assign responsibility for getting those tasks done.
From the Task List view, you can assign one or more resources to a task, unassign resources, and change the assignment duration, % allocation, or effort.
Note: If the user’s calendar is updated recently, it will be synced with Simple Scheduling only if any edit is made to the task details. Task data needs to be edited to get updated Resource calendar information. For example, if the resource is allocated on a task from 01-11-14 to 6-11-14 and the same resource has marked two days of 4 and 5-11-14 as holidays in the personal calendar at the user level. The Resource Calendar is synced with Simple Scheduling whenever any edit or change is made to the task details. Otherwise, the Planned Start and End Start dates are not affected and Actuals are also not updated.
Steps to Assign Resources to Tasks
To assign the resource,
- Double-click the Task in the Tasks List view.
- Click the Resources tab, which is visible on clicking the More icon.
- In the Resource tab, allocate resources by selecting one or more resources from the Resources pane using the SHIFT+ARROW Keys or CTRL+ARROW keys and clicking Add button.
- To add all resources, simply click Add All without selecting any resource.
- Click the SAVE button.
The Allocation details will be displayed automatically based on the Task dates and full (100%) allocation indicating that the resources are assigned to the task for the entire Task Duration. If you modify the allocation, the assigned effort is automatically calculated. If you change the Assigned effort, the allocation % is automatically calculated. If you change the planned start date (cannot be earlier than the Task Start Date) and end dates (cannot be later than the Task End Date), the assigned effort is automatically calculated.
Note: If resources are locked or unallocated for a task then the Planned Start Date and Planned End Date will be non-editable.
Steps to Unassign Resources for Task
To unassign resources for a Task,
- Select the corresponding check box for the resource in the Task Assignment pane.
- Click the SAVE button.
You can also assign single or multiple resources from the Task Assignment panel in the same way.
You can also view the resource allocated against the taskbar for the task in the Gantt view. The Planned Start Date and Planned End Date of the resource assignment are the same as the Planned Start Date and Planned End Date of the task.
The effort is calculated as:
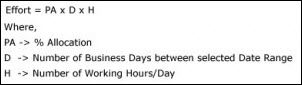
Here, Effort is Planned Effort which is based on Resource Calendar.
Changes in either % Allocation or Effort change the other value proportionately, i.e.
- When you change the allocation, the Effort for the Task Assignment gets changed proportionately.
- Similarly, when you change the Effort, the % Allocation value gets changed proportionately.
Steps to Unassign Resources from Selected Task
To unassign a resource from the selected task,
- In the Resources column, click the Resource list for the task.
- Clear the selection for the resource and the resource’s assignment for the task will be removed.
After you have assigned resources to the tasks, click the Open Time-Entry icon of the Task Assignment window. This opens the time entry for that task and resources will be able to enter time for the tasks through the timesheet or the Task Detail view.
The Open and Close Time-Entry feature will be available if the timesheet is enabled for Tasks Plan form i.e. ‘Include in Timesheet’ option selected for the Task Plan form, To use this feature, ensure that the Timesheet Setup wizard is run i.e., Timesheet is generated for the project.
To disable resources to enter time for tasks, click the Close Time-Entry icon of the Task Assignment window, This closes the Time-Entry for that task. However, the task will continue to appear in the resource’s timesheet and the timesheet cells will be grayed out.
You can also enable or disable Time-Entry for tasks by clicking the relevant buttons at the bottom of the Detail view of the task.
You can reopen the timesheet entry for the closed tasks by clicking the Open Time-Entry button available for closed tasks i.e., tasks for which the Time-Entry is closed.
You cannot unassign a resource from the task if he/she has entered time for the task. The check box for the resource will not be available for clearing the selection.