
In this article, we will help you to understand how to define Mind-maps for forms.
|
Skip Ahead to: |
Overview
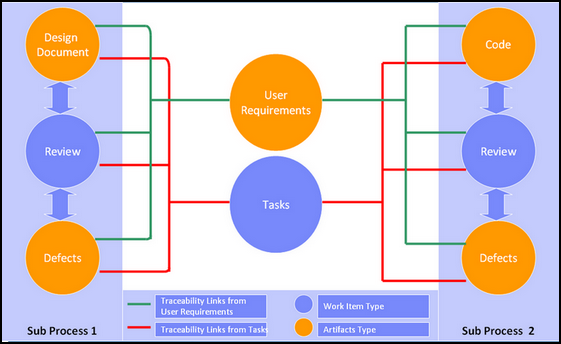
Creating a Mind-map helps you to set relationships between workitems and trace them while working with them. You can set relationships between project items such as software specifications, the software code, and test specifications, and link them to work in an integrated system (See the schematic below for an example). If a project item is modified, the Mind-map link enables you to study the impact of the changes and ensures that the related items are identified and changed as required.
To allow users at the instance level to set a Mind-map between the workitems in a project or across projects in an organization, you need to define the Mind-map settings for the Form.
Note: The Mind-map feature will not be available for Forms created with scope as ‘Organization level hence the Mind-map section and ‘Mind-map Settings’ icon will not be available.
Navigation
Administration Level
In the left navigation panel, expand the Workspace menu and select Administration. Hover over the Administration breadcrumb at the top, expand the Process Governance module, and select Forms.
In the left navigation panel, expand the Recent Projects menu and select any Project. Hover over the Project breadcrumb at the top, expand the Setup module, and select Forms.
Defining Mind-map for Forms
-
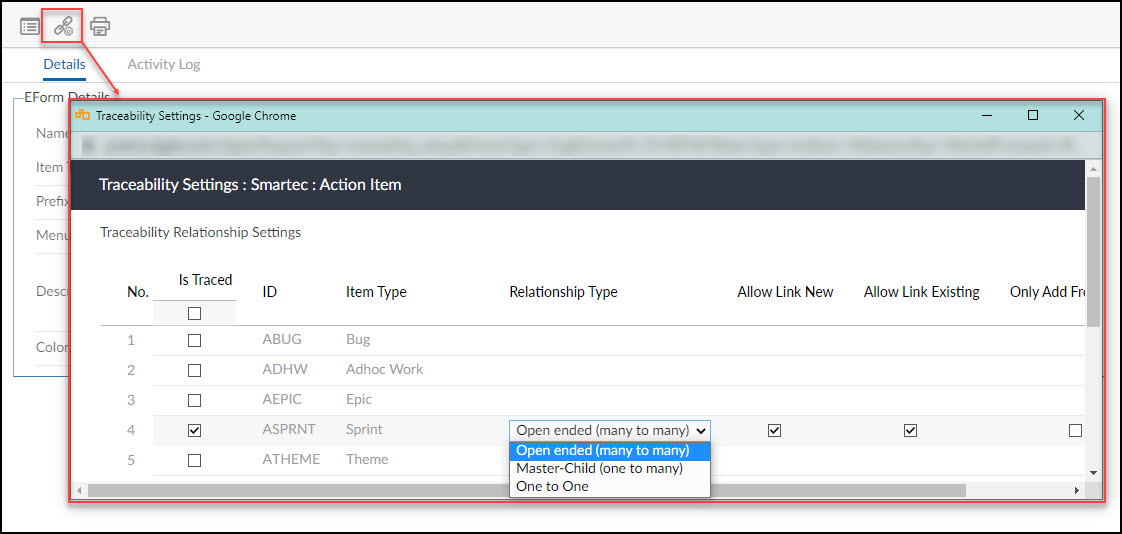
Select the required Form in the Form list and click the Mind-map Settings icon on the toolbar.
- In the Mind-map Settings window, you can view the existing item types to which the Mind-map link can be created. The following details for the item types are displayed:
-
- Sr. No.
- Is Traced
- ID
- Item Type
- Relationship Type
- Allow Link New
- Allow Link Existing
- Only Add from this Form
-
-
To define the Mind-map link for the selected Form, select the check box under the Is Traced column. Note that when you select an item the other columns are now available.
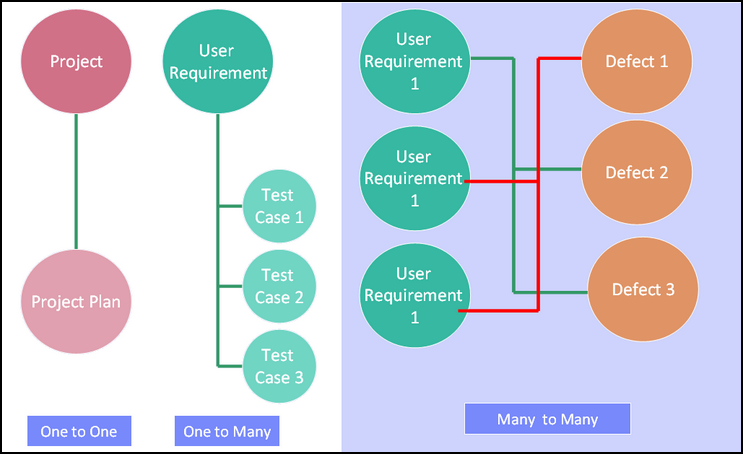
- Select any one of the relationship types in the list. The relationship type depends on the item type. The following are the different relationship types:
-
-
Open Ended: This is a many-to-many relationships where two or more sets of item types are related to each other more than once, both ways. For example, Deliverables and Documents.
-
Master Child: This is a one-to-many relationships where one item type is related to many other item types more than once. For example, Review and Defects.
-
One-to-One: This relationship is where one item type is related to another single item type. For example, Review and Task.
Schematic for understanding the different types of Mind-map Relationships.
-
-
-
To restrict adding an instance from the main menu, select Only Add from this Form. This allows adding an instance only from the Mind-map section of the linked item so that the Mind-map is always maintained between the two item types.
For example, configure the Defect Form defining the Mind-map relationship with the Issue and select the Only Add from This Form check box. Defects can now be only added from the Mind-map section of the Issue Management Form. Defects can not be added independently from the Defect Management menu. Thus, it is ensured that every defect will have a link to some issue. -
Click Save to save the changes or click Reset to discard the changes. Click Close to exit the window.
After configuring the Form with Mind-map for the required Form and the Relationship Type, team members will be able to see that Form in the Mind-map section of workitems and can link the workitems of the linked Form. For example, a Defect in the image below is being linked to a new Test Unit.
Similarly, workitems of the same Form type can be linked to another workitem by configuring a Linked Item Segment to a Form. For example, team members can link various Action Items to a single Defect and use the standard List view features to track them in a dedicated section.