This article explains how Advanced Filters and Column Filters help you find and focus on relevant workitems.
|
Skip Ahead to: |
Overview
NimbleWork provides two ways to filter your workitem list views:
- Advanced Filters – Create and save named filters with one or more conditions using field names, data conditions, and values. Advanced Filters support single or multiple card types and can be set as Public (visible to all project members) or Private (visible only to you). Access and manage all your Advanced Filters from the central Advanced Filters page under Configure.
- Column Filters – Quickly filter the list based on existing column values without saving the filter.
Advanced Filters
Accessing the Advanced Filters Page
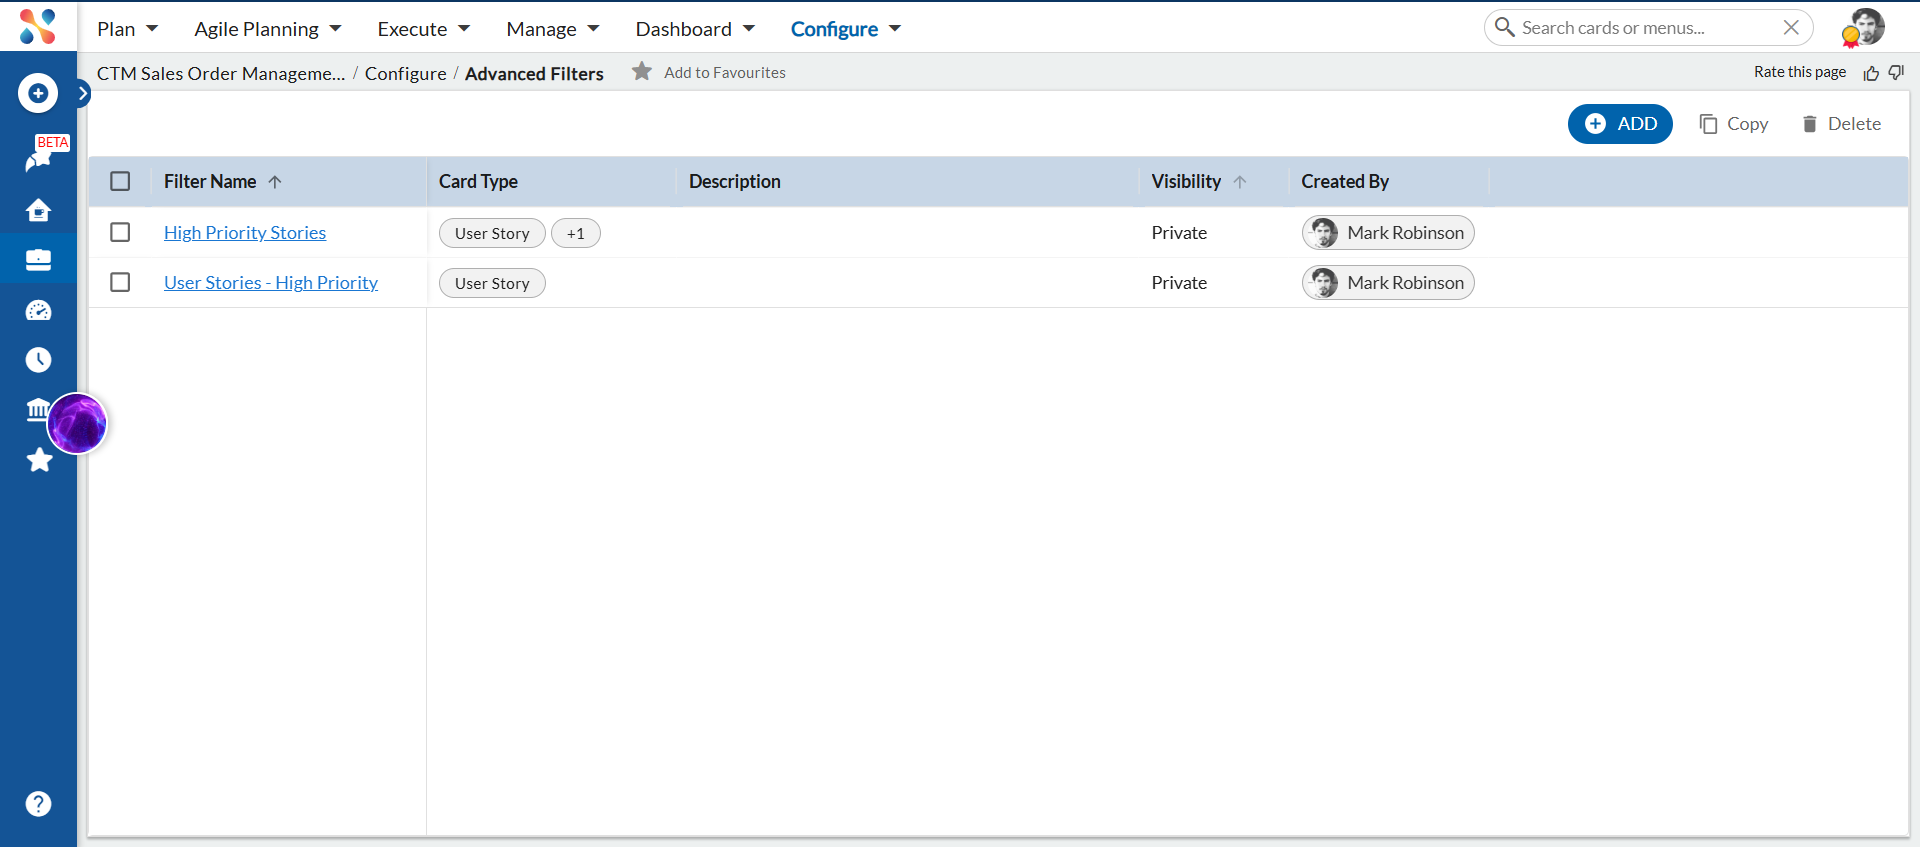
The Advanced Filters page is the central location to view, create, and manage all your Advanced Filters. All authenticated project members can access it regardless of their role.
To open the Advanced Filters page:
- From the project navigation, open the Configure menu.
- Select Advanced Filters.
The page lists all filters visible to you — filters you created and public filters created by other project members. The list shows the following columns:
- Card Type – The card type(s) the filter applies to.
- Filter Name – Click to open the filter in edit/view mode.
- Created By – The user who created the filter.
- Description – Optional description of the filter.
- Visibility – Public or Private.
The + ADD button creates a new filter. Single card type filters created from an Individual List View also appear here.
Creating an Advanced Filter
To create a new Advanced Filter:
- On the Advanced Filters page, click + ADD.
- In the Advanced Filter form, enter a Filter Name (required).
- Optionally, enter a Description.
- Select one or more Card Types (required). Selected card types appear as removable tags.
- Set the Make Public toggle:
- On (Public) – All project members can see and use this filter.
- Off (Private) – Only you can see and use this filter.
- Under Filter Criteria, define your conditions:
- Select a Field name.
- Select a Data condition.
- Select or enter a Value.
- To add more conditions, click the Add (+) icon. To remove a condition, click the trash icon for that row.
- Click SAVE to store the filter.
Note: When two or more card types are selected, the Field name dropdown shows only fields that are common to all selected card types, listed in alphabetical order. When only one card type is selected, all fields for that card type are available.
Using Advanced Filters in List Views
Advanced Filters appear in the filter selection dropdown of each relevant card type’s Individual List View.
- A filter for a single card type (e.g. User Story) appears in that card type’s list view filter dropdown.
- A filter for multiple card types (e.g. User Story and Technical Story) appears in each of those card types’ list view dropdowns.
- Filters created from within an Individual List View also appear on the central Advanced Filters page.
When creating a filter from within an Individual List View, the Card Type is automatically set to that card type (single selection only), and the SAVE & APPLY option is available to save and apply the filter in one step. When opening a multi-card-type filter from within a list view, the Card Type field is shown as read-only.
Editing an Advanced Filter
To edit an Advanced Filter, click its Filter Name on the Advanced Filters page. Only the creator can edit and save changes to a filter. If you open a public filter created by another user, it opens in view-only mode — use Copy to create your own editable version.
Copying a Filter
You can copy any visible filter — yours or a public filter created by another user — to use as a starting point.
To copy a filter, select it on the Advanced Filters page and click Copy. The new filter is created with:
- Name: Copy <original filter name>
- Created By: your name
- Visibility: Private by default (you can change this)
- All original card types, description, and criteria are carried over and can be edited.
Deleting a Filter
You can only delete filters you created. To delete a filter:
- Select your filter on the Advanced Filters page.
- Click Delete.
- Confirm the deletion in the dialog that appears.
Note: The Delete option is only enabled for filters where you are the creator. It is disabled for filters created by other users.
Advanced Filters in Dashboard Analytics
Public Advanced Filters appear in the Dashboard Analytics filter selection dropdown so you can use saved filters for dashboard reporting.
- Only Public filters appear in the Dashboard filter dropdown — Private filters are not shown.
- An eye icon next to each filter lets you view filter details (name, card type(s), criteria, visibility, created by) in read-only mode. Filters cannot be edited from the Dashboard.
- When a public filter is deleted, it is removed from the Dashboard dropdown. Copies of that filter saved as Public by other users remain available.
Clear Filters
- To remove an applied Advanced Filter, select the Clear (×) icon next to the filter name above the list.
- To remove all filters, open More Options and select Clear All Filters.
Examples
Example 1: Filter by a single workitem type
Say you want to quickly see all high-priority User Stories in the project. Here is how to set up that filter.
- Go to Configure → Advanced Filters.
- Click + ADD.
- Enter a name — for example, User Stories – High Priority.
- In Card Type, select User Story.
- Under Filter Criteria, choose Priority as the Field name, set Data condition to is, and pick High as the value.
- Click SAVE.
The filter is saved and listed as Private by default. You can now apply it from any List View using the Filter option in the toolbar.
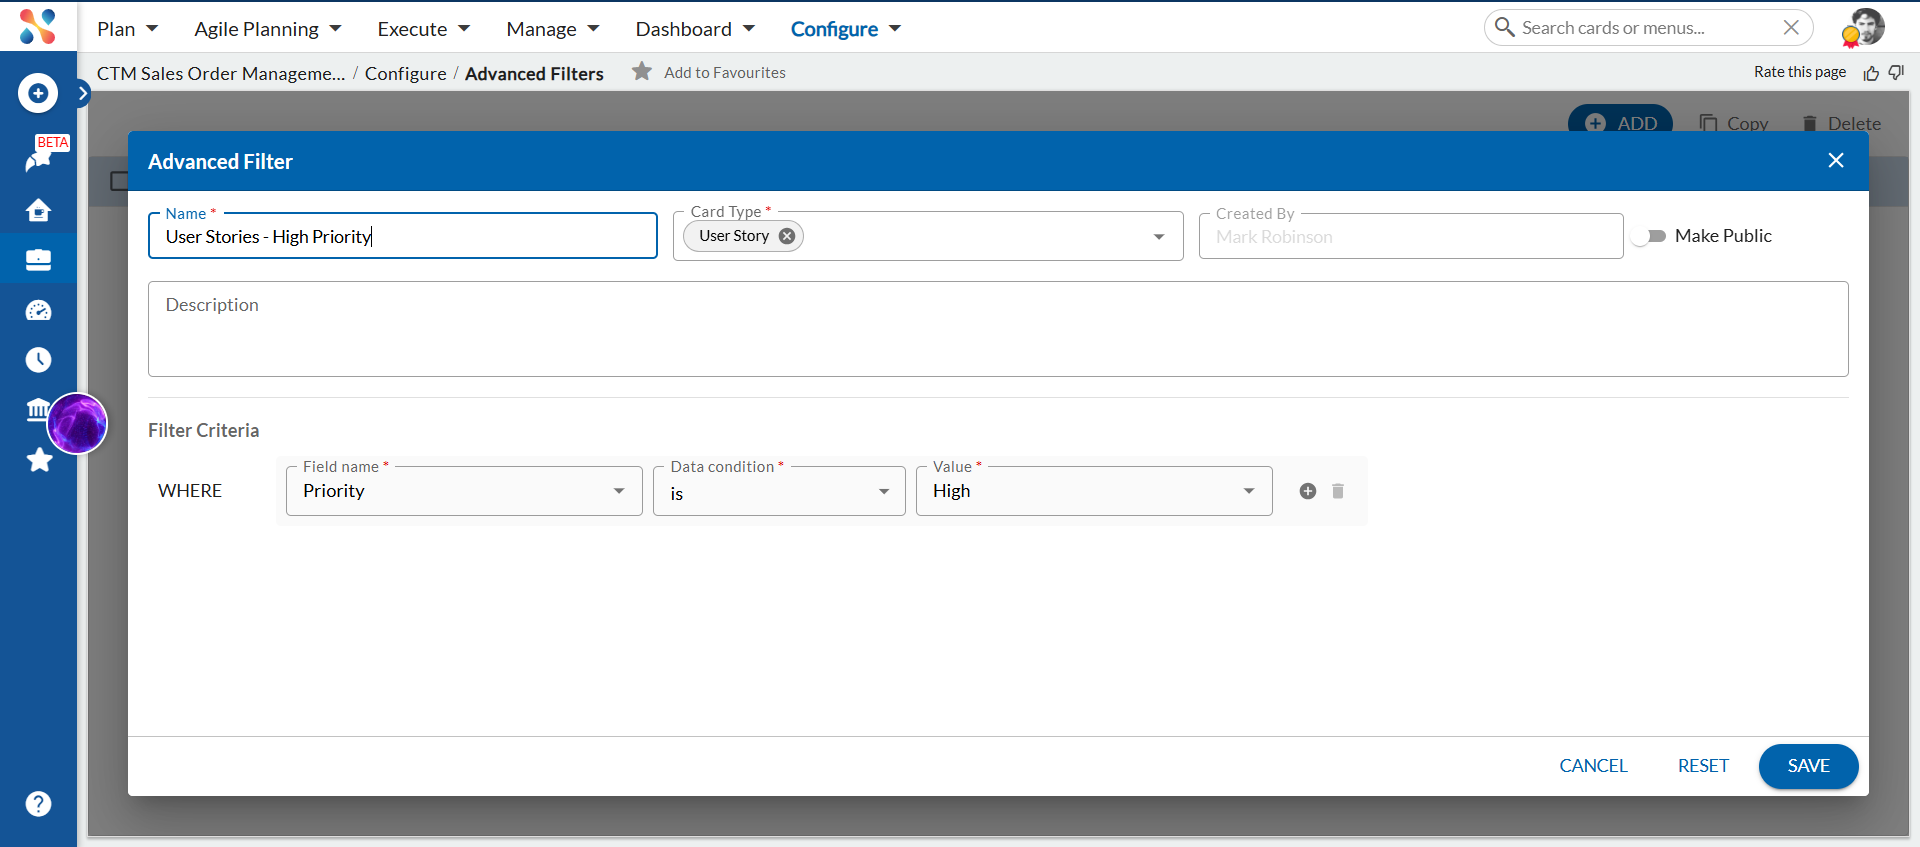
The filter targets one workitem type — only User Stories where Priority is High appear in the List View when you apply it.
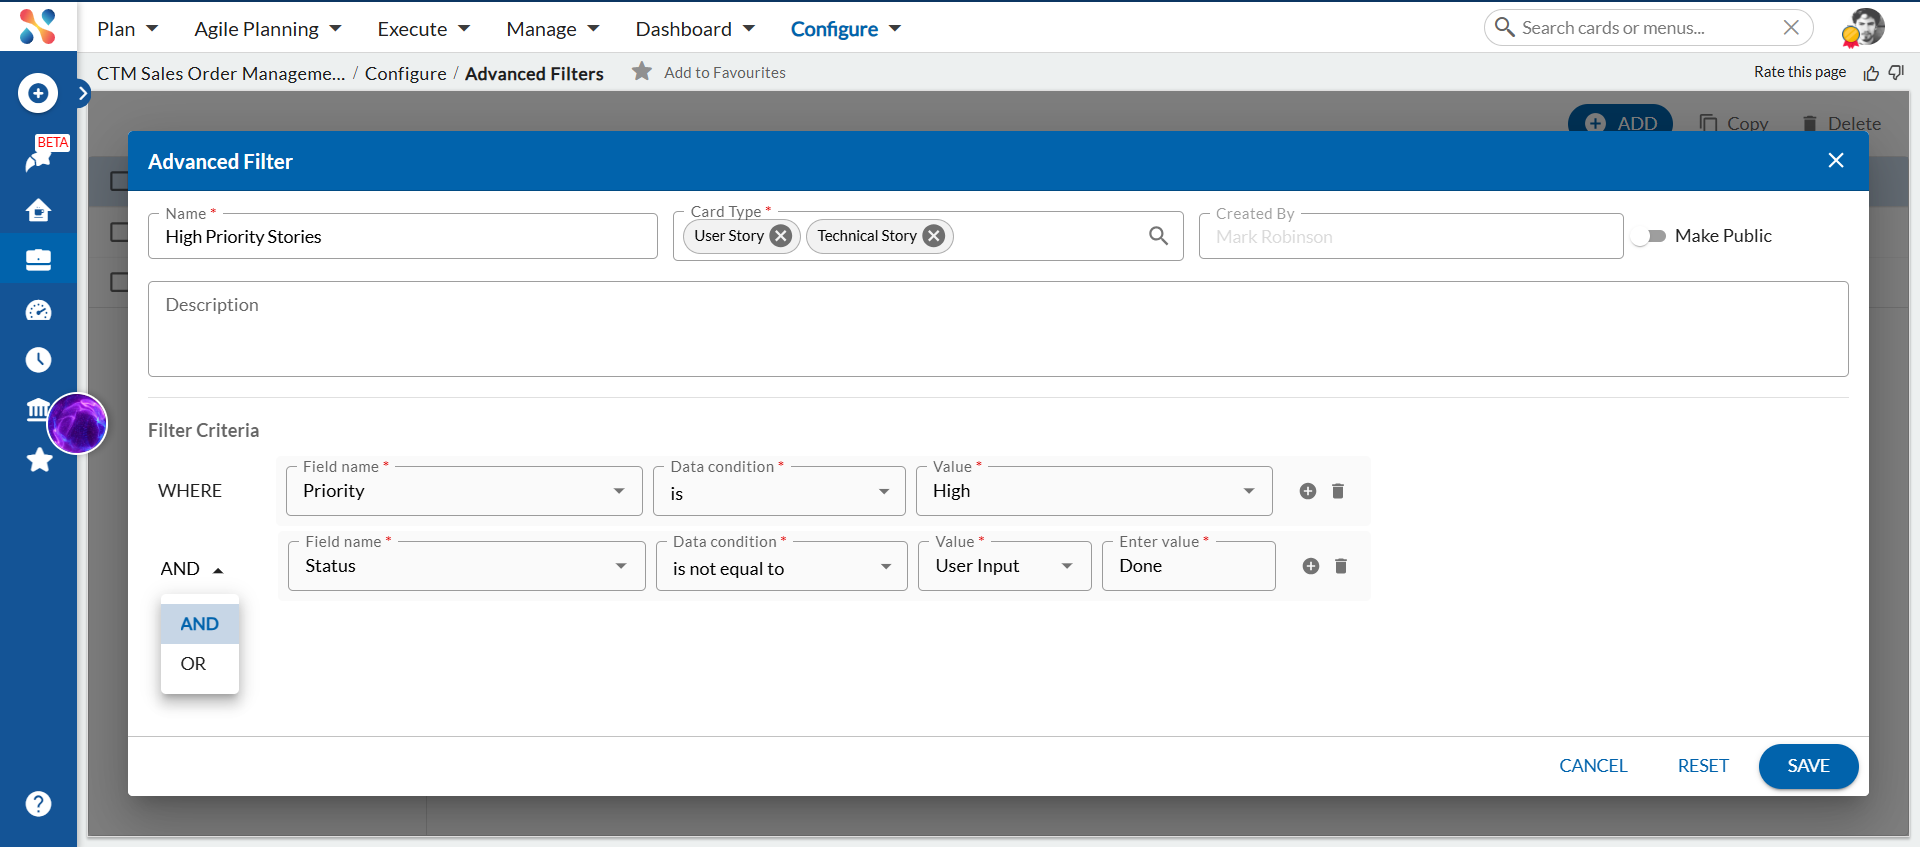
Example 2: Filter across multiple workitem types with conditions and condition groups
Say you are a sprint lead who wants to see all high-priority User Stories and Technical Stories that are not yet complete — and share that view with the whole team. This example shows how to use Add condition, the AND/OR toggle, Add condition group, and the Make Public toggle.
- Go to Configure → Advanced Filters.
- Click + ADD.
- Enter a name — for example, High Priority Stories.
- In Card Type, select both User Story and Technical Story. Both appear as chips in the field.
- Enable the Make Public toggle — all project members can see and apply this filter. When the toggle is off, the filter is private and visible only to you.
- Under Filter Criteria, set the first condition (the WHERE row):
- Field name: Priority
- Data condition: is
- Value: High
- Click the + (Add) icon on the condition row. A dropdown appears with two options:
- Add condition — adds a single new condition row. The prefix label defaults to AND; click it to switch to OR.
- Add condition group — adds a grouped block of conditions that you can configure independently with their own AND/OR logic.
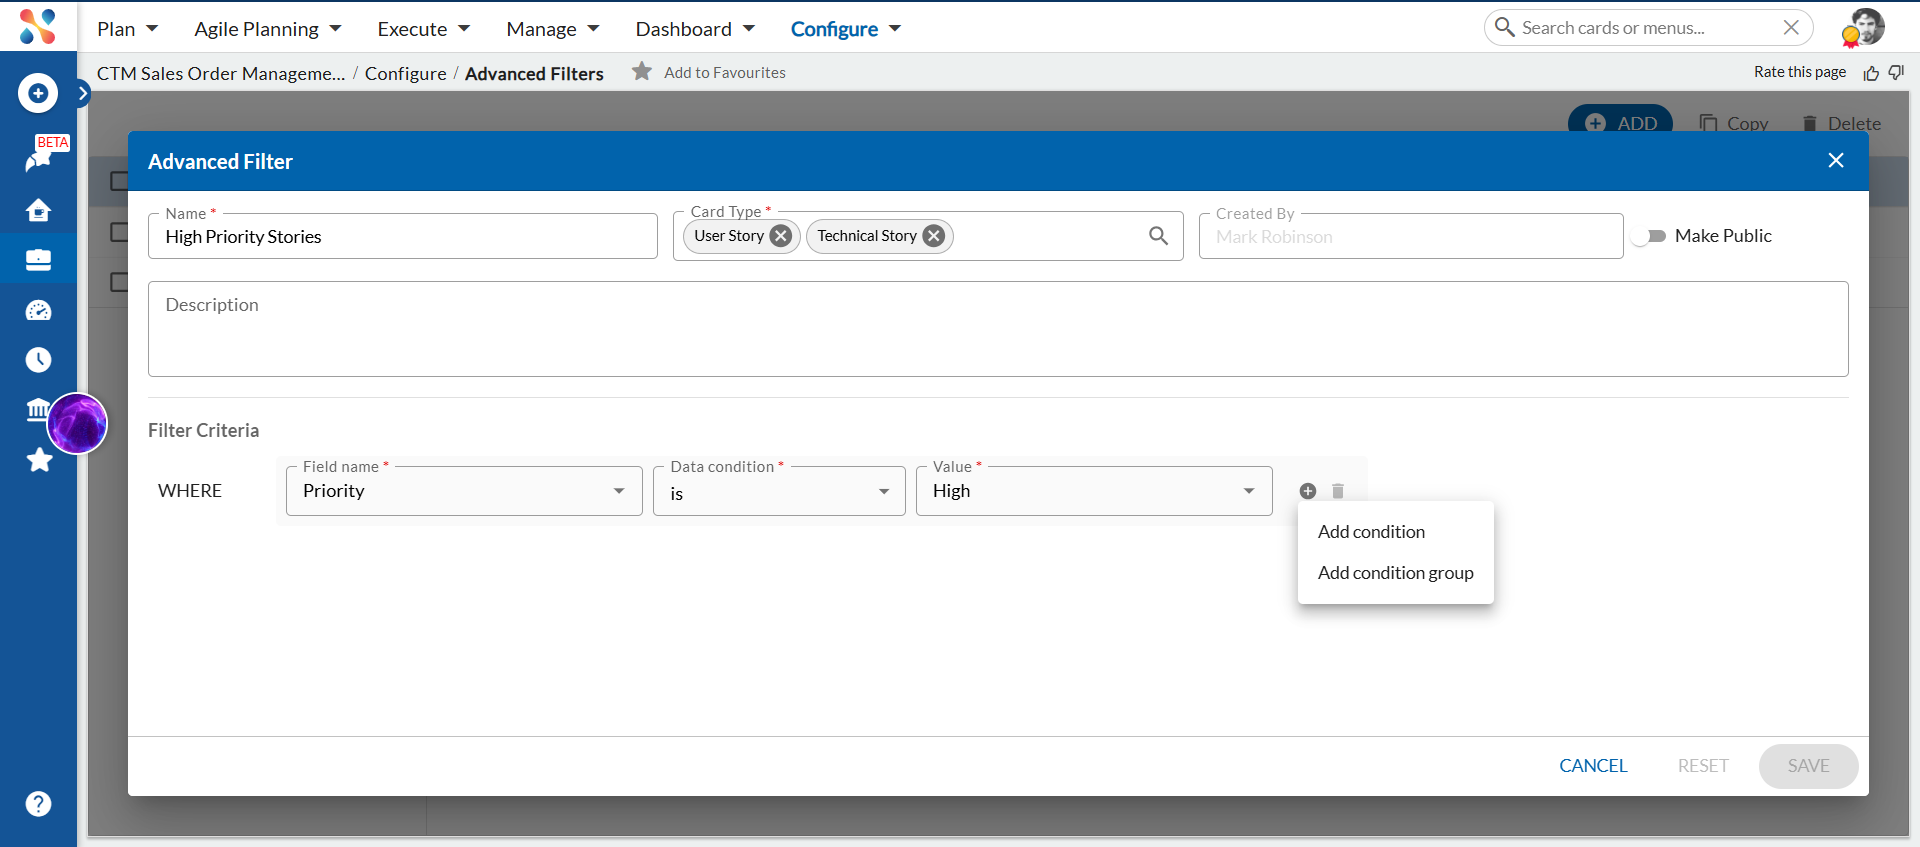
Clicking + lets you add a single condition or a grouped block of conditions.
- Select Add condition. A new row appears with an AND prefix. Set it to:
- Field name: Status
- Data condition: is not equal to
- Value: Done
- Click the AND label on any condition row to switch the operator between AND and OR. Use AND when all conditions must be true; use OR when any one condition is enough.
Each condition row has an AND/OR toggle so you can control how conditions relate to each other.
- Click + again and select Add condition group. A grouped block appears labelled All of the following conditions are true.
- Inside the group, click the AND between the two condition rows and switch it to OR. The label updates to Any of the following conditions are true.
- Set the conditions inside the group:
- First row — Priority is Critical
- Second row (OR) — Priority is High
- Click SAVE.
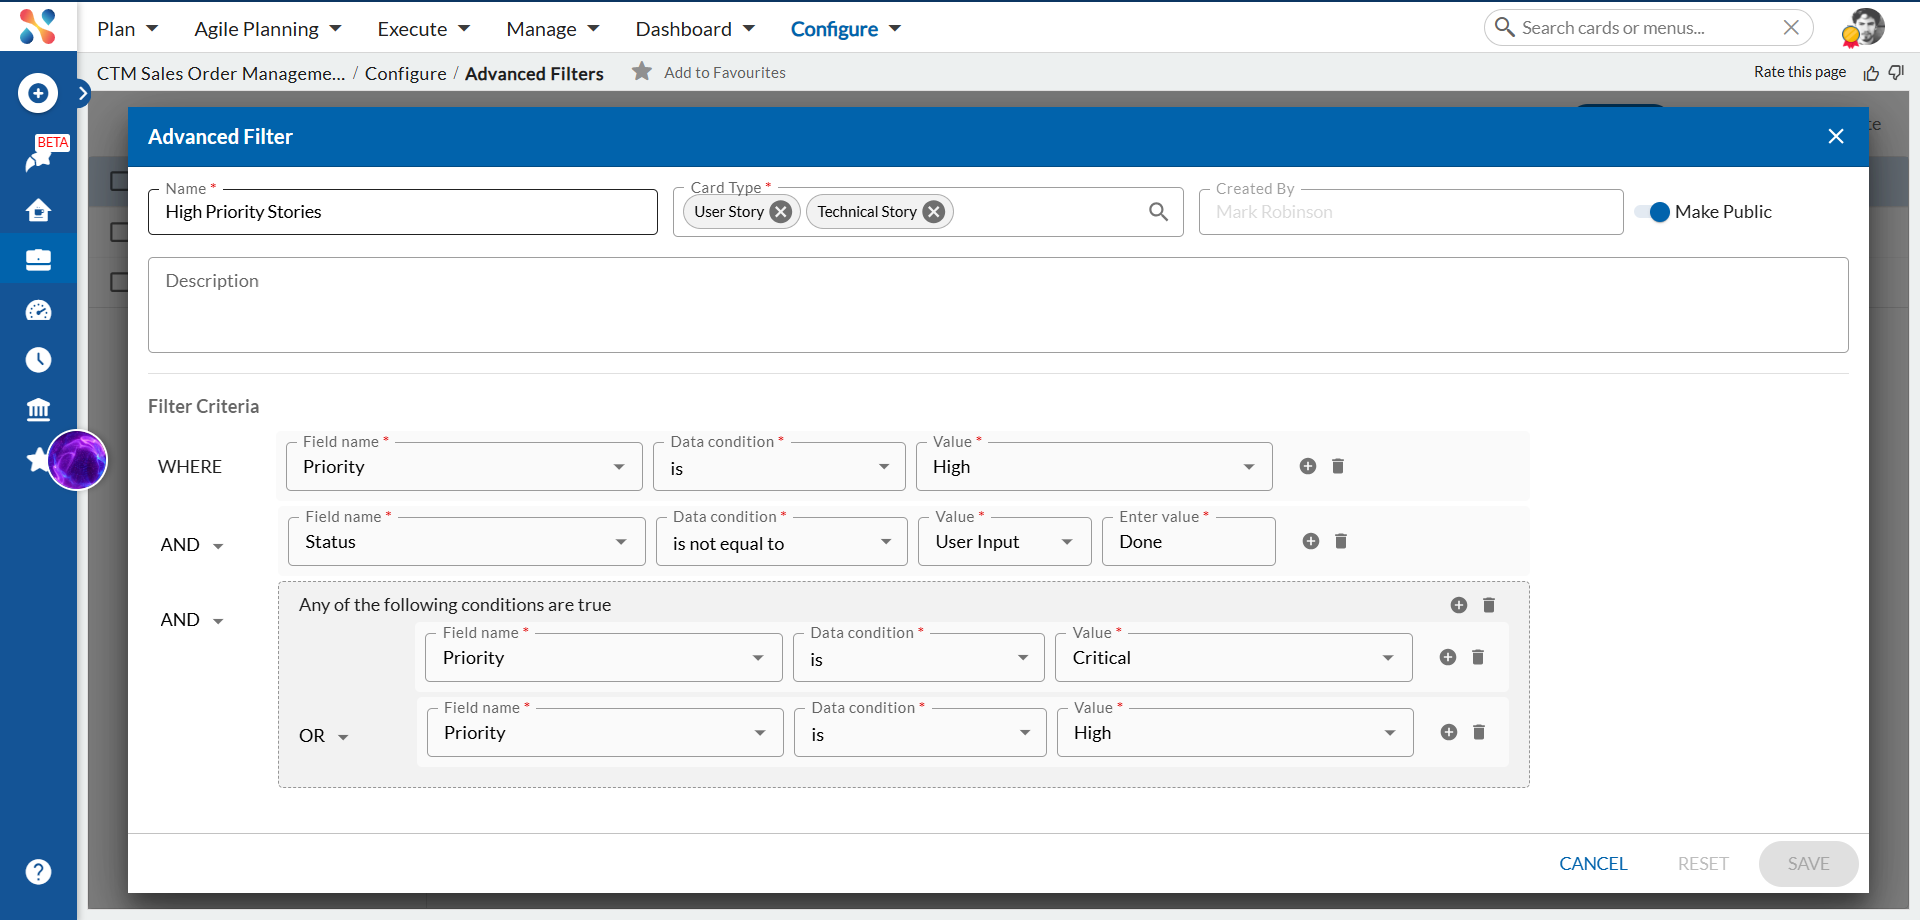
The completed filter — Make Public is on, two top-level conditions are joined by AND, and a condition group uses OR logic to match Critical or High priority items.
The filter is saved and listed as Public, so all project members can apply it from any List View. When applied, it shows User Stories and Technical Stories where Priority is High, Status is not Done, and Priority matches Critical or High in the condition group.
Column Filters
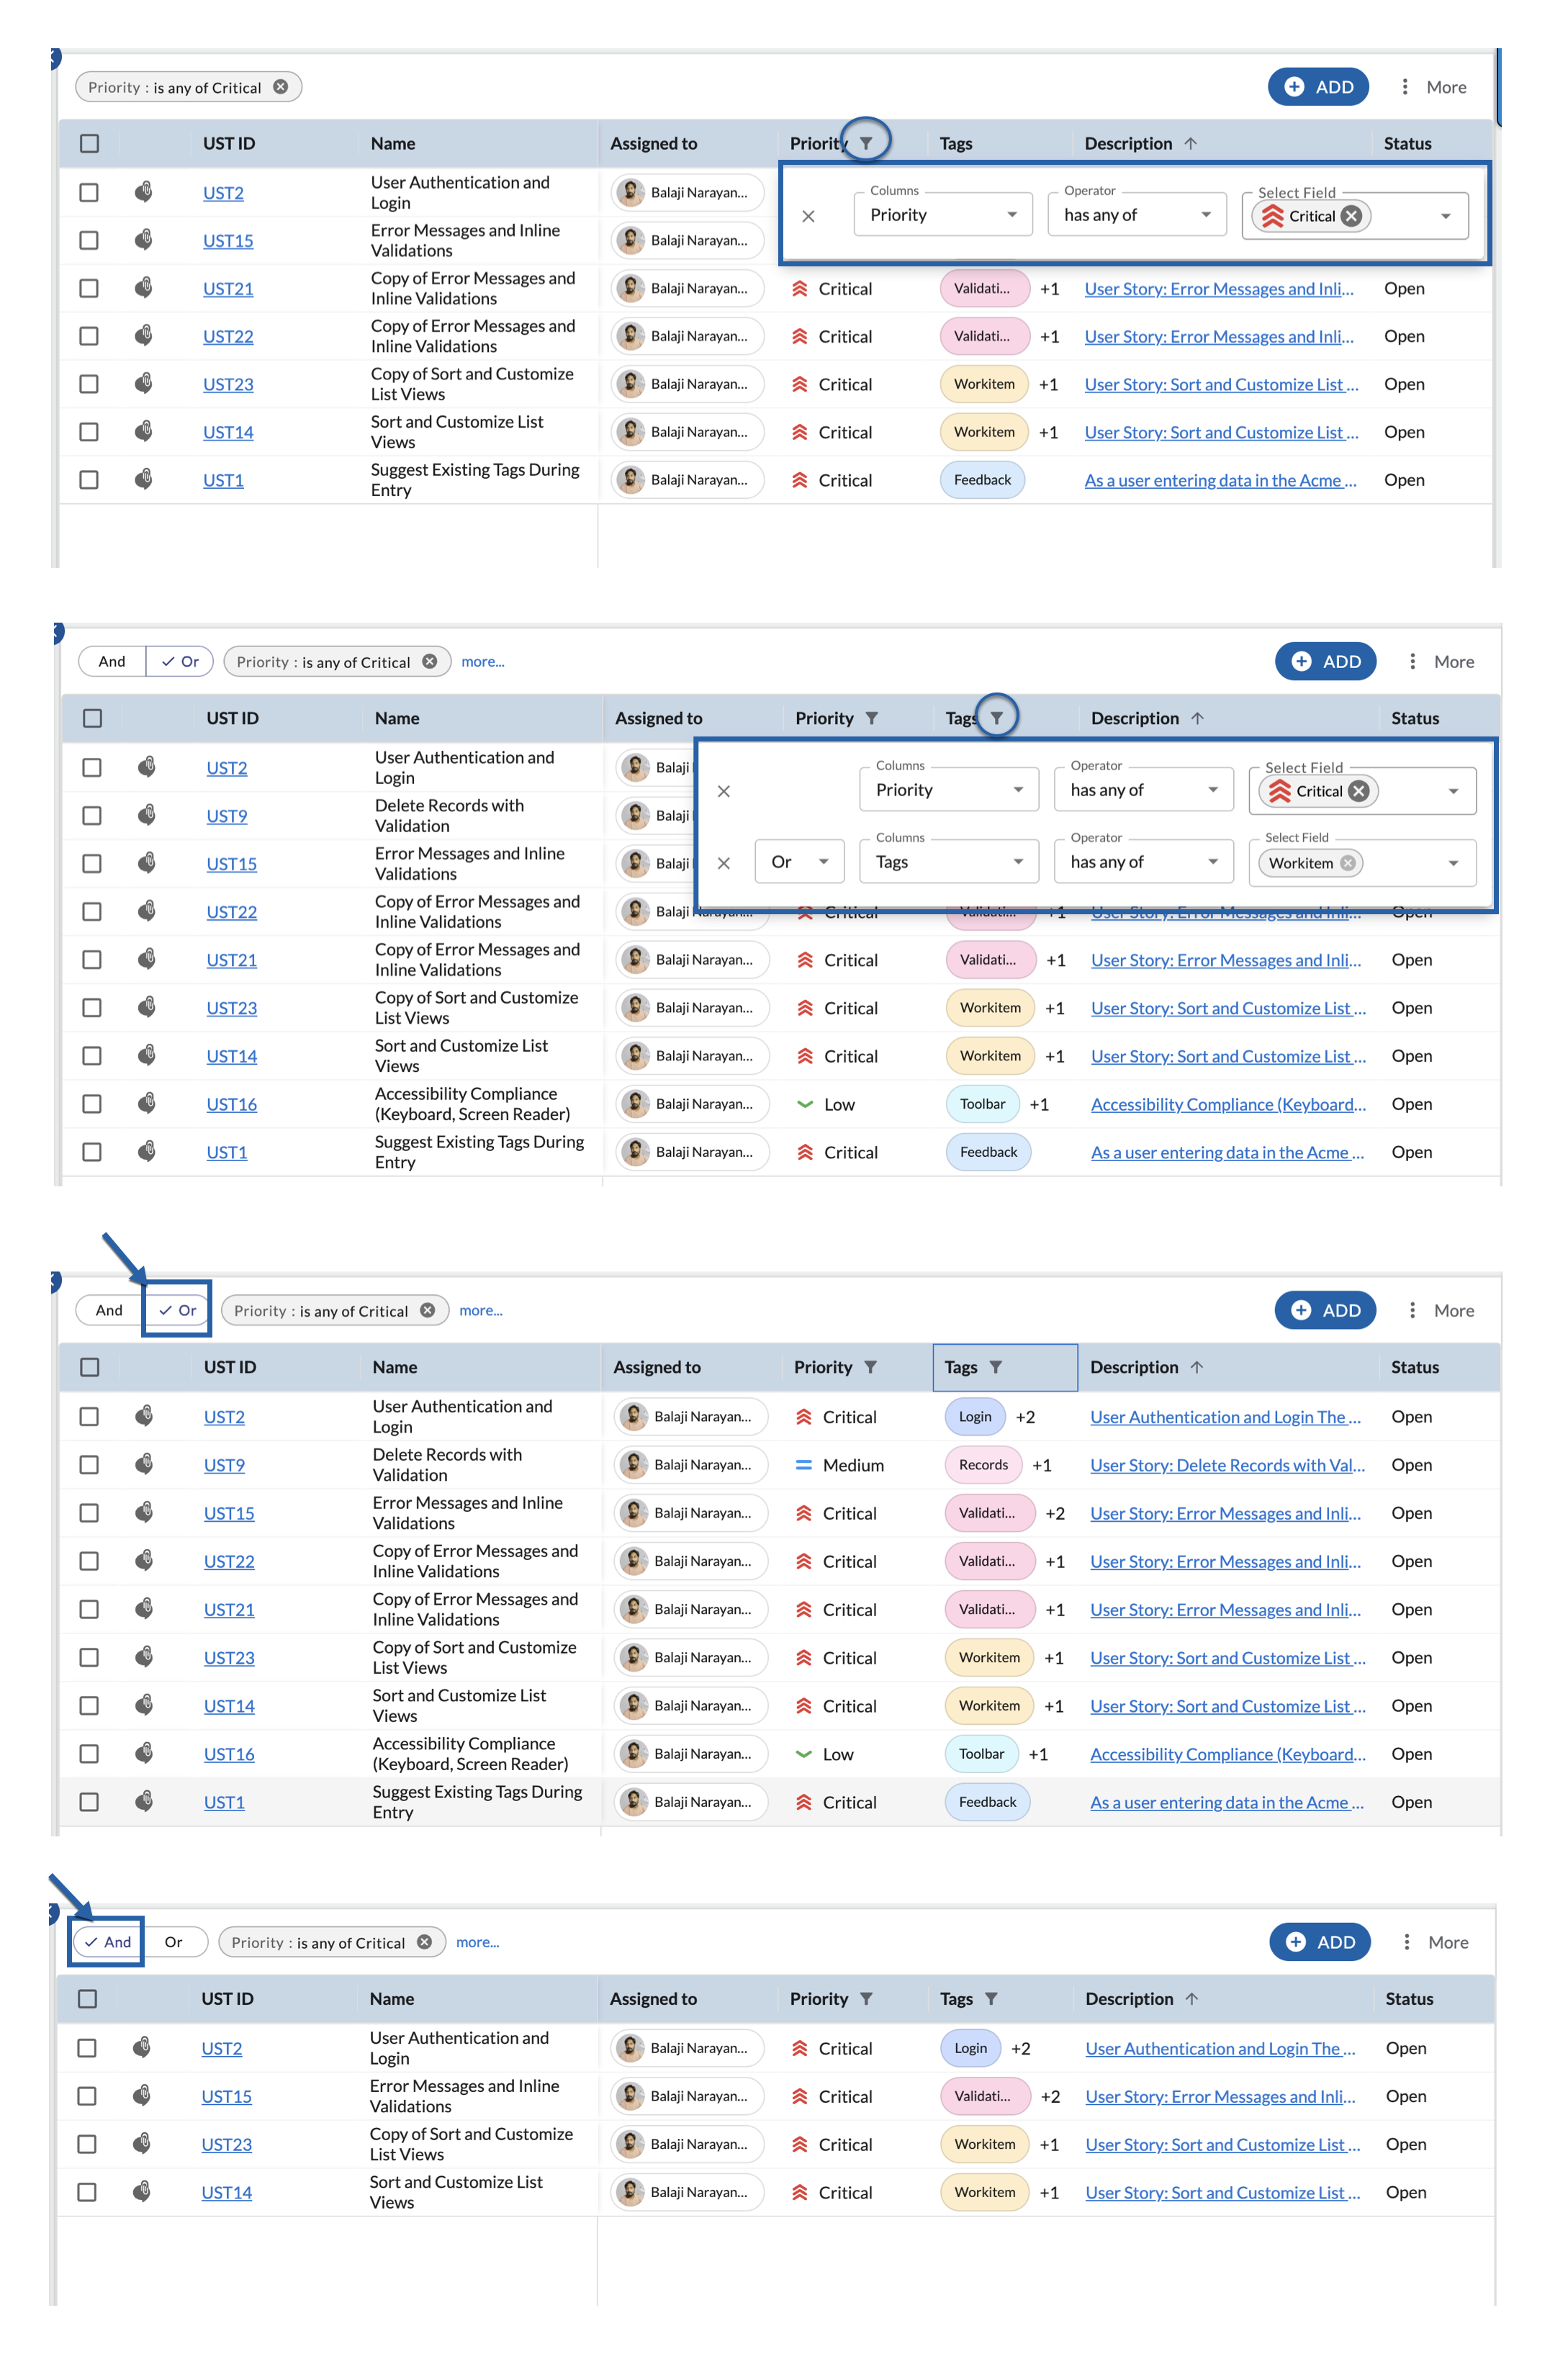
Column Filter helps to filter the list quickly based on the existing columns.
Prerequisites
Ensure that the List view displays the columns related to that attribute, for example, Status. It is better to select a few columns to avoid too much horizontal scrolling in List View.
Steps to Add Column Filters
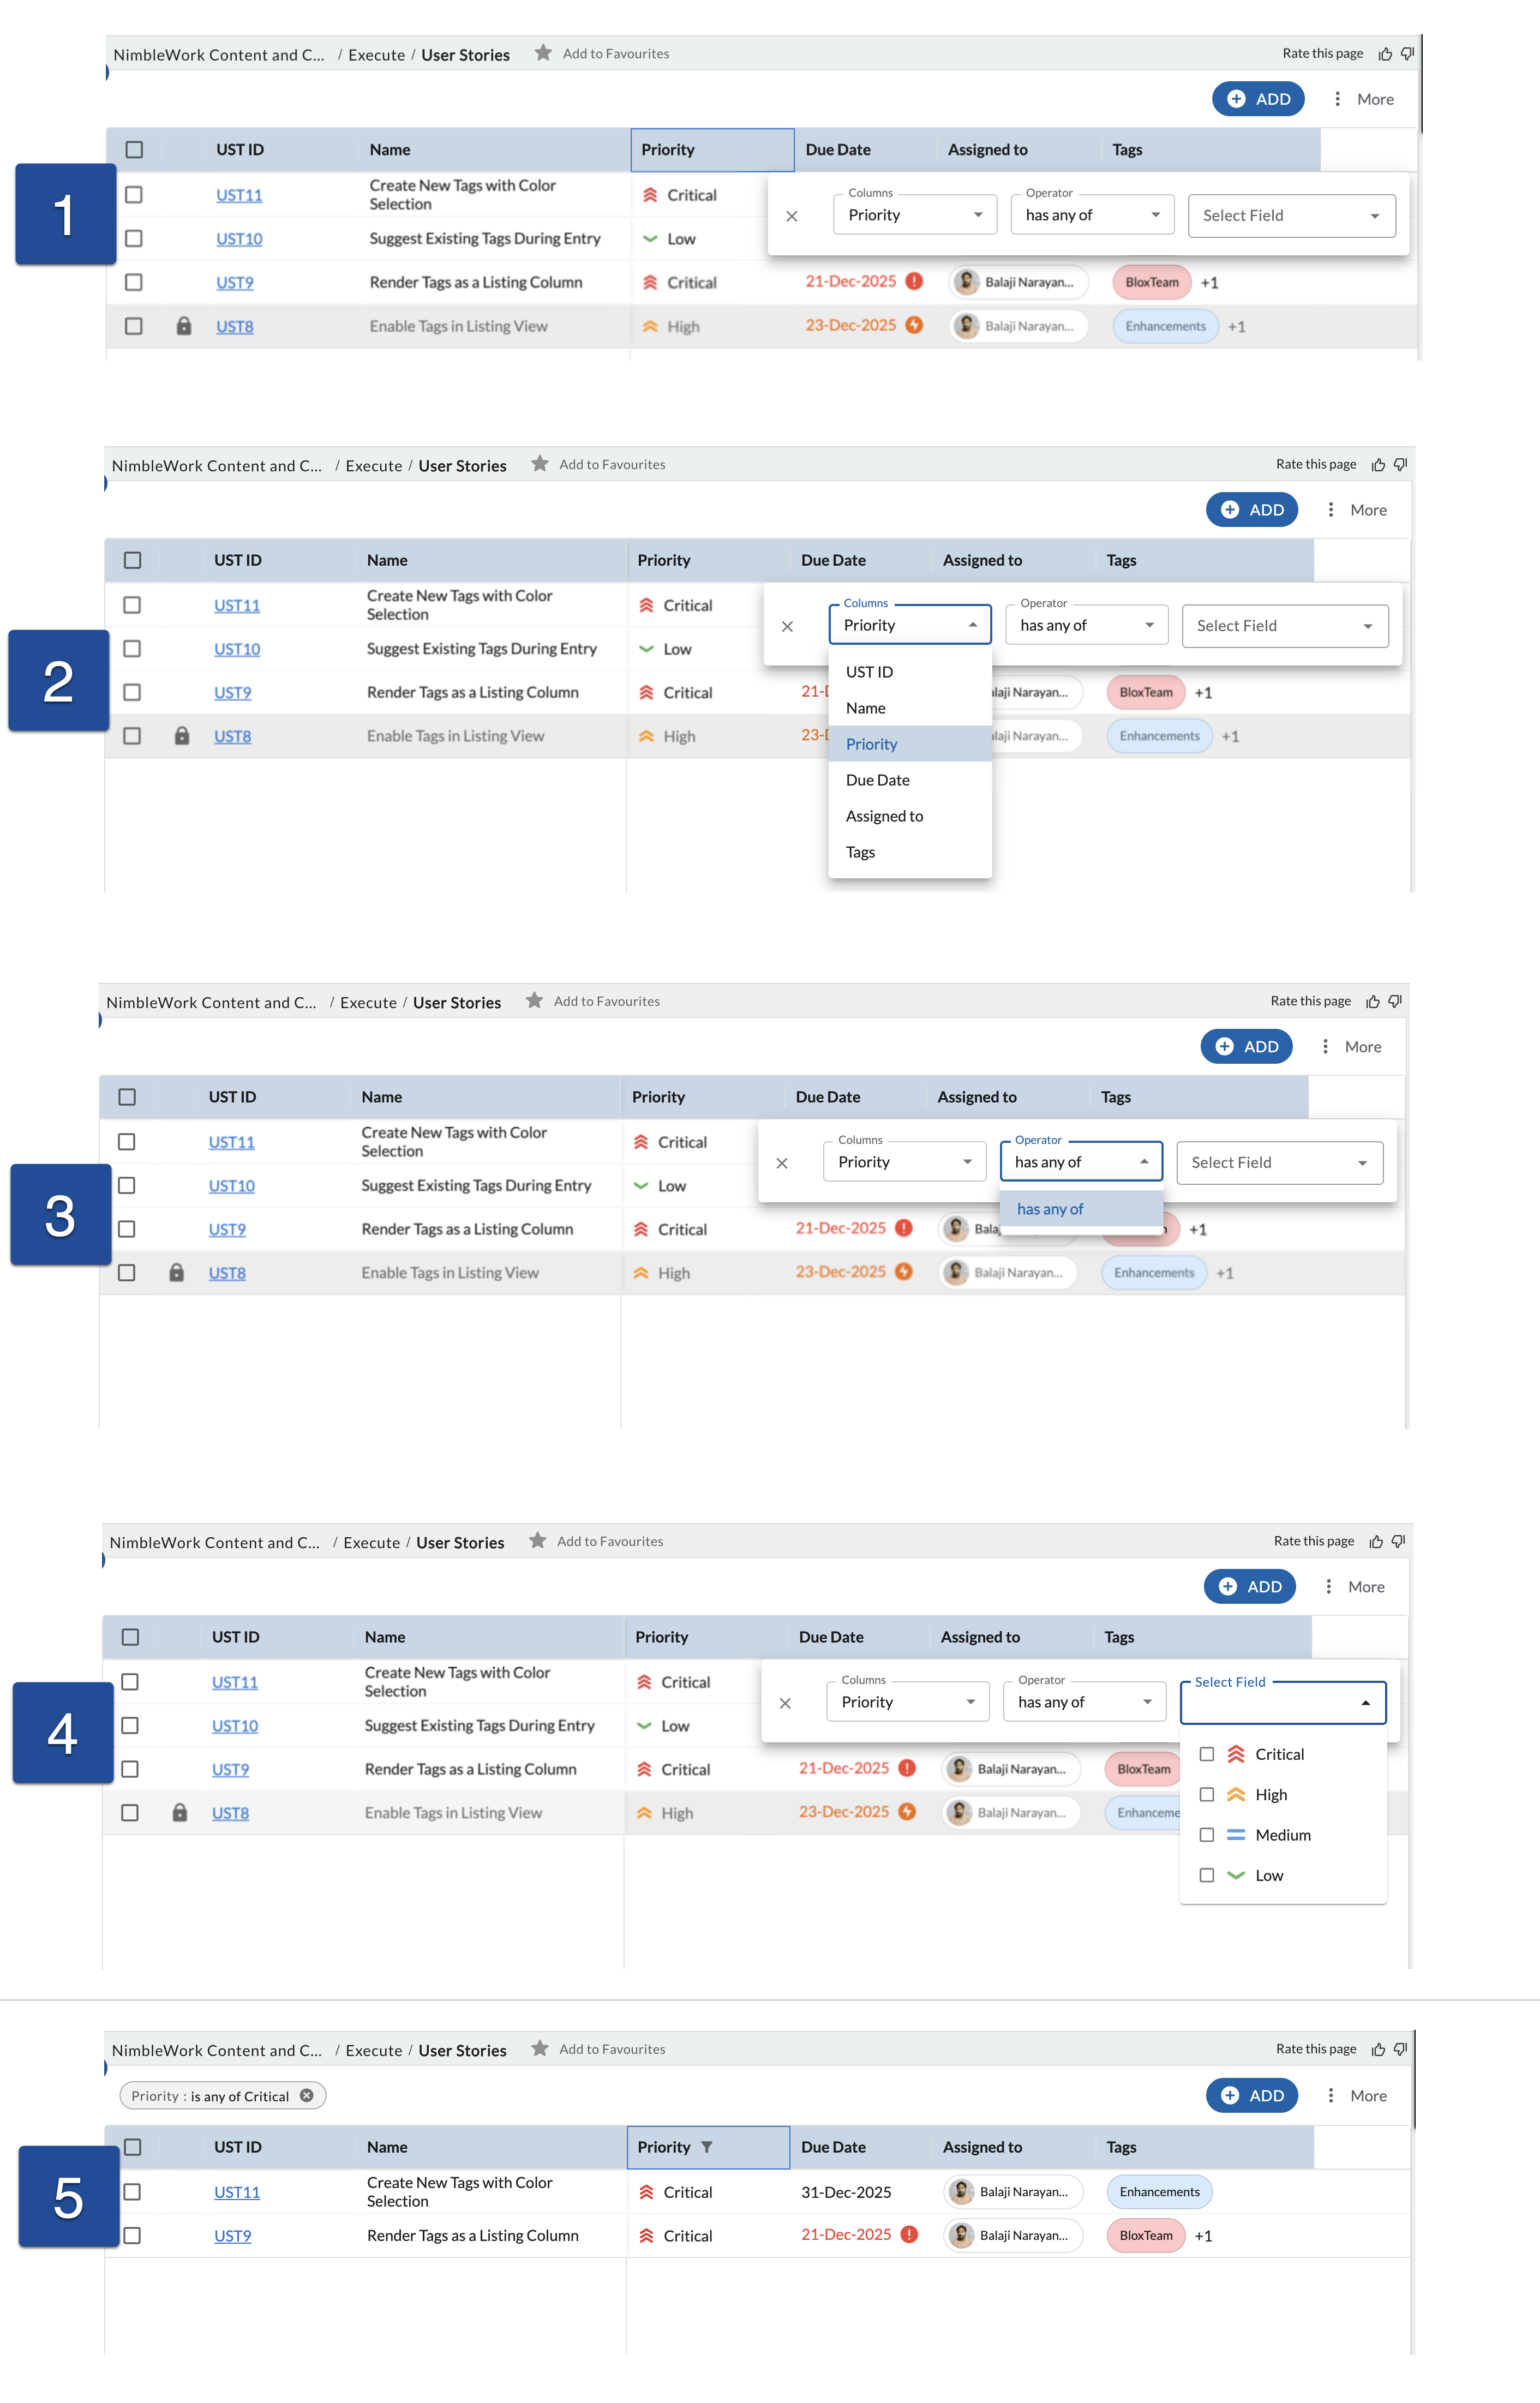
- Hover over any column header in the workitem listing.
- In the column header:
a. Click the drop-down arrow.
b. Select Filter from the menu.
c. The filter panel opens, showing all available columns. - From the Columns drop-down, select the column you want to filter (for example, Priority, Due Date, Tags).
- Choose an operator based on the selected column type.
- Select or enter the required value based on the chosen operator.
- Click anywhere outside the filter panel to apply the filter.
The list view updates to show only the matching workitems. When a filter is applied, a filter icon appears in the column header. Clicking this icon opens the filter options again.
Note: If there are more than 500 instances of a workitem including All and None, then the filter option provides a search box. Enter the value in the search box based on which you want to filter the list and click Apply.
To reset the filter, click the drop-down icon, select Filters, clear the selection for unwanted values, and select new values.
To remove all the applied filters and view all workitems, click the Clear All Filters icon from More Options.
How multiple-column filtering works?
When filters are applied to more than one column, each filter condition applies to a different column in the listing. A connector appears between the filter conditions to define how they work together. You can choose And or Or as the connector. And filters the list to show only workitems that match all the selected conditions, while Or filters the list to show workitems that match any one of the selected conditions.
| And — match all conditions | Or — match any conditions |
|
Use And to show workitems that match every filter condition. Example: Tags is Workitem “And” Priority is Critical Result: Only workitems that have the Workitem tag and a Critical priority are shown. |
Use Or to show workitems that match at least one filter condition. Example: Tags is Workitem “Or” Priority is Critical Result: Workitems that have the Workitem tag or a Critical priority are shown. |
Apply filters on multiple columns
- Apply a filter on the first column.
- Apply a filter on another column.
- Select And or Or between the filter conditions.
- Select the required values.
- Click anywhere outside the filter panel.
Result: The list updates based on the selected option. Active filters appear at the top of the list, and a filter icon appears in each filtered column.
Note: You can switch between And and Or at any time.