Start with the video first to get a better grasp of the topic!
|
Skip Ahead to: Steps to Create Parent-Child Hierarchy Steps to Add Traceability Link Common Options Available in Parent-Child Links and Traceability Steps to Add a Predecessor to a Card |
Overview
Linked Cards help you to set relationships/dependencies between workitems and trace them while working with them. You can set relationships between project items such as Change Requests, Defects, Risks, etc., and link them so as to work in an integrated system.
For example, after you set the relationship between a change request to a defect, you can later trace the origin of a change request and understand the defect which led to the development of that feature. If a project item is modified, the link enables you to study the impact of the changes, and the items affected are identified and changed as required.
You can link an existing workitem or create a new workitem and then link that to the current item. The links can be internal (within the same project) or external (in any other project).
In the Linked Cards segment, we have three options-
Note: “Traceability” is referred to as “Mind Map” for non-software development templates such as Simple Work Management, SEO A/B Testing, Recruitment Process, etc.
Steps to Create Parent-Child Hierarchy
Important:
- To close the parent card, you need to first close all the child cards in the hierarchy below the parent card.
- To re-open a child card, you need to first re-open all parent cards in the hierarchy above the child card.
Linking your cards using the Parent-Child Links option
The application allows defining a parent-child relationship between different cards to define a hierarchy. This can be useful in situations where larger (the parent) cards need to be broken down into several smaller (the child) cards for better planning and execution. This entire Card Hierarchy approach has a highly visual interface that enables linking new child cards and existing cards to parent cards.
The most significant thing about Card Hierarchy is the Drill-down hierarchy such that the progress on the highest level can be tracked down to the smallest level in the hierarchy and vice versa. For example, if an Epic is broken down into Feature and then feature into user stories.
IMPORTANT: Selecting this option lets you link or create new cards across projects.
- Open the (details view of the) workitem.
- Next, click the Linked Cards tab. A parent-child relationship between different cards was created considering the current example is already present under Parent-child Links option.
- The hierarchy view can also be viewed as a list view. On the list view page, you have the option to sort the in ascending or descending order. Cards on the same level defined in the hierarchy get sorted. By default, the workitems are sorted as per the Item ID of the workitem. You can even apply filters to curate and list down only the relevant workitem in the list that you want to view and work upon. On applying filters, using the search-select drop-down, it shows the respective card along with its parent cards in the hierarchy.
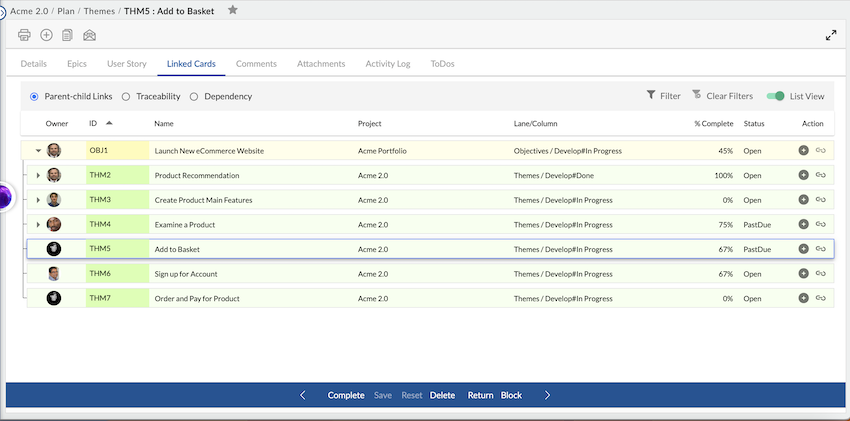
Note: By default, the list view is selected.
In the Parent-child Links option, you can edit a card, and close a card by clicking the Complete button and perform the following actions:
- Add Parent Card
Add New Parent
Add Existing Parent
- Add Child Card
Add New Child
Add Existing Child
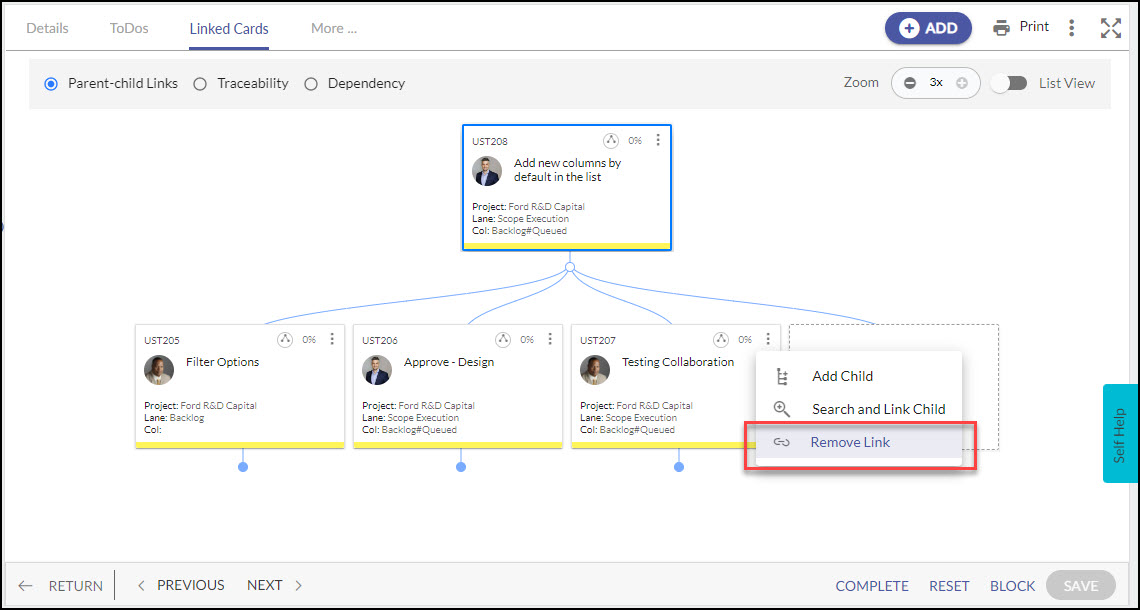
- Remove Link
Steps to Add Parent Card
- Click the More Options icon at the top-most Parent card. To remove the link of the other cards from this parent card, you need to perform the action through its child card.
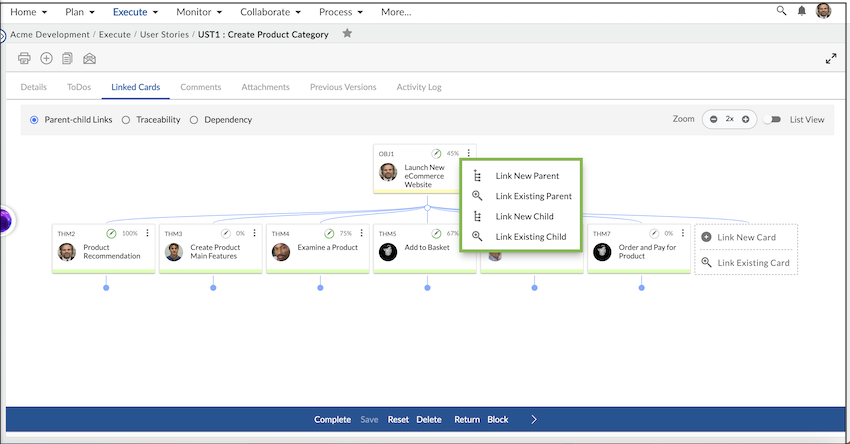
- Select either the Link New Parent option or if you already have cards created, you can use the option Link Existing Parent to add an existing card as a parent card.
- If you select the Link New Parent option, the following options are available. Over here you can select the project and the card type.
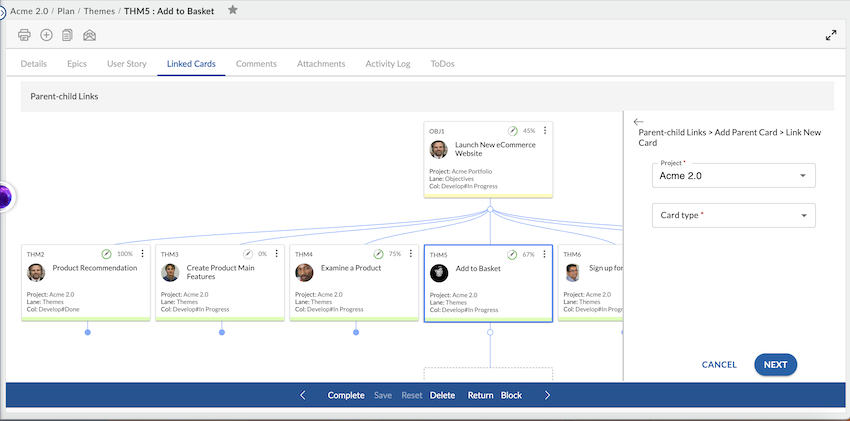
Note: The Project field includes the list of projects for which you are a team member. Only those card types are displayed in the field options for which you have access to create workitems.
- The details tab for the selected Card type opens. Fill in all the required options and click Save. Once done, a new Parent Card gets added.
- If you select the option Link Existing Parent the following screen appears.
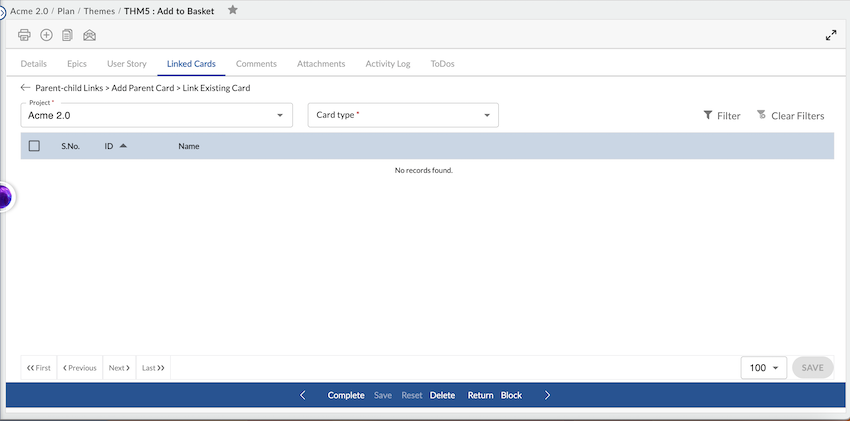
- Select the project (same project or across projects to which you are a team member and have proper access to card types) and then the card type. Once you select the Card type, the screen list down all the similar card types from the selected project. You can select one of the cards as your parent card and click Save.
- The selected card will become the parent card.
- The functionality remains the same even in the list view. On the list view page, you have the option to sort the in ascending or descending order. Cards on the same level defined in the hierarchy get sorted. By default, the workitems are sorted as per the Item ID of the workitem. You can even apply filters to curate and list down only the relevant workitem in the list that you want to view and work upon. On applying filters, using the search-select drop-down, it shows the respective card along with its parent cards in the hierarchy.
Steps to Add Child Card
- This option is available for both Parent as well as Child cards. Select either the Add New Child option or if you already have cards created, you can use the option to Add Existing Child your cards to this parent card.
- If you select the Add New Child option, the following options are available. Over here you can select the project and the card type.
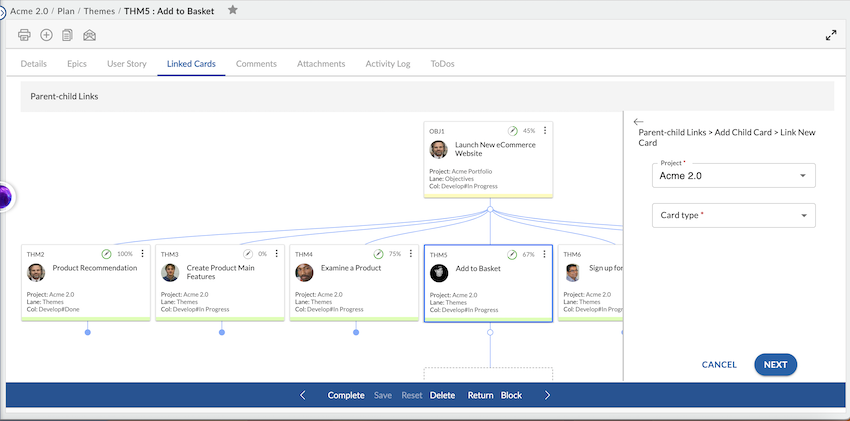
Note: The Project field includes the list of projects for which you are a team member. Only those card types are displayed in the field options for which you have access to create workitems.
- The Details tab for the selected Card type opens. Fill in all the required options and click Save. Once done, a new Child Card gets added.
- If you select the option Add Existing Child the following screen appears.
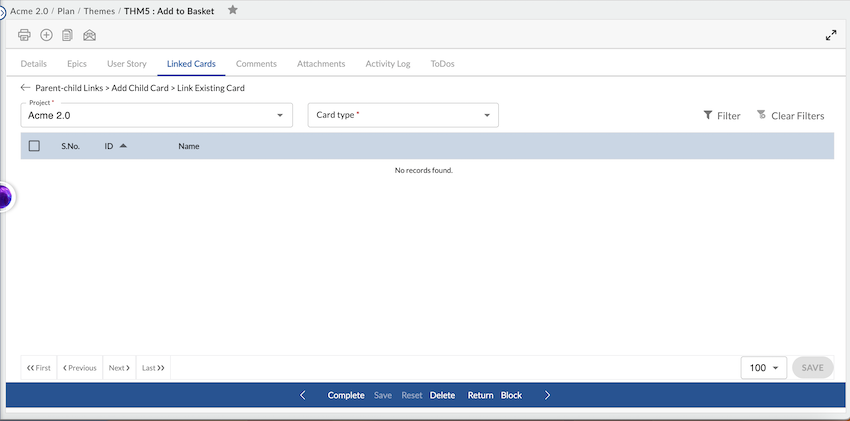
- Select the project (same project or across projects to which you are a team member and have proper access to card types) and then the card type. Once you select the Card type, the screen list down all the similar card types from the selected project. You can select one of the cards as your parent card and click Save.
- The selected card will become the parent card.
- The functionality remains the same even in the list view. On the list view page, you have the option to sort the in ascending or descending order. Cards on the same level defined in the hierarchy get sorted. By default, the workitems are sorted as per the Item ID of the workitem. You can even apply filters to curate and list down only the relevant workitem in the list that you want to view and work upon. On applying filters, using the search-select drop-down, it shows the respective card along with its parent cards in the hierarchy.
IMPORTANT INSTRUCTIONS:
- If you want to close a parent card in its hierarchy, you need to first close all child cards in the hierarchy below that parent card. Certain validations/behaviors are present on the child cards that cannot be overridden for their closure.
- Once you close a card, the operation may take time to complete successfully. You will receive an email once the card is closed.
- If you want to re-open a child card in its hierarchy, you need to first re-open all parent cards in the hierarchy above that child card as there are certain validations/behaviors that are linked to each other.
Steps to Add Traceability Link
Note: “Traceability” is referred to as “Mind Map” for non-software development templates such as Simple Work Management, SEO A/B Testing, Recruitment Process, etc.
To add a Traceability Link to a new item:
- In the Linked Cards tab of a selected card at the center, select the Traceability option and click More Options you have got two options: Link New Card and Link Existing Card.
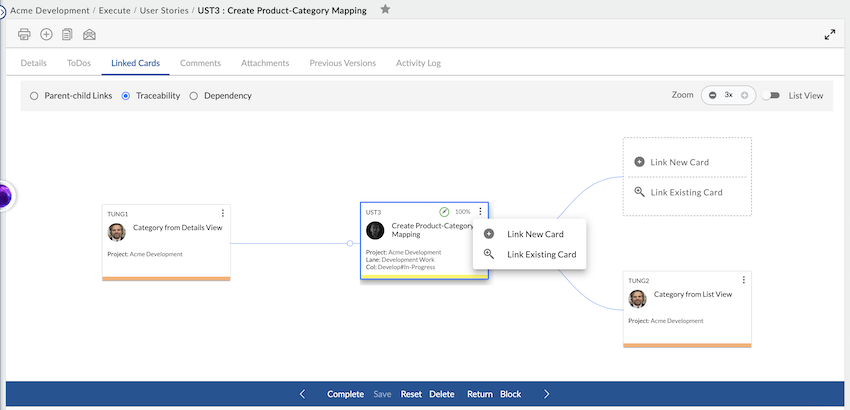
- If you select the Link New Card option, the following options are available. Over here you can select the project and the card type.
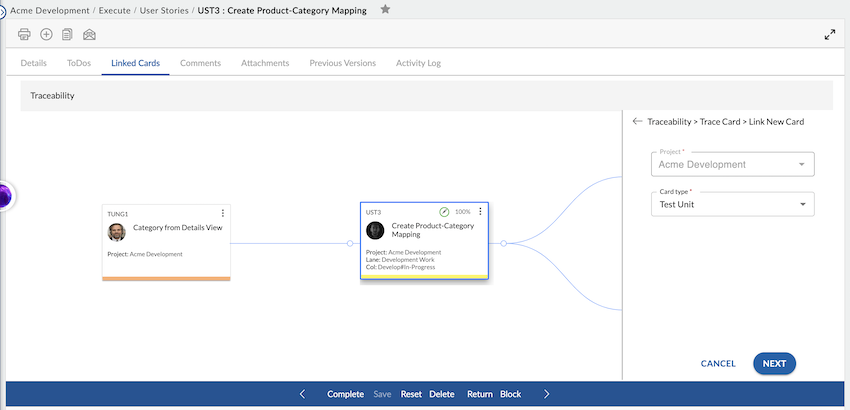
- In the Details tab of the selected card type, enter the details and click Save.
- The other option is Link Existing Card. On selecting this option, the following window opens in which you can select the project (current project or across the project in which you have access to create card types).
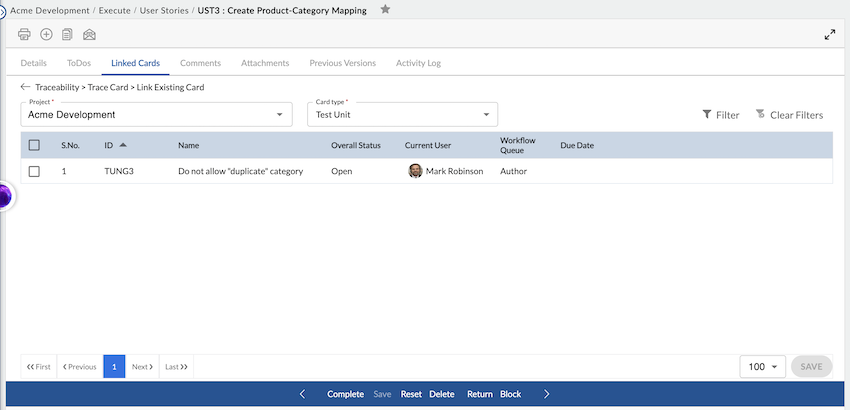
- Select the cards that you want to link from the project and click Save.
- The new card gets linked to the selected card as highlighted below.
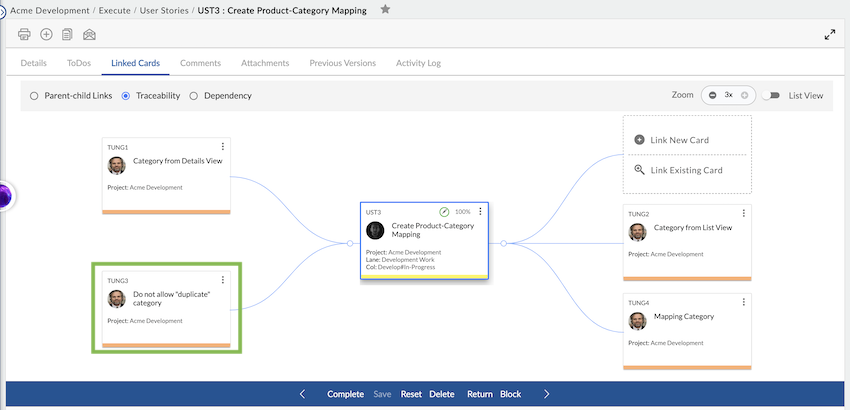
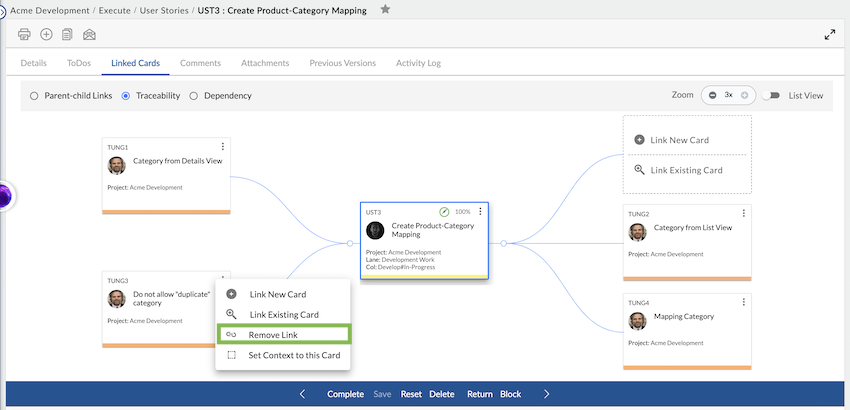
- From the same window, you can even add a new card to the other cards or remove the link.
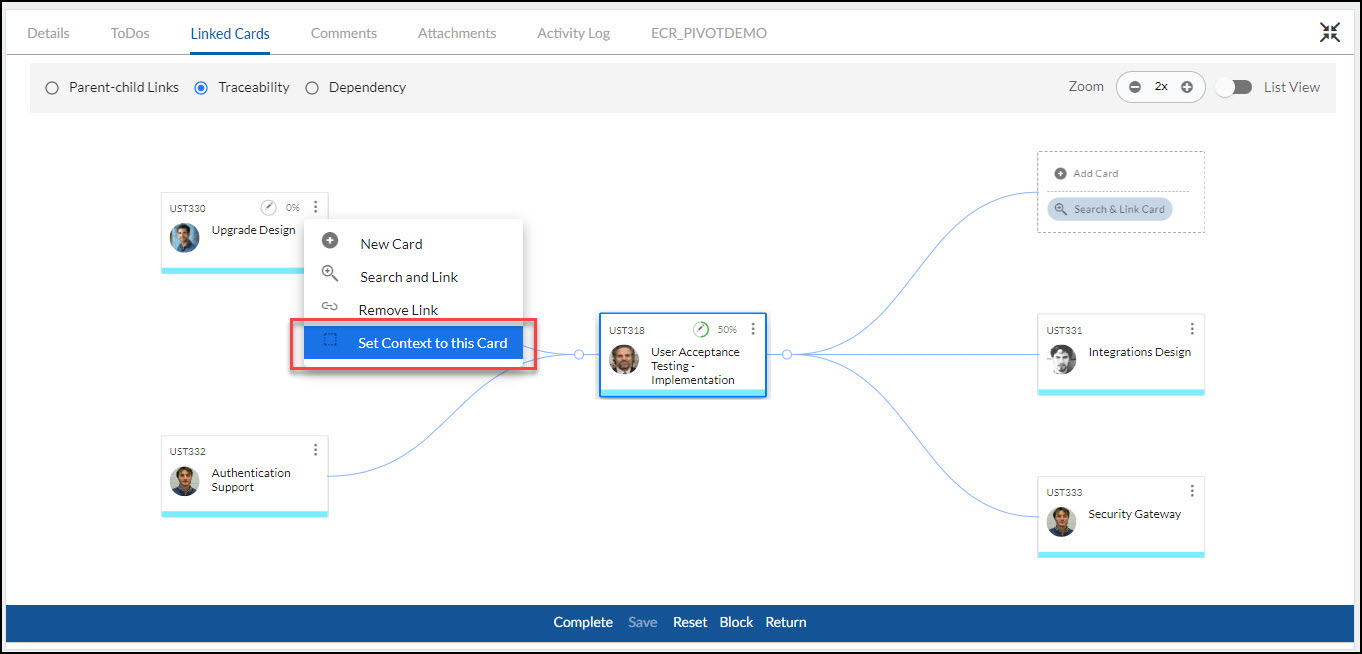
- Now, if you want to check if the new card has got added as a link to this card, select the option Set Context to this card. This option lets you make any card present in your traceability screen as a center point and check its traced items. For example, we added new cards to ATST3. If you want to check the trace of ATST3 or the cards linked to ATST3 at the immediate level, select Set Context to this Card option, and the following screen is displayed.
- The last option available is Remove Link. Selecting the Remove Link option will simply remove an existing link between two cards and they won’t be linked in the Traceability option.
Common Options Available in Parent-Child Links and Traceability
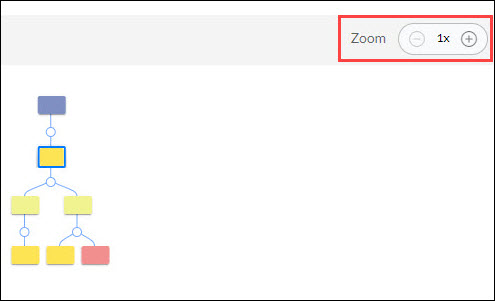
Zoom feature – You can select from 1x to 3x zoom for viewing the hierarchy. This option is not available in List View.
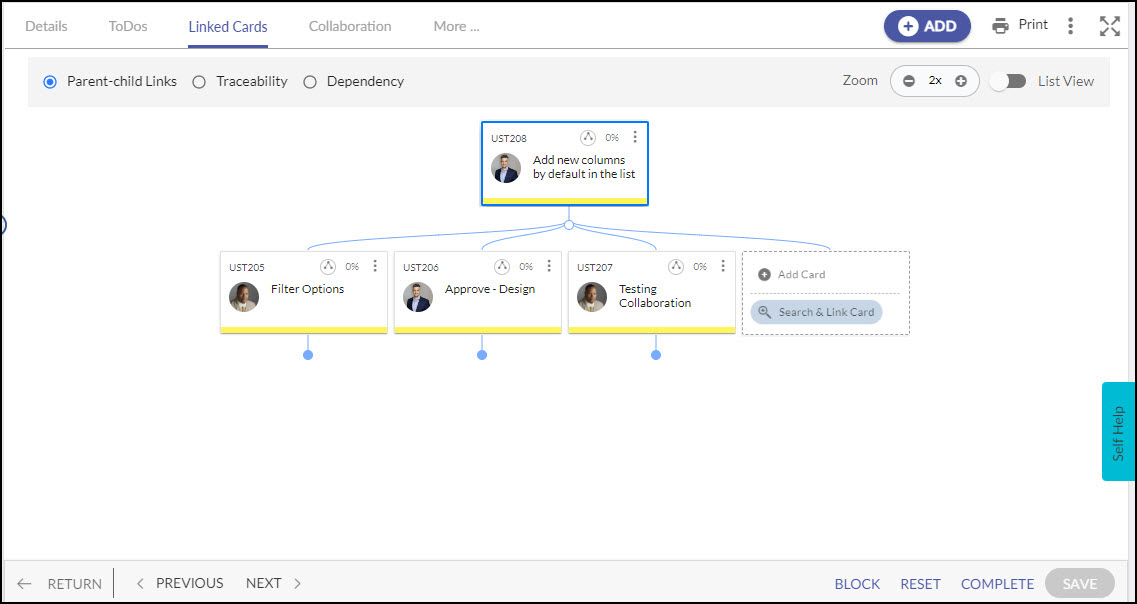
- 2x View: You can view, the Percent complete of the card along with the Card Name and Owner (in the case of multiple card owners the count is mentioned on the card).
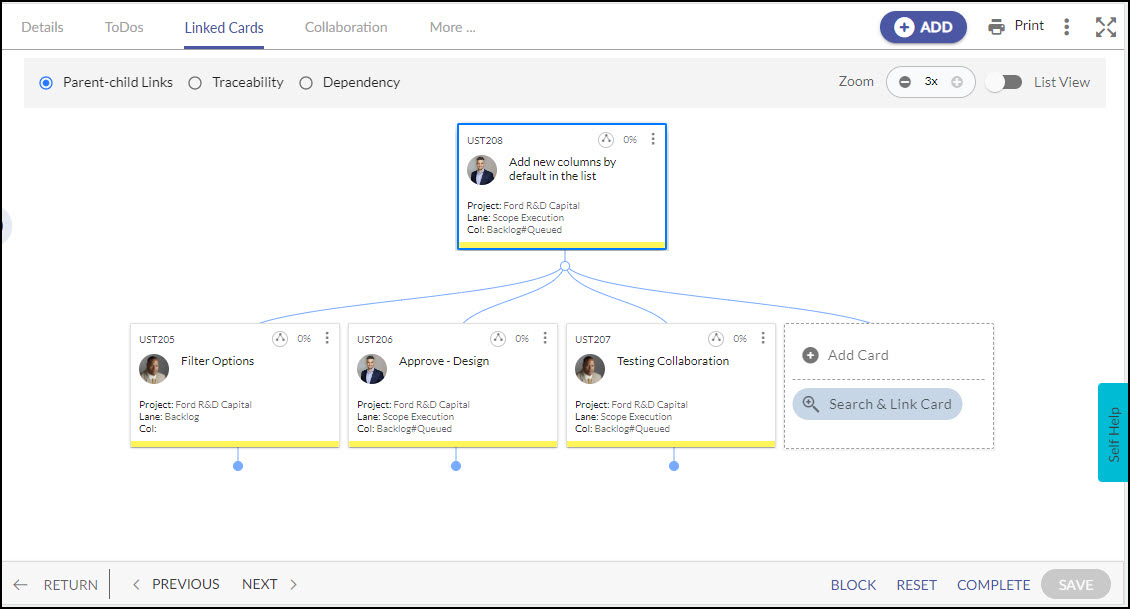
- 3x View: In this view, if a card is tagged to other projects, you can check the details available in the 2x view along with the Project Name, Lane, and column in which the card belongs. If a card is tagged to the same project, you can check the details available in 2x view along with the Project name. For more information, check the following screenshot.
Viewing Progress on Card (Only Available under Parent-child Links option): The Percent Complete icon on the card provides you with the progress of your card. There are 3 icons available that help you to understand the preference settings on the Card Percent Complete attribute as shown below.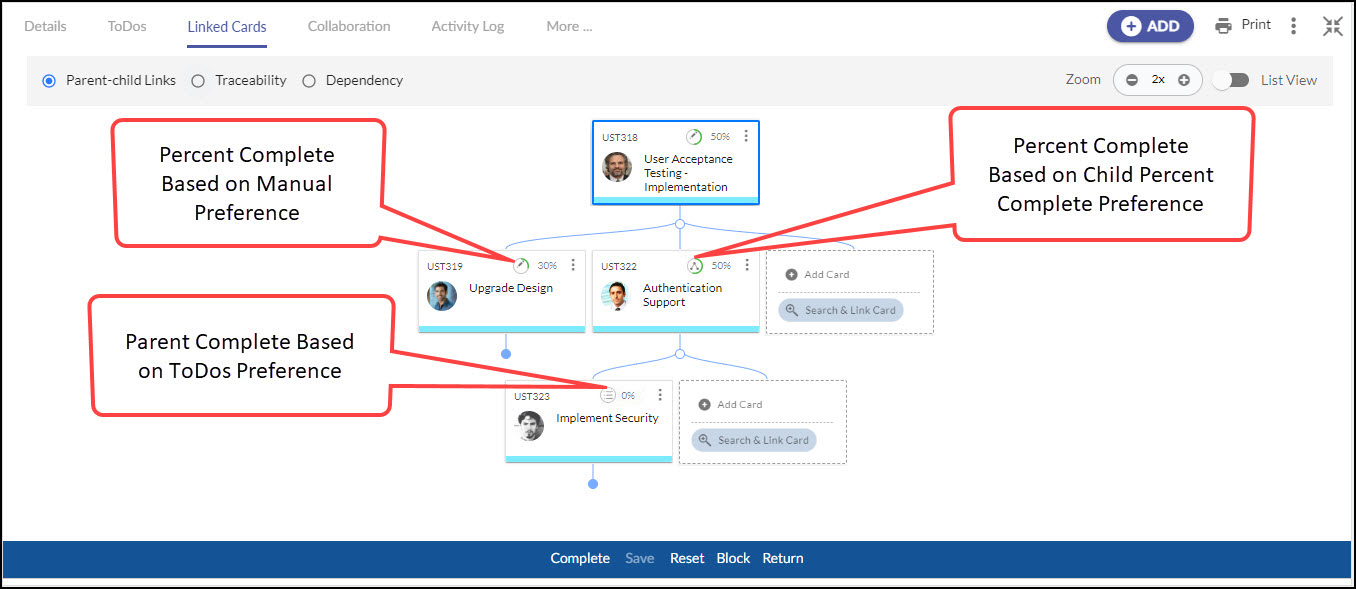
Hide Add Cards (Only available for parent-child cards)
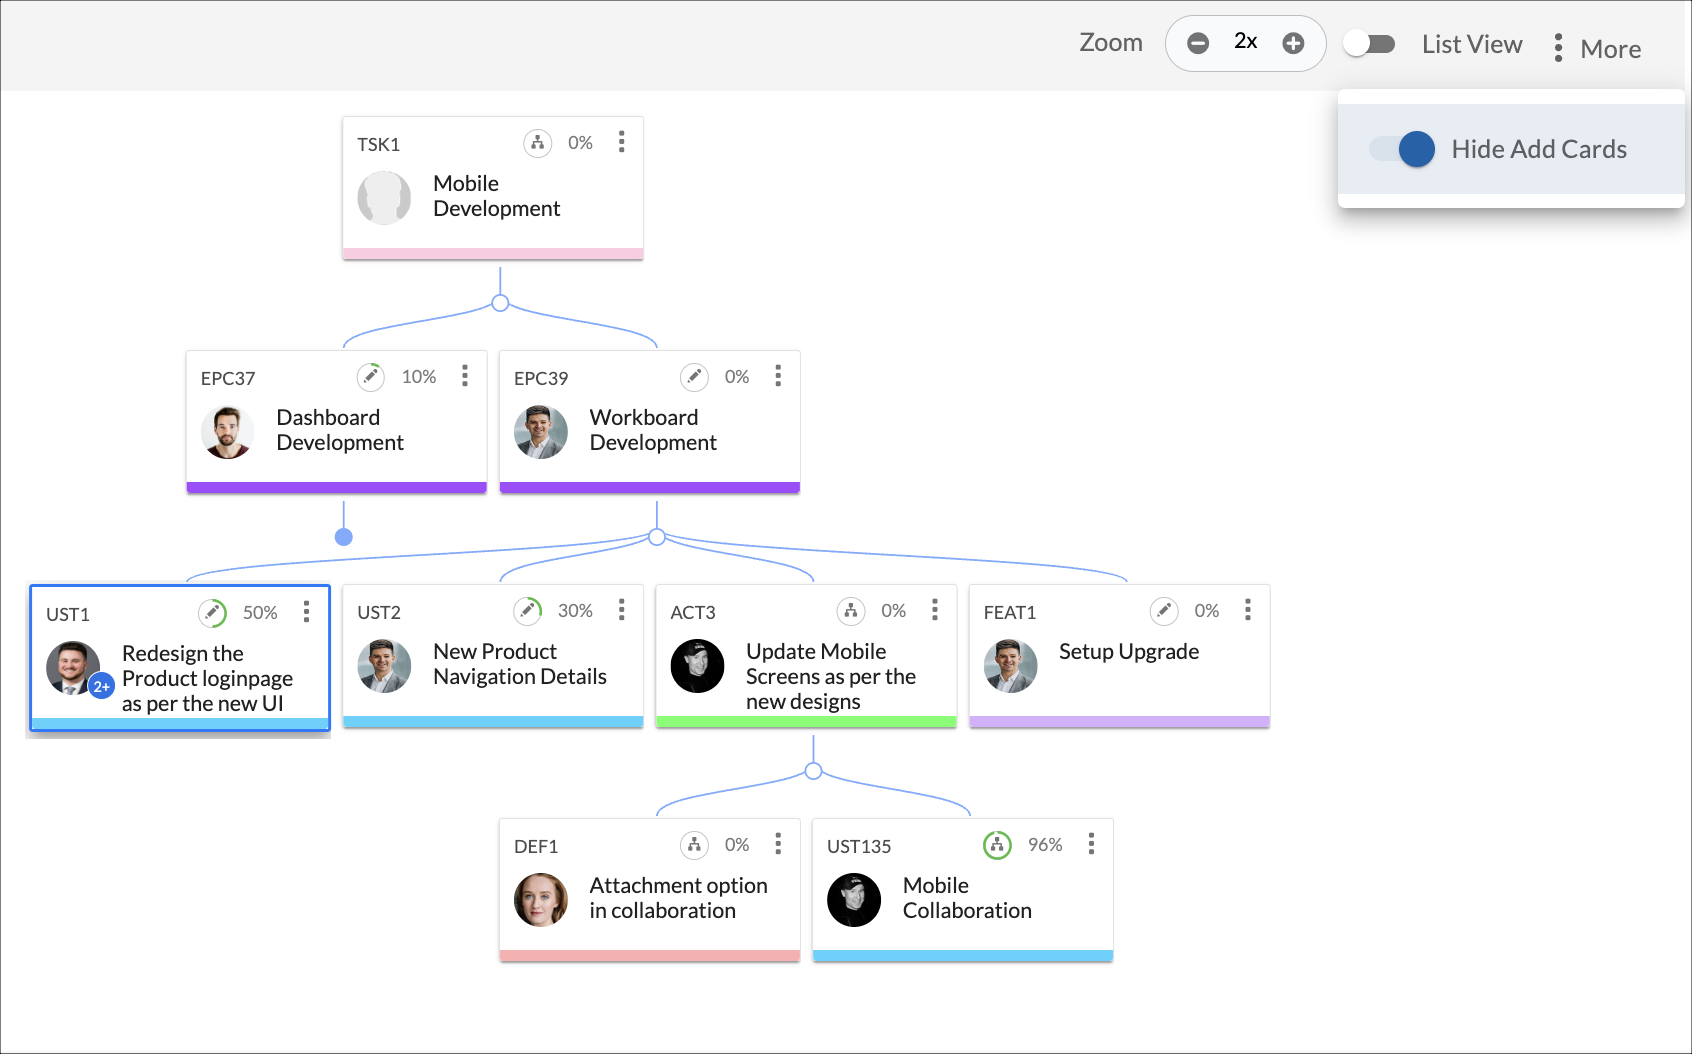
The Hide Add Cards option is available under the More option on the top-right corner of the screen. This helps you hide the empty placeholders from each level and card of the hierarchy so that you can see the cards in the hierarchy clearly.
Working with Dependency Tab
While working on multiple projects, you might want to keep track of workitems that are spread across multiple projects and dependent on each other for their completion. The Dependency View of a card helps users see the dependency of a card on other cards as well as the dependency of other cards on a particular card in the form of dependency links. The card whose dependency is being shown is highlighted with a blue color border.
Note: The Dependency tab is only available for software templates.
The Dependency tab facilitates you to see the dependency between cards in a graphical view as well as a list view. Moreover, you can use the Zoom feature to view different card size views, which persists across sessions.
The first zoom level shows only the card color set as per the card type, on hovering over it, you will see the card ID and card title. The Second level zoom level displays card ID, card title, Profile Pic, and top-level icons. The third zoom level displays the card ID, card title, Profile Pic, top-level icons, the current project, board lane, and board column.
Dependency in Graphical View
In the graphical view, the dependency between cards is shown in a grid where the top row shows the types of cards under which each card is placed according to their card type. Similarly, in the side column on the left, the name of the owners is shown. If a card has multiple owners, then the first owner (whose initials or profile pic is shown on the card) is shown here.
The card whose dependency is open is highlighted in blue color. The dependency between cards is represented by the dependency link where the dependent card is called the Successor and the card on which the successor card is dependent is called the Predecessor. The arrow of the dependency link derives from Predecessor towards Successor.
The color of the dependency icon and the link is decided according to the given conditions –
1. If a workitem has no dependency links (relations) with any workitem, then the color of the dependency icon on this workitem will be grey in color.
2. If a workitem has a dependency on a workitem and any of the four fields (Done date, Due date, Sprint date, and Release date) are available on both the workitems (predecessor and successor), then the color of the dependency links and icon on both the workitems will be decided by comparing the dates of the following fields on the workitems in the given order:
- If the Done date field on the predecessor and successor workitems has any date in it, then the Done date of both the workitems are compared.
- If no date is available in the Done date field of the Predecessor and Successor workitems, then it will look for and compare the dates entered in the Due date field of Predecessor and Successor workitems.
- If no dates are available in the Due date field of the Predecessor and Successor workitem, then it will look for and compare the dates entered in the Sprint field of the Predecessor and Successor workitems.
- If no dates are available in the Sprint filed of the Predecessor and Successor workitems (i.e., workitems are not tagged to any sprint), then it will look for and compare the dates entered in the Release filed of Predecessor and Successor workitems.
Similarly, if one workitem’s Done date is available and the other workitem’s Done date is not available then it will compare the first workitem’s Done date with the second workitem’s Due date. Likewise, if the second workitem’s Due date is also not available then it will compare the first workitem’s Done date with the second workitem’s Sprint date and so on. The same is applicable to the availability of the fields on the first workitem.
Now, if the value of a predecessor field is before the value of the successor field then it is an ideal scenario and hence the color of the dependency icon and dependency links between the cards is green. If the value of a predecessor field is after the value of the successor’s field then the color of the Dependency icon and links will be red.
3. If there are dependency links (relation) on a workitem, and the value of any of the fields (Done date, Due date, Sprint date, and Release date) is not available then the dependency icon and link color will be green.
4. If there are multiple dependency links on a workitem and any of them is red then the dependency icon on the workitem will be red.
5. If all the dependency links on a workitem are green then the dependency icon will be green.
Dependency in List View
One can see the same dependency among the cards in the List format also. To view the cards in that format, click the List View icon. The List view screen has two tabs, each listing the predecessors and successors of the card in this format:
<CARD ID> PREDECESSORS and <CARD ID> SUCCESSORS.
As the name shows, <CARD ID> PREDECESSORS lists all the predecessors of the card. Similarly, <CARD ID> SUCCESSORS lists all the successors of the card.
Clicking on any card on either screen (graphical view or list view) opens the card in a Detail view.
On the list view page, you have the option to sort the in ascending or descending order. By default, the workitems are sorted as per the Item ID of the workitem. You can even apply filters to curate and list down only the relevant workitem in the list that you want to view and work upon.
Steps to Add a Predecessor to a Card
No matter whether you are in a graphical view or list view, you can add a new predecessor to a card using the Options icon under the Action column icon. You can add a new card as a predecessor to a card or search and add an existing card.
To add a new predecessor to a card, perform the following steps –
- Click the Options icon on the card to which you want to add a predecessor.
- Click Add Predecessor.
- Select Board, Card Type, and Board Lane/Column.
- Enter the card title and description.
- Click Save.
To add an existing card as a predecessor to a card, perform the following steps –
- Click the Options icon on the card to which you want to add a predecessor.
- Click Search and Link Predecessor.
- Select Board and Card Type.
- Select the card from the list of cards shown below. You can also filter cards by clicking the Filter icon on the right side.
- Click Save.
Steps to Add a Successor to a Card
To add a new successor to a card, perform the following steps –
- Click the Options icon on the card to which you want to add a successor.
- Click Add Successor.
- Select Board, Card Type, and Board Lane/Column.
- Enter the card title and description.
- Click Save.
Adding an existing card as a predecessor to a card
To add an existing card as a successor to a card, perform the following steps –
- Click the Options icon on the card to which you want to add a predecessor.
- Click Search and Link Successor.
- Select Board and Card Type.
- Select the card from the list of cards shown below. You can also filter out cards by clicking the Filter icon on the right side.
- Click Save.
Steps to Remove Dependency Link
To remove a dependent, perform the following steps –
- Click the Options icon on the dependent card.
Note: You cannot remove a link from the highlighted card. - Click Remove Link.
The dependent card will be removed from the highlighted card.
See the Dependency Links of other Highlighted Cards
You can also see the dependency links of other cards that are present on the Dependency screen by setting them as highlighted cards. This will open the dependency screen of the selected card and take you to their screen.
- Click the Options icon of the card on which you want to see the dependency links.
- Click Set Context to this Card.
The card will be set as the highlighted card and its dependency links will be shown on the screen.

