
Overview
Using the Default Tasks elements-Practices, Phases, and Standard Activities, defined in the Process Governance, the Process Team designs a Framework in a Process Template. When managers create projects from a template, the Process Framework is inherited in the project under the Default Tasks.
Project Managers can also create a Framework for their projects that is not based on any process templates.
The Default Tasks provide you with a holistic view of your practices, phases, and standard activities, and their association with each other on a grid. It comes with Process Framework capabilities that help you perform different operations like adding, modifying, splitting, and deleting these workitems (practices, phases, and standard activities) on the grid.
Navigation
Navigate to the breadcrumb at the top, and hover over the Project name, expand the Configure module, and select Default Tasks.
Practices
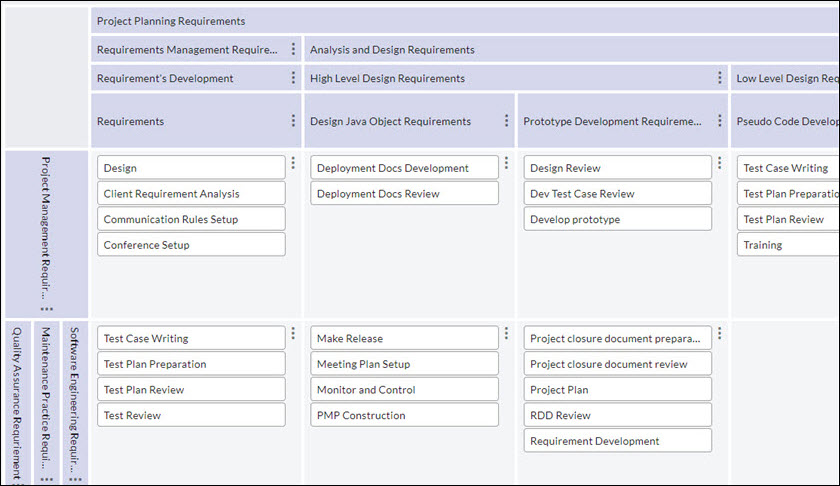
Practices are shown vertically in the grid. One row of a grid represents one practice. You can perform the operations on a practice by clicking the overflow icon on a practice. If a practice has sub practices then the sub practices are shown in a row adjacent to the existing one. For example, if a practice of Software engineering has four sub practices, then the four sub practices are shown in a hierarchy as shown in the given diagram.
You can perform the following operations in practice –
Add – This option will appear if you have not created any practice on the grid. Once you create a practice, you will see the Edit option there. You can add one or more practices, organized around various process areas such as Software Engineering, Quality Assurance, etc. You can organize these into a hierarchy structure i.e. a sub-practice within another practice. For new practices, you can add phases and activities.
To add a practice, click the More Options icon and select the ADD option.
If your project is based on a process template and the ADD icon is not available, it indicates that the Tailoring Guideline is set to disallow custom practices in the project.
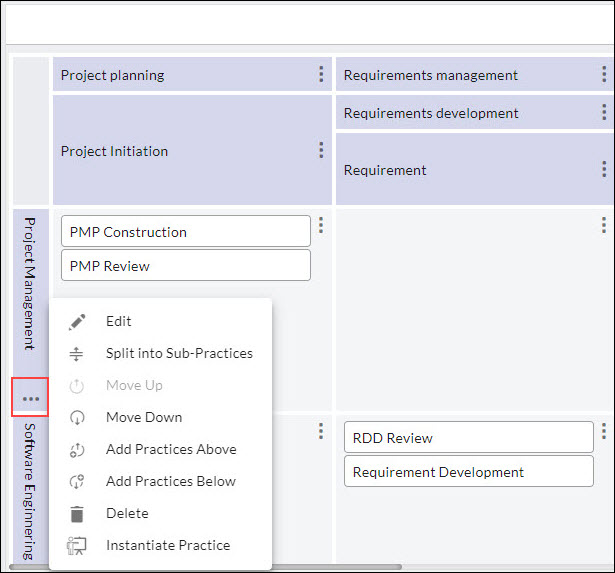
Edit – The Edit option allows you to modify the details of practice.
Split into Sub-practices – This option allows you to split a practice into multiple practices. The existing row of practice is divided into two or multiple rows to be renamed as sub-practices.
Move Up – Click this option to shift a practice one row up. Moving the practice will reorder all the practices and activities in it.
Move Down – Click this option to shift a practice one row down.
Add Practice Above – Click this option to add a practice above the existing practice.
Add Practice Below – Click this option to add a practice below the existing practice.
Delete – Click this option to delete the selected practice. Deleting a practice removes the corresponding phases and/or activities associated with it.
Instantiate Practice – This option allows you to convert the practice (including the sub-practices, phases, and activities under it) into tasks and sub-tasks.
Phases
Phases are shown horizontally in the grid where one column represents one phase. You can perform the operation on a phase by clicking the overflow icon on a phase. If a phase has sub-phases, then the sub-phases are shown in a hierarchy wrt to the parent phase. For example, if a phase Analysis and Design is split into two sub-phases – High-Level Design and Low-Level Design then these sub-phases are shown in a hierarchy as shown below –
If a practice is associated with multiple phases, then these multiple phases can be seen in the columns of that practice row where each column represents a phase.
You can perform the following operations in practice –
Add – This option will appear if you have not created any phase on the grid. Once you create a phase, you will see the Edit option there. You can add phases in practice, such as the Initiation Phase, Design Phase, etc. You can organize these phases into a hierarchy structure i.e. a sub-phase within another phase, for example, Structure Design and Content Architecture Design under the Design phase.
If your project is based on a process template and the Add icon is not available, it indicates that the Tailoring Guideline is set to disallow custom phases in the project.
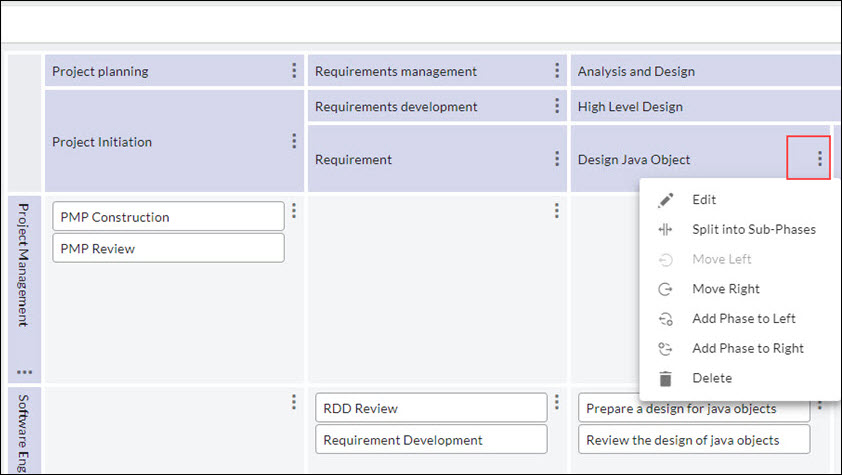
Edit – Edit option allows you to modify the details of a phase.
Split into Sub-phases – This option allows you to split a phase into multiple phases. The existing column of a phase is divided into two or multiple columns to be renamed as sub-phases. All the activities associated with a phase are hidden by splitting a phase.
Move Left – Click this option to shift a phase to the left side. Moving the phase will reorder all the phases and activities associated with it.
Move Right – Click this option to shift a phase to the right side.
Add Phase to Left – Click this option to add a phase to the left of the existing phase.
Add Phase to Right – Click this option to add a phase to the right of the existing phase.
Delete – Click this option to delete the selected phase. Deleting the phase removes corresponding activities associated with it.
Note: If you split a practice or phase into sub practices or sub-phases, they can’t be merged back into one.
Standard Activities
Standard Activities are shown in the cell (in the combination of practices and phases) to show their association with the practices and phases.
Important Points:
- If phases are not associated with a practice, then you cannot add standard activities in that particular practice.
- If certain activities/phases are associated only with the parent practice then these standard activities or phases are not seen in the grid against its sub-practices.
- If certain standard activities are associated only with the default phase, then these activities are not seen in the grid.
You can perform the following operations on a standard activity-
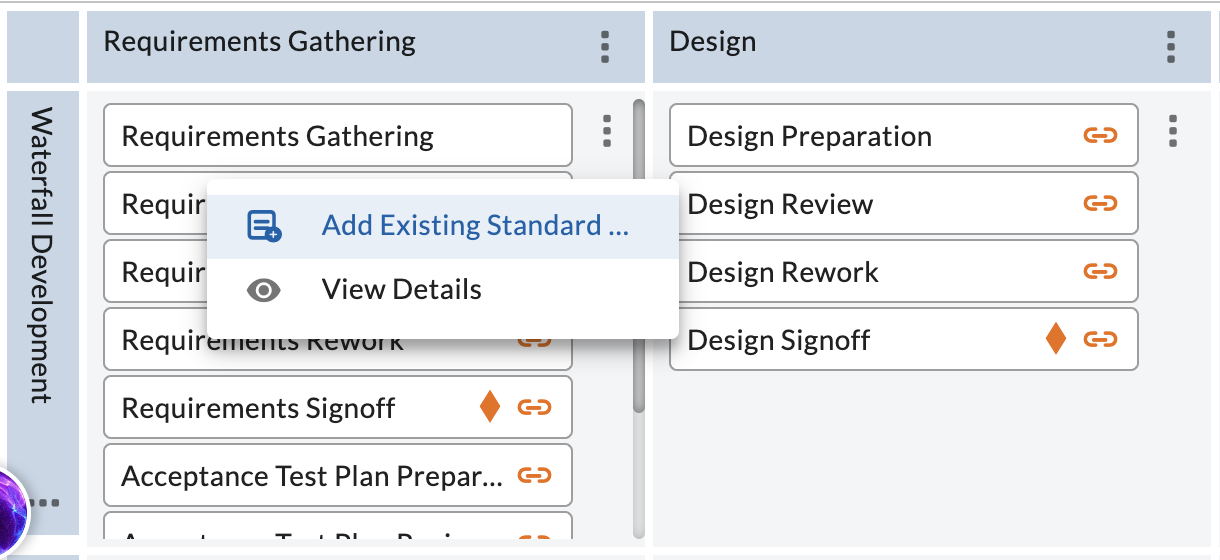
Add Existing Standard Activity
It allows you to add standard activities to the matrix from the existing available standard activities.
To add an existing standard activity to the Default Tasks, perform the following steps –
- Click the More Options icon in the cell.
- Select the Add Existing Standard Activity option and select the standard activity that you want to add.
- Click the Add button.
View Details
It allows you to view the details of the standard activities in the cell. You can also perform the following operations on the standard activities.
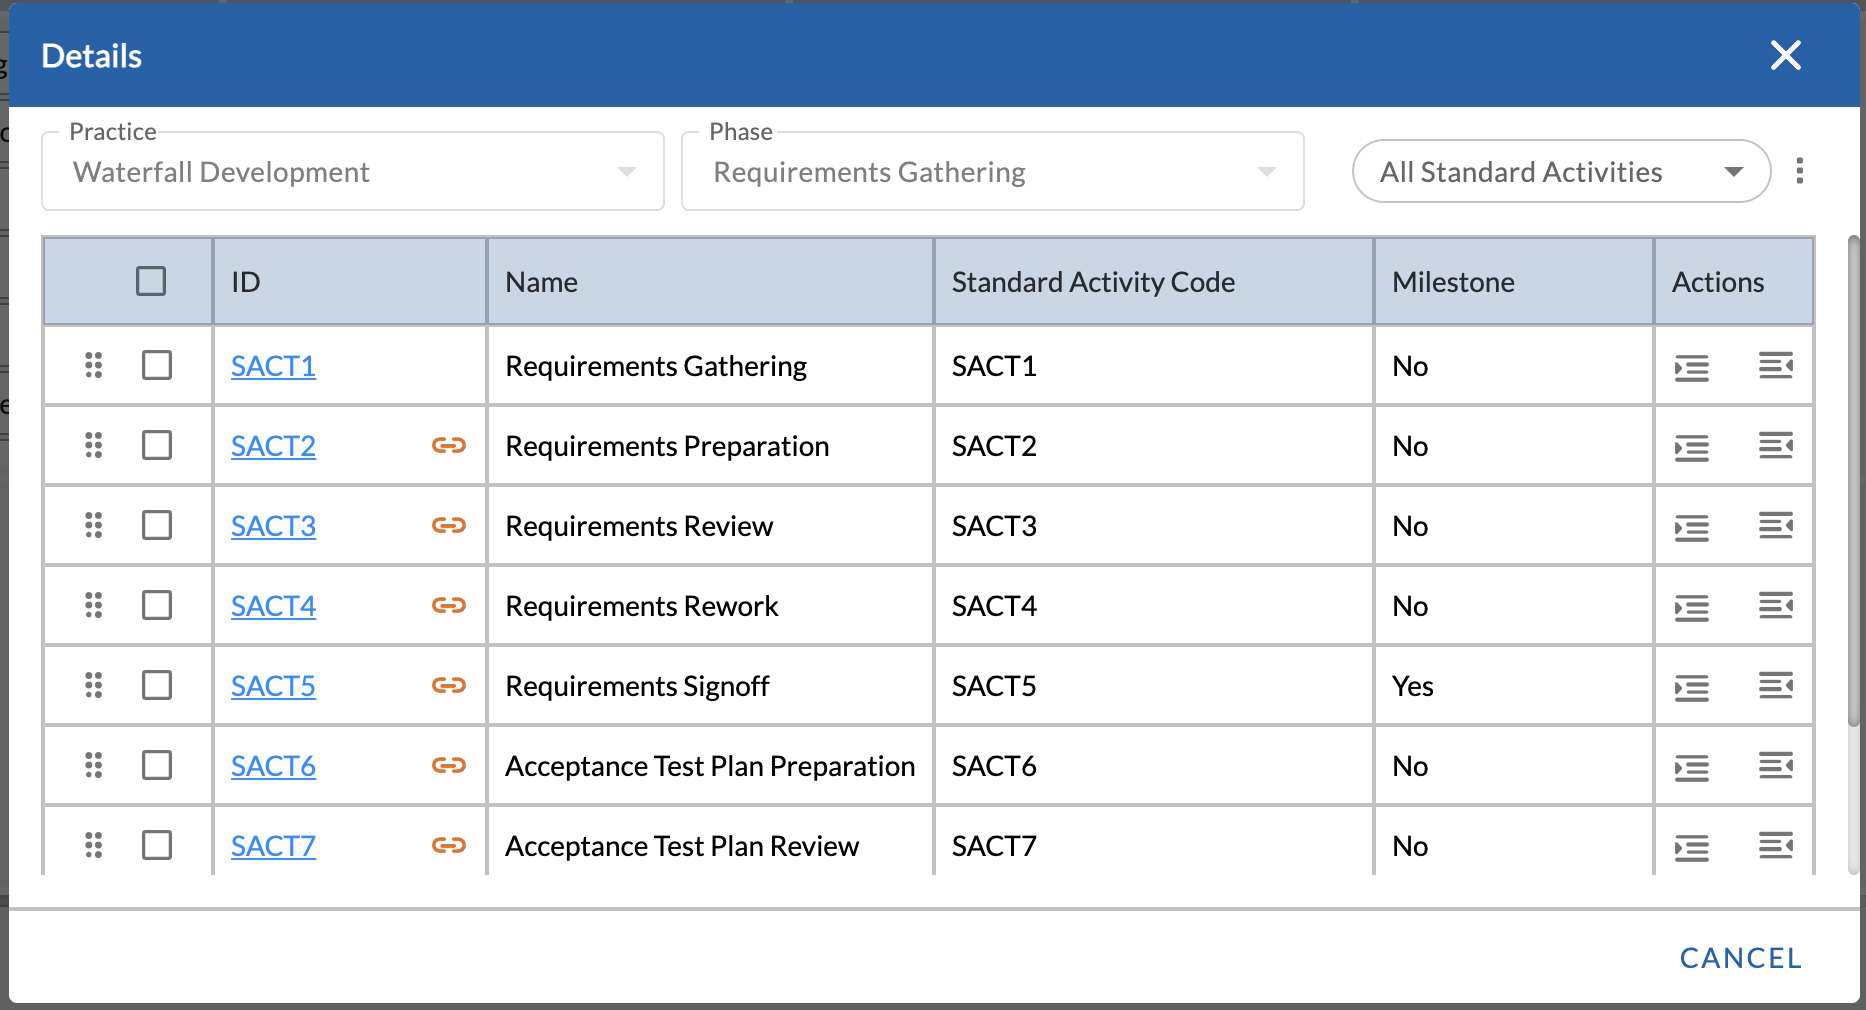
Indent – Indenting a standard activity set it as the child of the above standard activity. To indent the standard activities, select the checkboxes in the list, click the More Options icon, and select the Indent option. You can also select the standard activity in the list and click the indent icon in the row under the Action column.
Outdent – Outdenting a standard activity moves it one level towards the outside so that it is set as the parent of its below standard activities. To outdent the standard activities, select the checkboxes in the list, click the More Options icon, and select the Outdent option. You can also select the standard activity in the list and click the Outdent icon in the row under the Action column.
Link Activity – This option allows you to link this standard activity with another standard activity. When a standard activity is linked with another standard activity, the Link icon is shown on the standard activity in the list as well as on the grid.
Delink Activity – This option allows you to break the existing link of the standard activity. On delinking the standard activity, the Link icon disappears.
Mark as Milestone – To mark a standard activity as a milestone, select the standard activity check box, click the More Options icon, and select the Mark as Milestone option.
You can define standard activities as milestones in a phase, which are converted into milestone tasks in the project. The corresponding Task has the Category attribute as ‘Milestone’. Thereafter, the behavior of these milestone tasks is similar to the ‘Milestone’ that is added from project Task Module MSP/STaRT. A milestone activity is denoted by a black diamond shape icon against the activity name.
Delete – To delete a standard activity, select the check box, click the More Options icon and select the Delete option.