
Start with the video first to get a better grasp of the topic!
|
Skip Ahead to: |
Overview
Under Backlog Refinement, the second section is Groomed Backlog. It displays the workitems that are groomed and are ready to be moved ahead for sprint allocation. All these workitems are represented in the form of a pie chart based on the workitem type.
Note: The Groomed Backlog section of Backlog Refinement will have the same fields as available in the respective workitem listing.
 |
Navigation
Navigate to the breadcrumb at the top, hover over the Project name, expand the Plan module, and select Backlog Refinement.
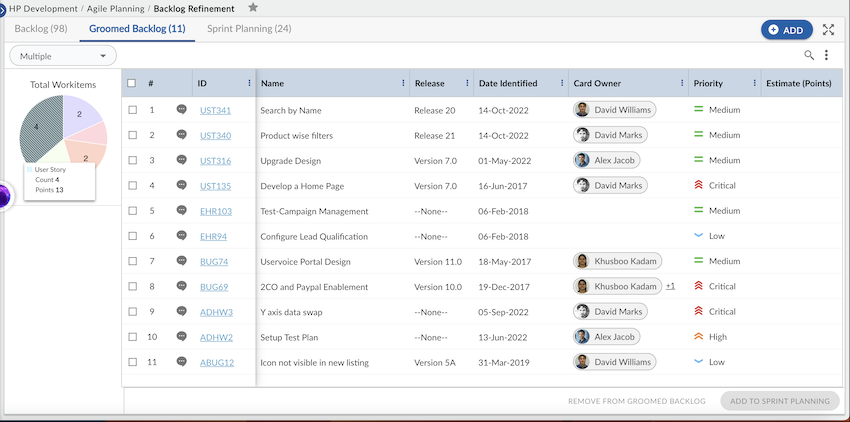
Groomed Backlog
The workitem that has been prioritized from the backlog is available in the Groomed backlog.
It consists of 2 panes:
Workitem Grouping
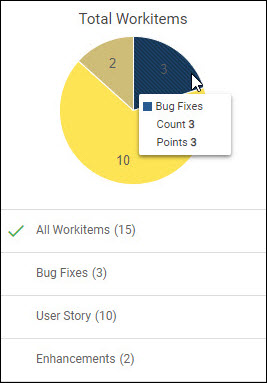
The panes show all the workitem instances grouped as per the workitem types.
A pie chart shows the bifurcation of the workitem types in their respective colors. Hovering on a slice will display the total workitems for that workitem type along with the sum of its estimated points. Labels on the slices are the number of instances for each workitem type.
Notes:
- The color of each workitem type is set under Form configuration.
- The Analytics panel is visible only if it is toggled on.
You can also click on a workitem type in the grouping to view its instances only.
Groomed Backlog Listing

The listing is similar to that of the backlog listing. The top bar displays the name of the selected group or workitem type. You can search for a workitem, edit a workitem by clicking the ID and select the workitem by its respective check box. Each column in the Groomed Backlog Listing also has a filter that you can use to further refine the workitem list based on the column values. To update or modify the cards, simply double-click on the card you want to edit and make the necessary changes according to your needs.
The bottom bar also shows the total count of the Selected Workitems and the Total Estimate Points. Here, the total is across workitem types while in the backlog listing, it was only for the selected workitem type. The selected workitems are moved for Sprint Planning by clicking the Add to Sprint Planning button. To remove workitems from Groomed Backlog and sent them back to Backlog, click the Remove from Groomed Backlog button.
To access the Analytics Panel, please follow these steps:
- Click the More Options button located on the toolbar.
- Toggle the Analytics Panel option.
- After toggling, the panel will appear on the left side of the screen.
Know more about the other stages of the grooming process: Backlog and Sprint Planning.