Start with the video first to get a better grasp of the topic!
|
Skip Ahead to: |
Overview
Creating a workitem becomes challenging when there are several fields that need to be filled up. At such a time, having the workitem fields auto-filled can be a boon. The AI-powered recommendation happens based on the information provided in the name and description fields of the workitem. This configure page helps you designate a description field and enable this feature so that the AI-powered recommendation of field values happens automatically. It also helps you set up the feature such that you can choose specific behaviors based on which AI algorithms will predict the field values.
Note: This feature is currently available for the purpose of understanding its benefits. To use the AI-Powered Auto-fill Field feature in the application, one must have a module license enabled. To try it out, please contact our Support team for activation.
Navigation
Navigate to the breadcrumb at the top and hover over the Project name, expand the Configure module, and select AI-Powered Auto-fill Field.
Steps to Set Auto-fill Fields
This setup page helps you designate the description field and enable this feature so that AI-powered recommendation of field values happens automatically. It also helps you set up the feature such that you can choose specific behaviors based on which AI algorithms will predict the field values.
To set the fields that you want to auto-fill in a workitem type, perform the following steps:
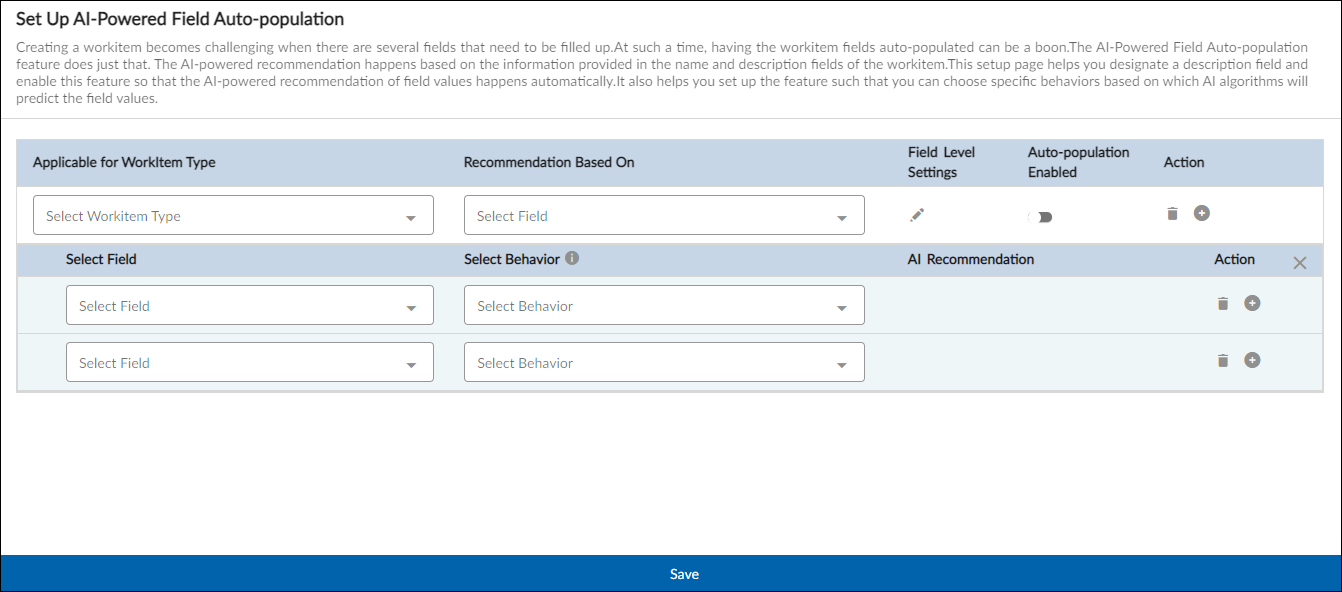
- Go to the Set Up AI-Powered Field Auto-population page.
- Select the following values:
-
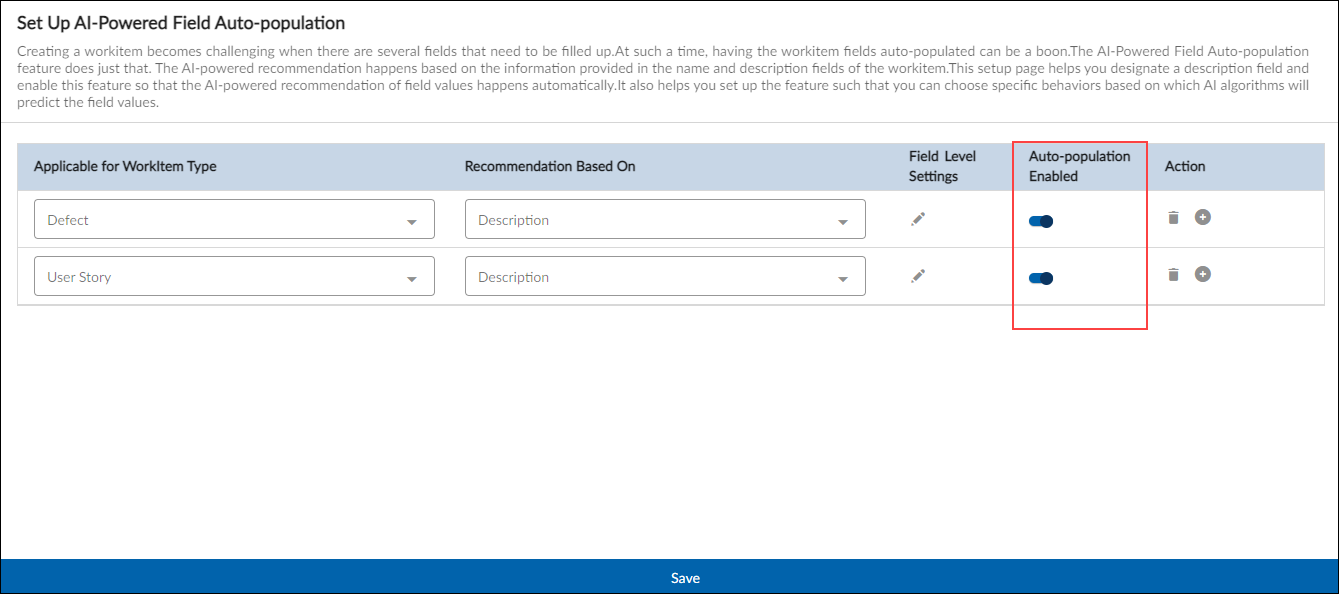
Applicable for Workitem Type column: Select the workitem type for which you want the fields to be auto-filled. The workitem type column enlists all the workitems of the project, which are accessible to you.
- Recommendation Based On column: In this column, you can designate a description type field whose content along with the name field will be analyzed by the AI system to auto-fill values for the selected fields. Also, tabbing out of this field will also invoke the auto-fill feature.
Note: Selection of Workitem Type and corresponding description field is mandatory. - Field Level Settings: Once you have chosen the workitem type and the description field based on which the field auto-fill is expected to happen, the next step is to set up the fields that need to be auto-fill. Click the pencil icon in this column to invoke another section of columns where the list of fields that need to be auto-fill can be set up. The criteria for fields to be enlisted in this section are as follows:
- If a field is set as Hidden, it will not be listed in the section
- The editable fields which are drop-down fields, multi-select lists, Radio button or checkbox fields, and text box fields (Duration, Percentage, Currency, Number, and Date) are listed in this section.
-
-
-
- For each field, you can set the behavior based on which the fields should be auto-fill. The AI model works on 6 types of behaviors as given below.
- Exploratory Behavior (Available for all Field Types): This behavior is the default behavior for any field selected to be auto-fill. This behavior lets the AI system ascertain which behavior works best for that field and then transition it over to that specific behavior. This specific behavior is automatically mentioned in the next column AI Recommendation, which is a read-only column.
Note: The value in the AI Recommendation column takes time to fill fields as AI needs to migrate data and proper testing needs to be done. Once AI understands the workitem types created in your project, it will start to provide you with better recommendations in this column. For remaining behaviors, the AI Recommendation column is left blank. For example, when a field like Priority is allocated exploratory behavior, the AI system will experiment with Similarity, constant and other behaviors before shifting to the most appropriate behavior it deems fit for the field. - Constant Behavior (Available for all Field Types): This behavior lets the AI system fill the field based on the constant value it has identified from historical records for the specific user. For example, reporting manager will be a constant value of a field for the specific user which will be used to auto-fill.
- Similarity Behavior (Available for all Field Types): This behavior lets the AI system fill the fields based on similar fields that it has identified from historical records. For example, the priority of a given item is determined on the basis of similar records that have been identified.
- Averaging Behavior (Available for Number Fields): This behavior lets the AI system auto-fill the field with an average/moving average of similar historical records. It is a variant of the Similarity behavior for numerical columns. For example, a field like Estimated Effort could be filled by taking an average of records that were found to be similar.
- Current Date (Date Fields Only): This behavior lets the AI system auto-fill the current date of the system.
- Prediction Behavior (Available for Date Field Types): This behavior lets the AI system attempt to predict a future date for the given field based on historical information. For example, the due date for a given item is predicted based on the historical Due Date and Creation Dates.
- Exploratory Behavior (Available for all Field Types): This behavior is the default behavior for any field selected to be auto-fill. This behavior lets the AI system ascertain which behavior works best for that field and then transition it over to that specific behavior. This specific behavior is automatically mentioned in the next column AI Recommendation, which is a read-only column.
- Action Column: In one row, you can select only one field and its behavior. To select another field and set its behavior, click Add icon at the end of the existing row. Similarly, to delete an existing selection, click the Delete icon. Once you delete the auto-filled settings for a field or workitem type and save the changes, the field will not be auto-filled.
- For each field, you can set the behavior based on which the fields should be auto-fill. The AI model works on 6 types of behaviors as given below.
-
-
- Auto-Fill Enabled column: Once you set up the field(s) and set its behavior, then you need to set the Auto-Fill Enabled slider On. Only after the slider is set to On and settings are saved, is the Auto-fill feature for that workitem type as per the configuration done for each field get enabled.
Note: Upon clicking the Save button, the description field mapping gets set against the workitem type, and migration of all its workitem instances starts asynchronously. This process can take time before the feature starts working for you.
To know more about how the fields get auto-populated once the setup is done, please click here.
View Auto-Populated Fields
Based on the recommendation settings, AI helps to auto-populate the editable workitem fields.
Enter adequate information in the name and designated description type field. For example, let’s consider a workitem type Defect and you want your AI recommendation to be based on the Steps to reproduce field. So, you set the recommendation on the Steps to reproduce field.
To facilitate better AI-powered recommendations, the field having this feature is highlighted and displays a message at the bottom-left corner. This is to indicate the users to add adequate inputs in the field to provide more relevant data for the auto-population or for generating results that show similar workitems. A similar workitem can be seen anytime even after creating a workitem and modifying it.


