
In this article, we will help you understand how to manage activities on the Work Hub.
|
Skip Ahead to: |
Overview
The Work Hub, by default, loads the activities as cards that are tagged to the current Sprint. The layout of the cards allows you to view cards tagged to any other Release and Sprints using the Filter option in the toolbar.
Note: Any inactive icon in the last row of the card layout (except for two icons in the bottom left position) will not be visible all the time and will appear only on hovering over the card. But once you use any of the right-side icons on a card, it will be visible on the card.
Navigation
Navigate to the breadcrumb at the top and hover over the Project name, expand the Execute module, and select Work Hub.
Actions to be performed on Cards
Comments & Attachments
Once an activity is created, open the Comments & Attachments.
- To add comments, click the Comment icon. You can tag other team members with the ‘@‘ symbol and add comments.
- To add attachments in the comments, use the ‘^‘ symbol. You can also add, download, and set a cover image from the attachments. To know more, click here.
Linked Cards
- Click the Linked Cards icon to see work items linked to the current card.
- On hovering over the Linked Cards icon, it will show you the number of workitems grouped by the workitem type. To know more, click here.
ToDos
- Go to the ToDos section.
- In the Actions column, click the Add icon.
- Set:
- ToDo Owner
- Estimated effort
- Actual effort
- Remaining effort
- Update the Status when work progresses. To know more, click here.
Note: You can set default ToDos for a Card Type from the Setup Default ToDos option.
Profile Picture
- When you assign a Card Owner, their profile picture appears on the card.
- Click the picture to change the owner.
- You can assign multiple owners to a card.
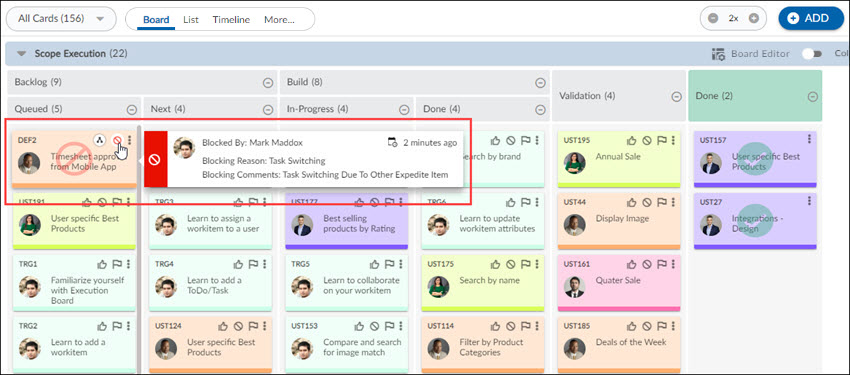
Flags (Block, Vote, Flag)
Use flags to quickly signal card status:
- Block
- Marks a bottleneck.
- Requires both a blocking reason and a blocking comment.
- Blocking comments are shown in a table view.
- Flag
- Highlights cards needing attention.
- Past flag comments are also shown in a table.
- Vote
- Let’s you show preference or priority across cards.
- Also works for cards created via Forms 2.0.
Notes:
|
 Card Options
Click the More icon to view the following options:
i. Complete Card
- Closes the work item.
- The card is marked Done and removed from the Work Hub.
ii. Add Spillover Card:
Use this when a card cannot be finished in the current Sprint, and you want to track remaining work separately.
Before you start
- Spillover is only allowed if there are time logs on the card.
- If there are no time logs, you cannot create a spillover card.
Steps
- Click Add Spillover Card under Card Options.
- In the pop-up, update:
- Name
- Default:
Spillover of <CardID>:<Card Name> - You can rename it.
- Default:
- Open ToDos
- If checked, all open ToDos are copied.
- Remaining Effort on the original card’s ToDos becomes Estimated Effort on the spillover card.
- Comments & Attachments
- Check to copy comments and attachments.
- Estimates
- <Original Card ID> estimate
- Pre-filled from the original card.
- Revise based on work already done.
- New card estimate
- Enter the effort for the remaining work in the new card.
- <Original Card ID> estimate
- Close <Original ID>
- If checked, the original card is closed in Work Hub, Timesheet, and Form listing.
- Name
- Click Save.
Note: All fields will be copied except the Sprint, Flag Status, and Votes of the original card.
In the spillover card, the following points will be reflected:
- The original Card is traced to the spillover card and reflected in the Linked Cards section.
- The Activity Log of the copied card mentions the original card from which it has been copied.
- If the ToDo Owner is no longer a team member, then the Card Owner will be made the ToDo Owner. Also, in case the Card Owner is not available, then the Project Manager is made the ToDo Owner and the Card Owner. The same will be tracked in the Comments section of the new card.
iii. Move Card To:
- Move a card to another lane and column.
- To remove a card from Work Hub, move it to Backlog (System).
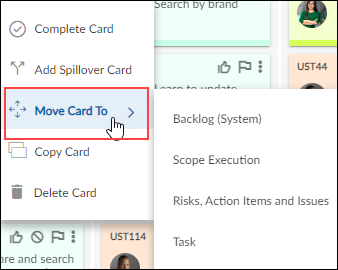
Bulk move: Moves multiple cards at the same time.
- Press CTRL (Windows) or Command (macOS) and click cards to select multiple.
- Right‑click and choose Move Selected.
- Pick the lane and column, then move.
iv. Copy Card:
Creates a copy of the agile workitem and its card on the Work Hub.
- Click Copy Card.
- Enter a new card name.
- Click Save.
In the copied card, the following points will be reflected:
- Same ToDos, names, ToDo Owners, and Estimated Effort.
- Date Identified is set to today, not the original date.
- Activity Log shows which card it was copied from.
- All fields are copied except:
- Flag status
- Vote status
- Card Owner is the same as the original.
- ToDo Owner:
- If still on the team, it stays the same.
- If not on the team, ToDos are created without an owner, and Estimated Effort is blank.
- These changes are logged in Comments.
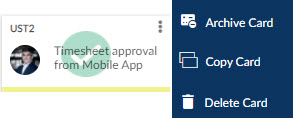
v. Delete Card:
Deletes the workitem and removes the card from the board.
vi. Archive Card:
For completed (Closed/Done) cards:
- Closed cards remain on the Work Hub but are shown with a watermark.
- When there are 100 closed cards, you get an alert to clean them up.
- You can use Archive Cards to remove completed cards from the board.
Archiving multiple cards
- All selected cards must be Completed / Closed.
- If any selected card is still open, archiving fails, and you will see an error.
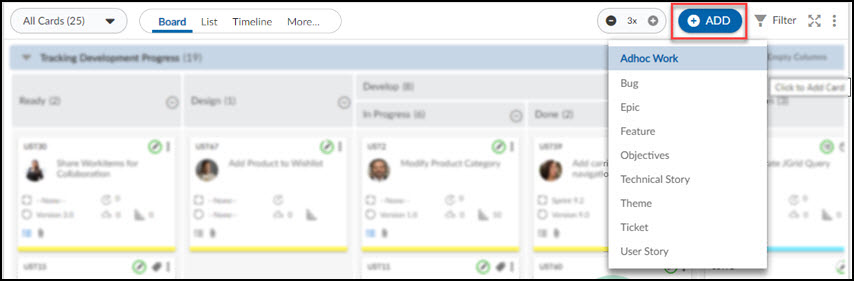
Add Card on Work Hub
You can add any agile workitem to the Work Hub by clicking the Add icon. The workitem need not be tagged to a Release to be added to the Work Hub.
- Click the ADD icon in the toolbar.
- Choose a card type from the dropdown.
- In the Details popup, fill in the required fields.
- Choose a lane:
- Use the default lane from Card Settings for that card type, or
- Pick another lane manually.
- Click Save.
You can also add a card by right-clicking the board. Read more here.
ReMove Card
To remove a card from the Work Hub, perform the following steps –
- Click the Card Options icon on a card.
- Select Move and select Backlog (System).
Note: The Backlog (System) lane is not visible anywhere in the application; it’s for the user’s reference only.
The card will disappear from the Work Hub. On opening the Detail view of the card, the Lane will be shown as Backlog.
Collapse Empty Columns
Use Collapse Empty Columns to clean up your board view.
- Click the Collapse Empty Columns button:
- Green = enabled
- Red = disabled
Notes:
|