
Introduction
In a project, there are a few repetitive tasks that need to be done regularly or on some Business criteria. Business Rules 2.0 automates field-level actions within Forms 2.0, eliminating repetitive tasks and improving accuracy. With Business Rule 2.0, you can automate certain things in your projects depending on specific criteria.
|
Skip Ahead to: Navigation |
Navigation
To configure a Business Rule 2.0, navigate to the project, hover over the top breadcrumb, expand the Configure menu, and select Business Rules 2.0.
Note: The menu is only accessible to the Project manager persona of that project.
Advantages of using Business Rules
- No coding or scripting is required.
- Reduce the manual work and fasten the day-to-day processes.
- It saves time for team members to focus on other important things.
- Creating Business Rules in Nimble is easy as you can visualize the flow of the Rule which helps you understand the triggers, conditions, and actions, in a better way.
Prerequisite
Main Components of Business Rule 2.0
A Business Rule 2.0 is made up of 3 important parts:
- Triggers
- Conditions and Conditions Group
- Actions
Triggers
Triggers are the events that kick off a Rule. If a certain trigger /event occurs, then the Rule defined on it will be kicked off. They start the execution of your Rules. Triggers will listen for events in the application, such as when a form is loaded or when a field value is changed.
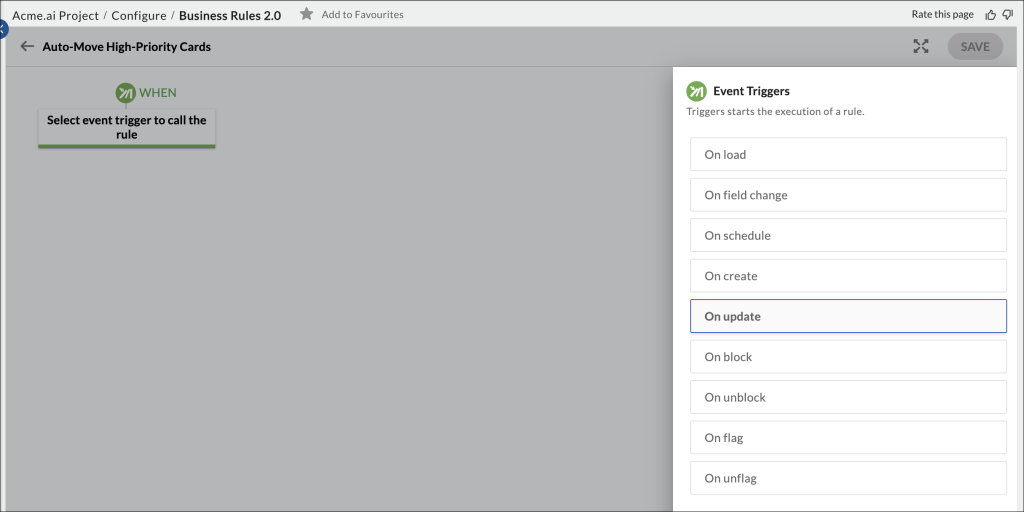
There are 8 types of triggers –
- On load – Business Rule will be executed if the form is loaded/ reloaded.
- On field change – Business Rule will be executed if the value of the set field is changed.
- On create – Business Rule will be executed on the creation of a new instance of a form.
- On update – Business Rule will be executed if there is any update in the instance of a form.
- On block- Business Rule will be executed if a card is blocked, allowing you to automate actions such as creating, updating, or further blocking/unblocking cards.
- On unblock-Business Rule will be executed if a card is unblocked, allowing you to automate actions such as creating, updating, or further blocking/unblocking cards.
- On flag- Business Rule will be executed if a card is flagged, allowing you to automate actions such as creating, updating, blocking/unblocking and further flagging/unflagging of cards.
- On unflag- Business Rule will be executed if a card is unflagged, allowing you to automate actions such as creating, updating, blocking/unblocking and further flagging/unflagging of cards.

Conditions
Conditions let you refine a Rule. For example, if the defined condition is Priority = High for a form, then if the priority is set high in an instance the Rule is executed on that form instance.
Conditions let you refine the scope of the event trigger for your Business Rule. They must be met for your Rule to continue running. Conditions can be like when an attribute in a particular form has a defined value. For example, if priority is high, then “Mark Robinson” should be set as the card owner or the Class of Standard is Expedite, etc.
You can select single or multiple conditions for a Rule. For example, a Rule should be executed if the Priority is High and the Card Owner is Unassigned. The conditions can be applied to attributes.
To set a condition for a Rule, you need to first select the card type and then the value for its attributes. So, if the selected card type has the value (set in the condition), then the condition will be fulfilled and the Rule will be executed.
Business Rule 2.0 supports the following conditions as per the field type –
| Field Type | Supported Conditions |
| Text |
Is Is not <Contains Does not contain |
| Number |
Is equal to Is not equal to Is greater than Is less than |
| Date and Time |
Is Is not Is after Is before |
Actions
When the defined condition is met for a form instance then the set actions are executed. For example, if a Rule says, set Owner = Mark Robinson if the Priority is high then on setting the priority as High of that instance, the owner is set as Mark Robinson.
Actions are the doers of the Rule. They let you automate your activities and make changes within forms. They allow you to perform many activities, such as editing the attributes of a card, sending mail, creating a new card, and so on.
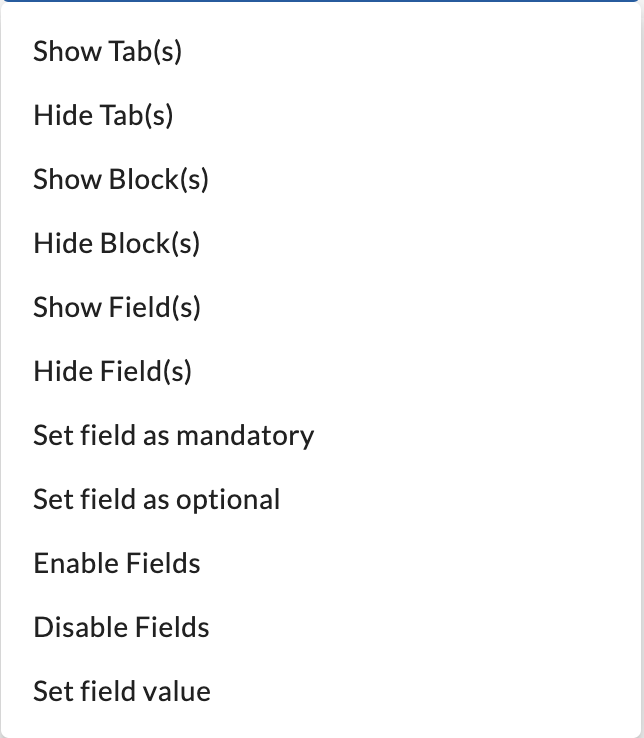
Business Rule 2.0 supports the following actions –
- Show Tabs
- Hide Tabs
- Show Blocks
- Hide Blocks
- Show Field
- Set field as mandatory
- Set field as optional
- Enable Fields
- Disable Fields
- Set field value
- Create card
- Update card
- Send mail
- Block card
- Unblock card
- Flag card
- Unflag card
- Increment field(s)
- Decrement field(s)
- Move card
- Update card
The availability of actions differs depending upon the trigger and the context set for the Business Rule.
How to Create a Business Rule 2.0
You can create a Business Rule 2.0 for the forms configured through Forms 2.0 only. The product shipped form and the ones not configured through Business Rules 2.0 do not appear in the Rule 2.0 creation list. For example, let’s create Rules for the following scenarios:
Example 1: Assign High Priority Cards to a Team Member
If a task priority is marked as High, then the task is automatically assigned to employee ‘John Doe.’ To create a Rule, perform the following steps –
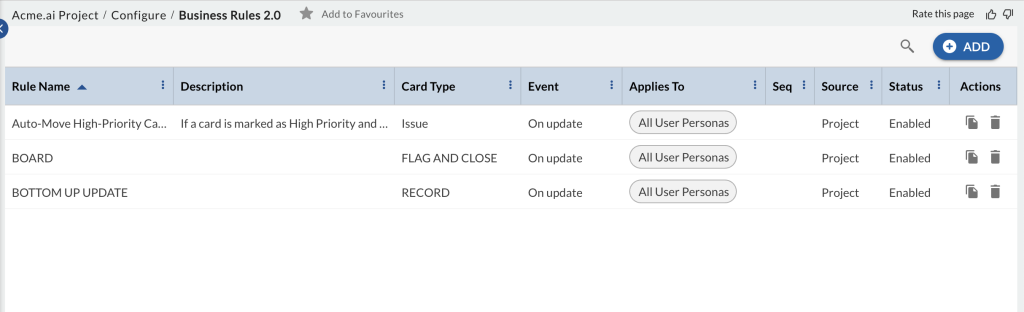
- Navigate to the Business Rule 2.0 listing page.
- Click the ADD button on the top right corner.
- Add a name and description for the Rule.

- Select which persona(s) the Rule applies to. The Rule will only execute the Business Rule for the personas selected in this field. If any other persona logs in and triggers the same Rule as defined in the Business Rule then it will not execute the Business Rule.

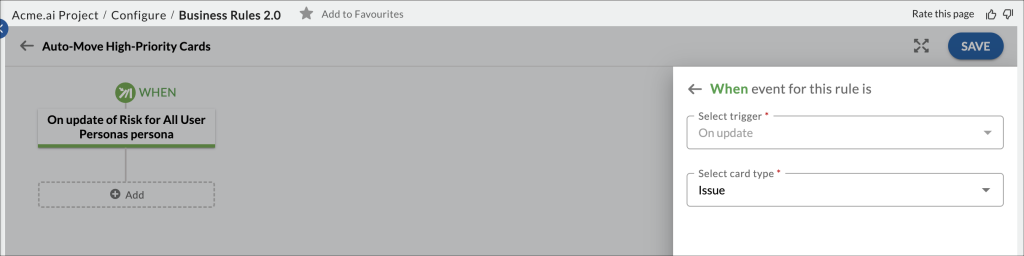
- Use Select event trigger to call the rule box to select the trigger such as On load, or On field change. The Rule will be triggered when the selected event occurs. For example, if the trigger is On field change, then the Rule will be triggered on the change of the field value.

- Select the card type and field on which you want the rule to apply and click the NEXT button.

- Select Add icon to add the action or condition for the Rule.

- Condition and specify the field name, condition, and the value for the field name. The Rule will be executed on meeting this condition. If you want to add more conditions you can use the Add icon at the end of the condition and the Delete icon if you want to delete it. Select NEXT.

- Click the Add icon to define the action for the given condition.

- Specify the action and the field on which the action should be performed. You can add multiple actions with the Add icon at the end of the action row or delete an action by clicking the Delete icon. Select SAVE to save the Rule.

- The visual flow of the entire Rule is shown to help you understand its flow at one glance. You can also use an Add Else if condition or condition group if required.

Here is a more complex instance to adjust deadlines and set escalation according to Priority and Status – When a card’s Priority field is set to High and the Status field is In progress, then the Due Date is adjusted to 3 days from the current day and the Escalation field is updated to Critical.
Example 2: Automatically Adjust Due Date


Example 3: Automatically Move Cards
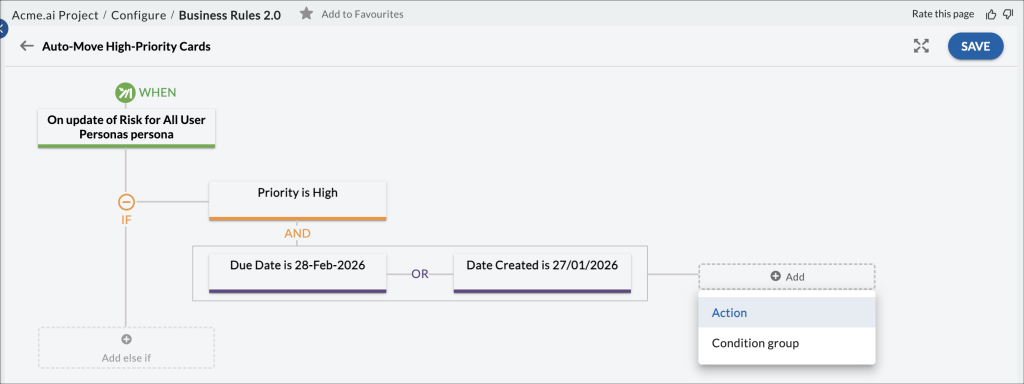
If a card has Priority set to High, is in the Backlog column of Defects lane, and has either a Due Date of 28-Feb-2026 or a Date Created of 27-Jan-2026, then the card should automatically moved to the In-progress column of Defects lane.
To create this Rule, perform the following steps:
-
Navigate to the Project → Configure → Business Rules 2.0 listing page and click the ADD button on the top right corner.
-
Click the name in the top-right corner. Enter the Rule Name as Auto-Move High-Priority Cards and provide a Rule Description explaining what the rule does.
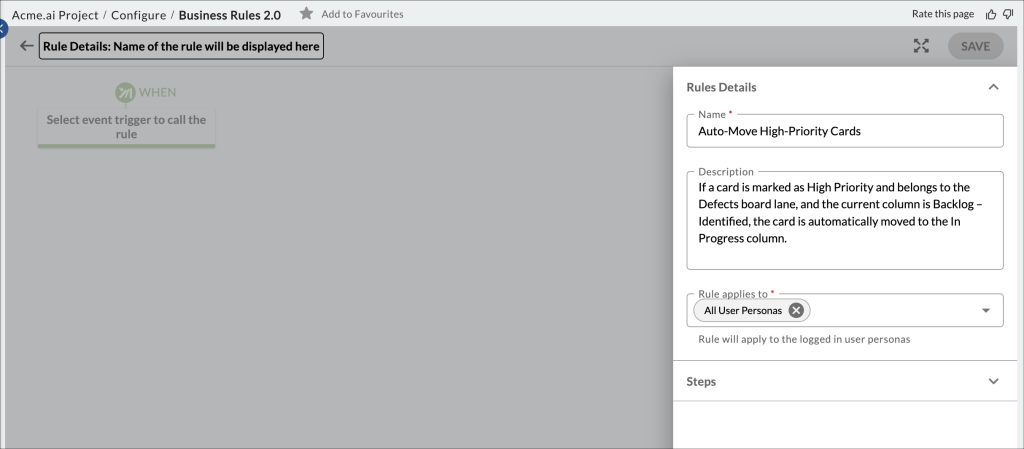
-
Select the persona(s) for which the Rule applies. The Rule will only execute for the selected personas. If other personas trigger the same conditions, the Rule will not execute.
-
Click the Select Event Trigger box and choose a trigger such as On update of Issue. The Rule will execute when the selected event occurs.
-
Select the card type and field(s) for the Rule condition (Priority, Board Lane, Due Date, Date Created), then click NEXT.
- Click Add, and then choose Condition.

-
Configure the IF condition by selecting the required field, condition, and value.
-
-
Priority is High -
Due Date is 28-Feb-2026 OR Date Created is 27-Jan-2026
Use the Add icon to add more conditions or the Delete icon to remove a condition, then click NEXT.
-
-
- Click Add, and then choose Action.
-
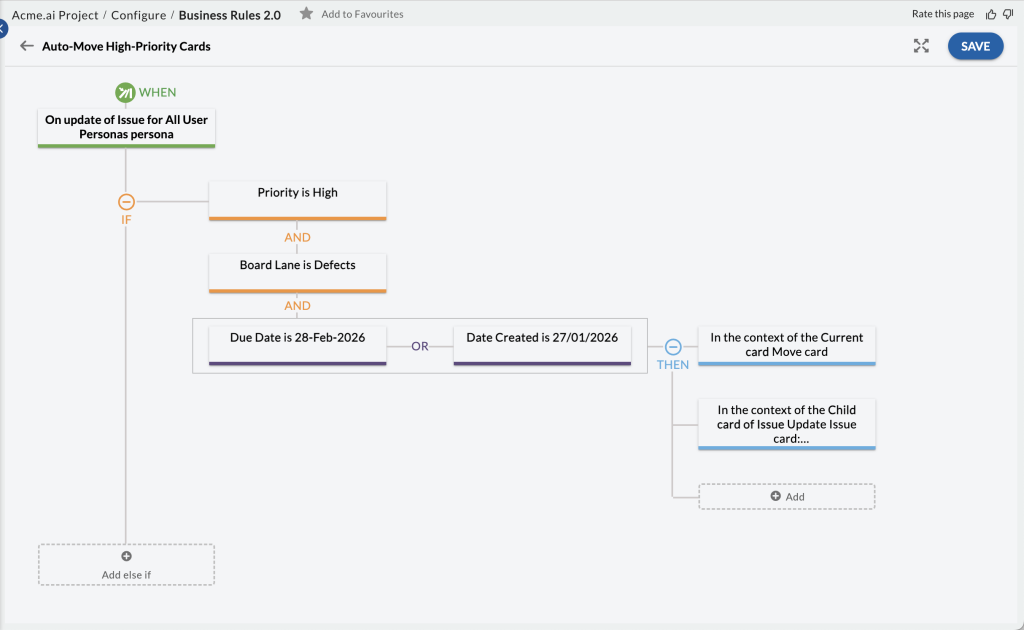
Configure the THEN action by selecting the required context, action, lane, and column.
-
-
Priority is High Current card → Move card -
Column is In Progress -
Lane is Risks and Issues
Use the Add icon to add more conditions or the Delete icon to remove a condition, then click NEXT.

-
-
-
Click SAVE to save the Business Rule. The visual flow of the entire Rule is displayed, showing conditions and actions at a glance. You can optionally add Else If conditions or Condition Groups to handle additional scenarios.
How to Use Fetch and Populate with an example
In this Test Management example, we will use Fetch and Populate to auto-populate fields by establishing relationships between the following four forms using Lookup fields.
- Test Events
- Test Groups
- Test Cases
- Test Steps

The goal is to fetch the relevant names from each form and populate the Test Execution Log sub-block (located on the Test Events form) so that all related data is displayed in one consolidated view.
- Test Events:
- Create a Drop-down field in the Test Events field segment called Execute Test Log. Add Yes and No as the options in the Drop-down settings.
- Add a data table sub-block named List Test Groups. Create a Lookup field called Test Group Name and link it to the Test Groups form.

-
- Create a tab called Test Execution which houses the Test Execution Log sub-block. Include Lookup fields in this sub-block to display the relevant data (such as Test Groups, Test Cases, and Test Steps names) fetched from the related forms.

2. Test Groups: Create a data table sub-block named Test Cases List with a Lookup field linked to the Test Cases form.

3. Test Cases: Contains a data table sub-block with a Lookup field linked to the Test Step form.

4. Test Steps: The smallest unit in the hierarchy with its own unique data.

By linking these forms with Lookup fields, the relationships between them are clearly defined. The final step is to set up a Business Rule that will execute the Fetch and Populate action when the Drop-down field Execute Test Log is set to Yes.
Configuring the Business Rule: Fetch and Populate
The following steps outline how to set up the Business Rule to fetch and populate data:
- After naming the Business Rule and setting the persona criteria, set the Rule to trigger On update of the Test Events form.
- Set a condition for the Business Rule to trigger only when the Drop-down field Execute Test Log is set to Yes.
- Set the following action’s context for the Rule so that records will be inserted in the sub-block Test Execution Log. Select Fetch and Populate as the method to populate the field values.
- Select forms: Specify the forms that are part of the relationship:
-
- Test Events (source form)
- Test Groups (linked via List Test Groups sub-block)
- Test Cases (linked from Test Groups)
- Test Steps (linked from Test Cases)
-

-
- Define filters: You can define filters to further narrow down the fetched data if required. Depending on the field(s) you select for filtering, the availability of conditions and values will vary.
- Apply sort: Determine the sequence in which the data will be displayed in the Test Execution Log.

-
- Assign values: Here you can view/edit the automatically established field and value relationships before proceeding.
4. After all the settings are configured, select SAVE to save the Business Rule.
Final Outcome
When a user selects Yes in the Execute Test Log Drop-down on the Test Events form, the Business Rule will:
- Fetch data from all related forms based on the established Lookup relationships.
- This data can be used to populate the Test Execution Log sub-block with the fetched data, displaying a consolidated view that includes Test Groups, Test Cases, and Test Steps details in the specified order.

Execution logs
On a Business Rule 2.0 configuration page, you will be able to see a Execution logs toggle on the top right:

When the Execution logs button is toggled on, you can view the records for each time the Business Rule 2.0 is executed. The fields accessible in the Execution logs are:
- Card ID: Provides the unique Card ID for easy identification.
- Result: Confirms if the Rule is executed successfully or not.
- Timestamp: Indicates the exact time of the Rule Execution.
- Message: If a Rule is executed successfully, there will be no message in this field.

You can also select a specific instance for more details.
Note: Business Rules 2.0 configured with an On load or On field change event trigger will not have the Execution logs toggle available.