
Start with the video first to get a better grasp of the topic!
|
Skip Ahead to: Estimate Synchronization Between Workitem and ToDos Managing ToDos from the Workitem Editing ToDos Using Inline Cell Editing |
Overview
ToDos are actionable tasks created within a workitem to break down work into smaller, manageable units. They help teams assign responsibility, track effort, and monitor progress at a detailed level.
The ToDos tab is visible only when it is enabled while configuring the form in Forms 2.0. Workitems created using forms where the ToDos tab is not enabled will not display the ToDos tab.
ToDos serve as the foundation for effort tracking. Effort logged and managed on ToDos determines the overall Estimated Effort, Actual Effort, and Remaining Effort of the workitem.
Default ToDo Creation
When a workitem is created, Nimble automatically creates default ToDos based on the ownership of the workitem.
- If the workitem has a single owner, one ToDo is created and assigned to that owner.
- If the workitem has multiple owners, a separate ToDo is created for each owner.
- Each ToDo is assigned to its respective owner.
The workitem’s Estimated Effort is automatically distributed across the created ToDos.
For example:
- If a workitem estimate is 8 hours and there is one owner, one ToDo is created with an estimate of 8 hours.
- If a workitem estimate is 8 hours and there are two owners, two ToDos are created with 4 hours each.
These default ToDos ensure clear ownership and accurate effort tracking.
Estimate Synchronization Between Workitem and ToDos
ToDo estimates are derived from the workitem estimate.
When the workitem estimate is modified:
- ToDo estimates are automatically updated only if no time has been logged on the ToDos.
- If time has already been logged on a ToDo, its estimate is not automatically modified.
This ensures that previously logged effort remains accurate and prevents unintended changes to effort tracking.
Managing ToDos from the Workitem (ToDos tab)
To manage ToDos:
- Open the required workitem.
- Navigate to the ToDos tab.
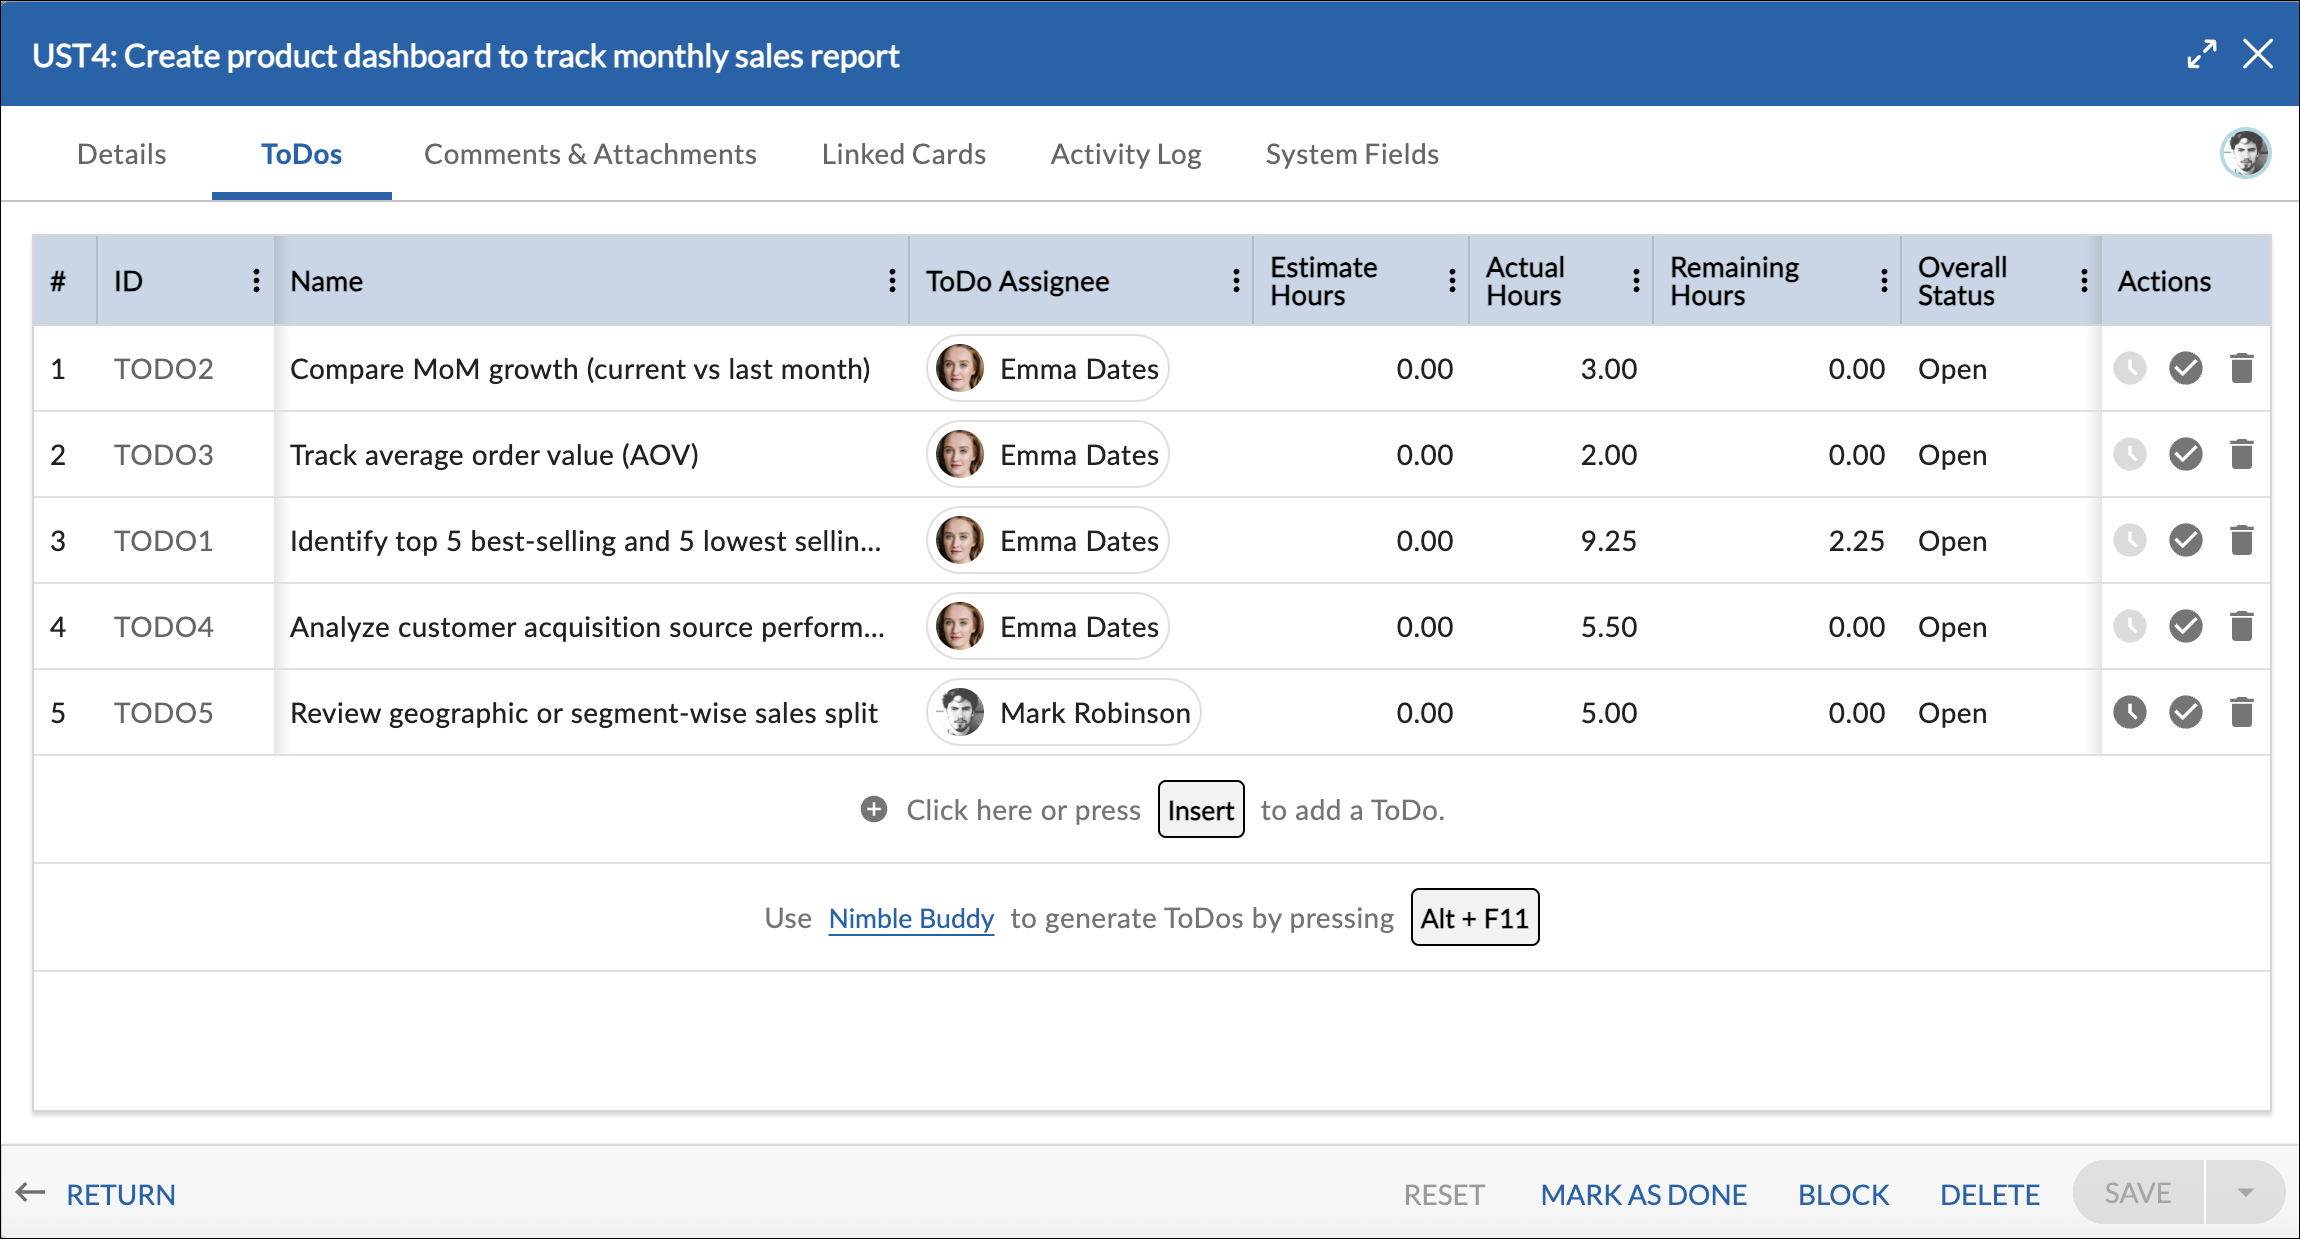
Adding a ToDo
To add a ToDo in a card:
- Click on the option Click here or press Insert to add a ToDo.
- Or press:
- Windows: Insert
- Mac: Option + Return
- Windows: Insert
- Enter the ToDo details.
- Click anywhere outside the row to save the ToDo.
You can immediately edit individual cells, such as ToDo Name, ToDo Owner, Estimated Effort, or Remaining Effort, using inline editing.
No Save button is required.
ToDo Fields
Each ToDo includes the following fields:
ID: System-generated identifier assigned after the ToDo is created.
Name: Describes the task to be completed.
Status: Indicates whether the ToDo is Open or Done.
ToDo Owner: The team member responsible for completing the ToDo.
Estimated Effort: The planned effort required to complete the ToDo.
Actual Effort: Automatically calculated based on the total time logged. This field cannot be edited manually.
Remaining Effort: Represents the amount of work left to complete the ToDo. It is automatically calculated based on Estimated Effort and Actual Effort, but can also be manually updated to reflect the current expected effort remaining.

Editing ToDos Using Inline Cell Editing
ToDos can be edited directly within the grid using inline editing, similar to editing workitems in the workitem listing page.
To modify a ToDo:
- Click on the specific cell you want to edit.
- The selected cell becomes editable.
- Enter or update the value.
- Press Enter or click outside the cell to save the changes.
You can edit the following fields inline:
- ToDo Name
- ToDo Owner
- Estimated Effort
- Remaining Effort
Changes are saved automatically. No separate Save button is required.
If a ToDo is closed, it becomes read-only and cannot be edited unless reopened.
Assigning or Changing the ToDo Owner
To assign or change the ToDo owner:
Assigning a ToDo owner does not change the workitem owner.
Closing a ToDo
To mark a ToDo as complete:
- Click the tick icon next to the ToDo.
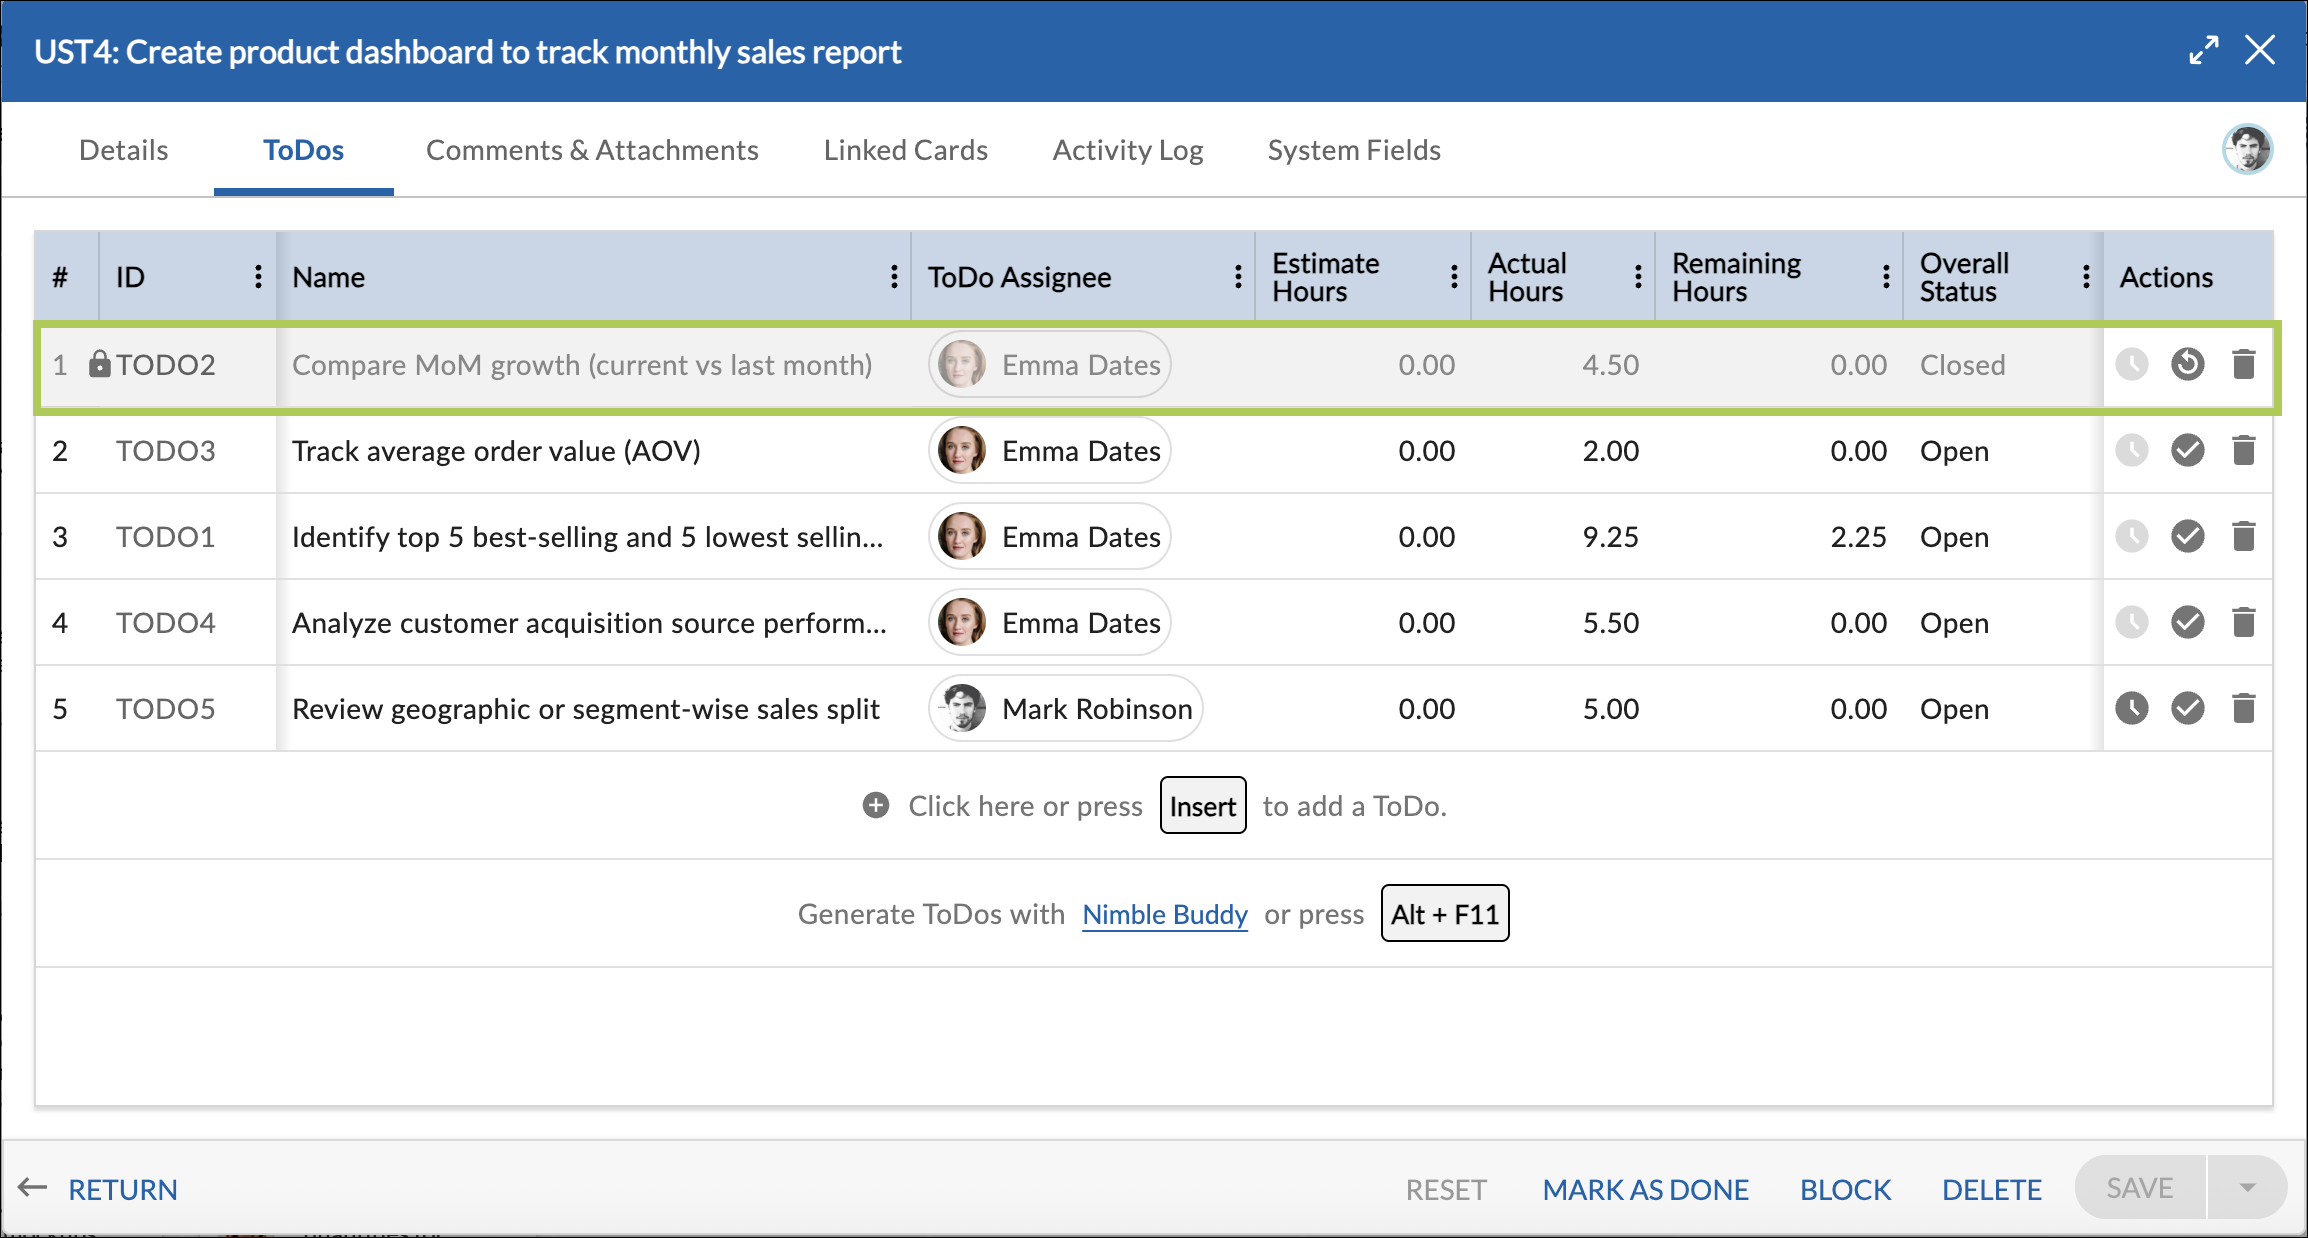
When a ToDo is closed:
- Remaining Effort is set to 0.
- The ToDo becomes read-only.
- The ToDo cannot be edited unless reopened.
Important: If time logged on the ToDo has been submitted for approval and is pending approval, the ToDo cannot be closed until the approval process is completed.
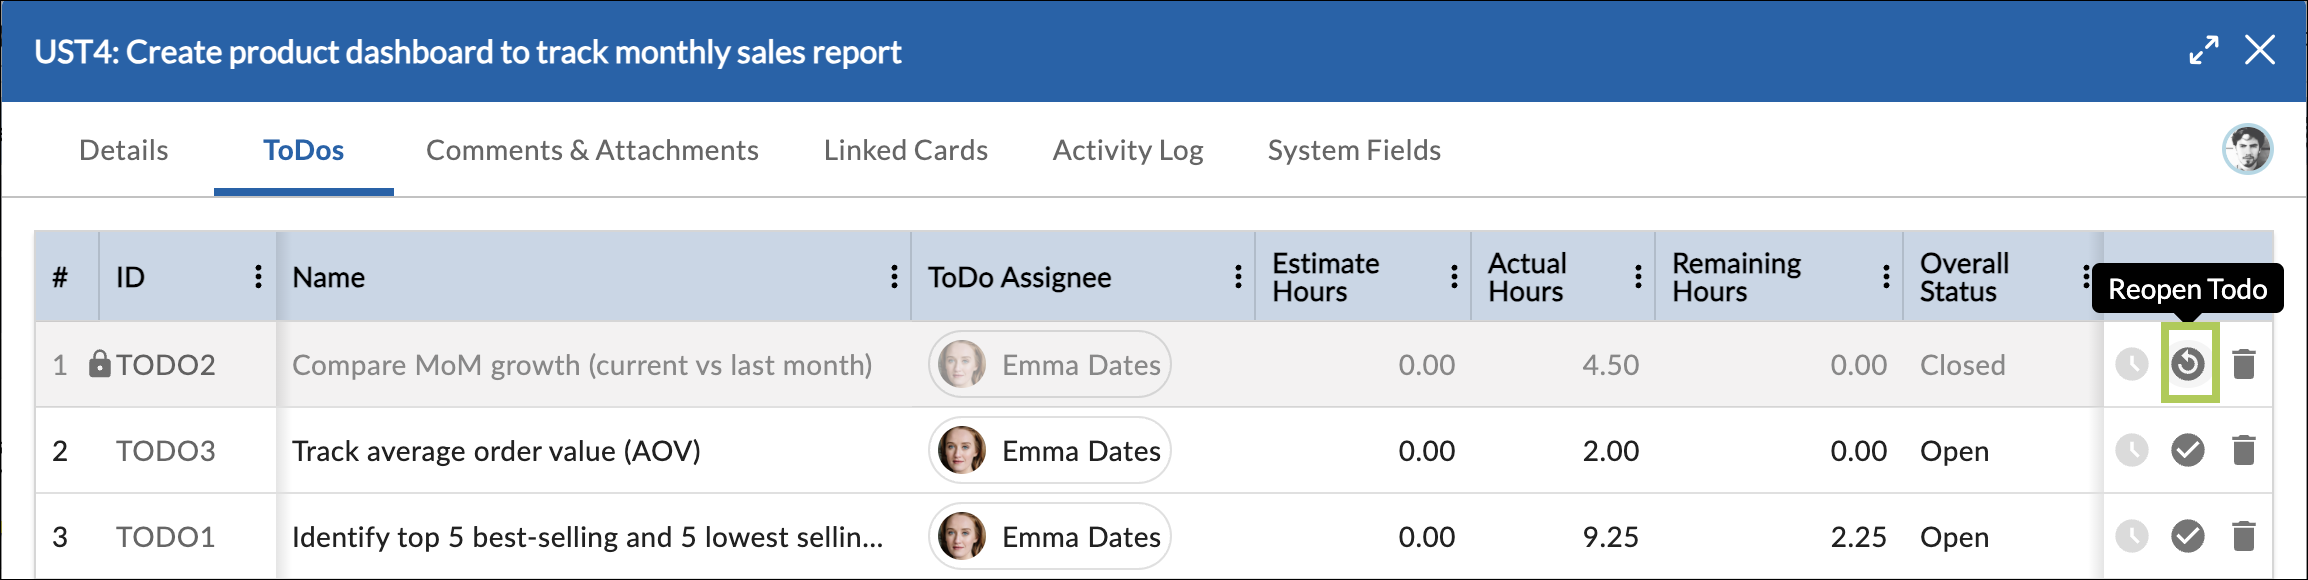
Reopening a ToDo
To reopen a ToDo:
From the ToDos tab:
- Click the Reopen ToDo icon in the Actions column.
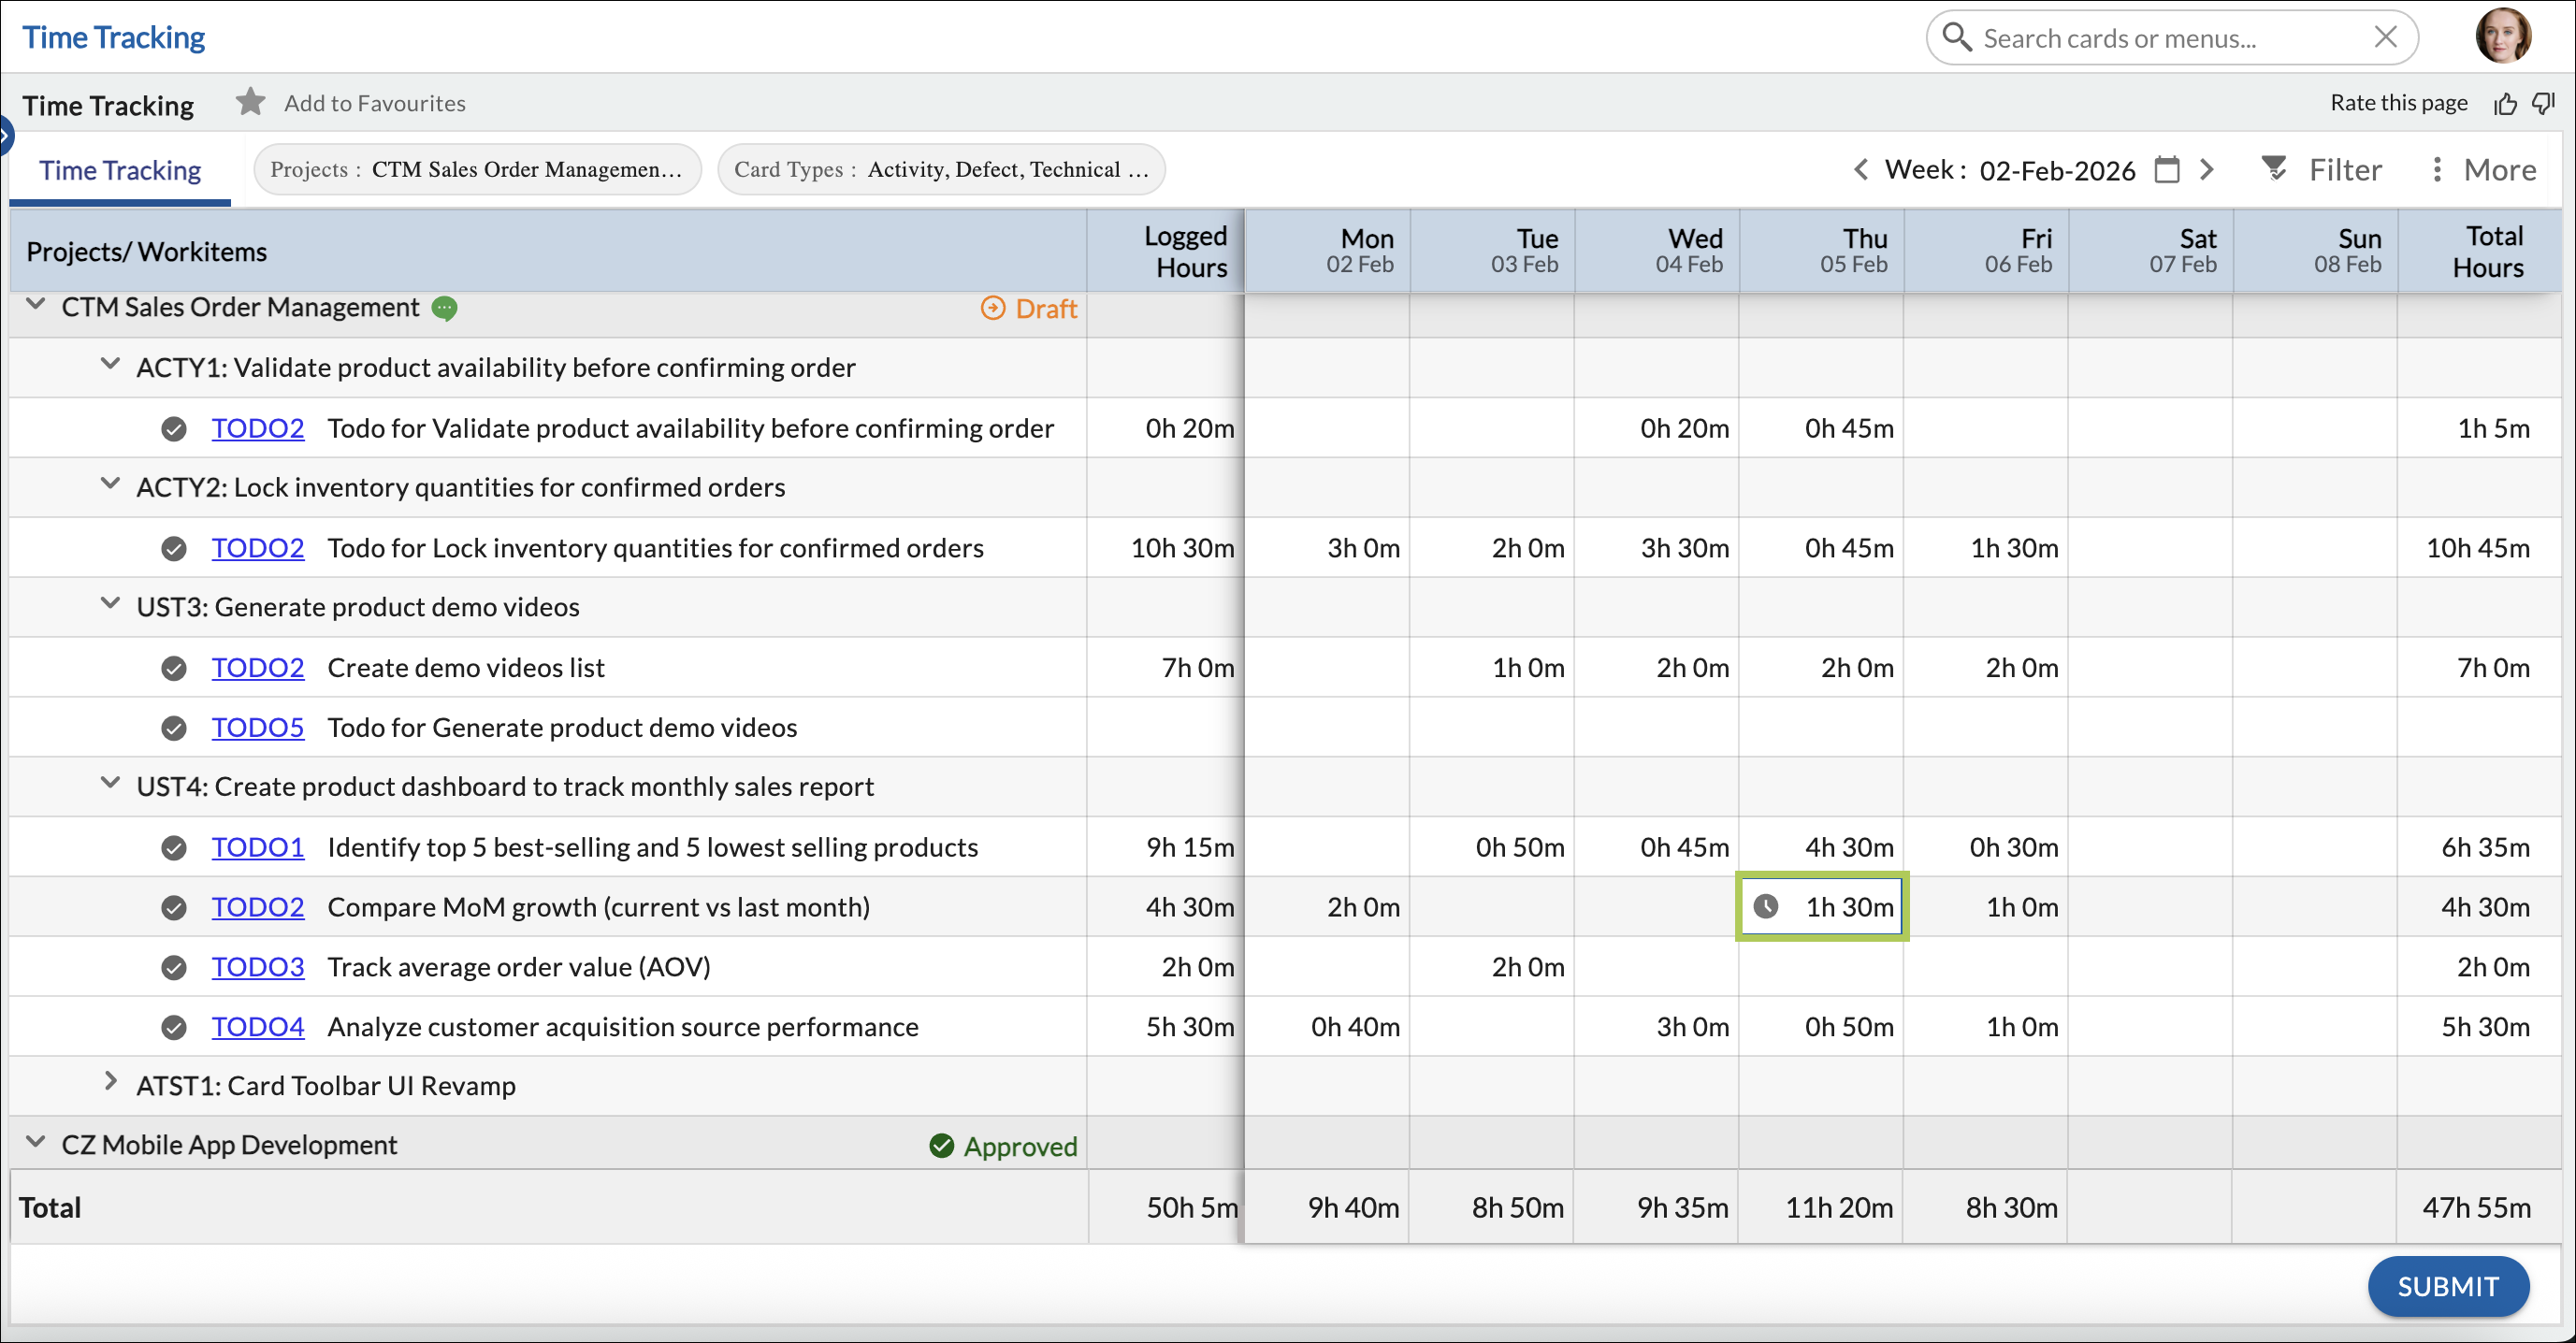
From the Time Tracking tab:
- Use the reopen option available for the ToDo.
![]()
When reopened:
- The ToDo becomes editable again.
- Remaining Effort is recalculated based on Estimated Effort and Actual Effort.
- Remaining Effort can be manually adjusted if needed.
- The ToDo becomes available for time logging.
Logging Time on ToDos
Time can be logged on ToDos in two ways.
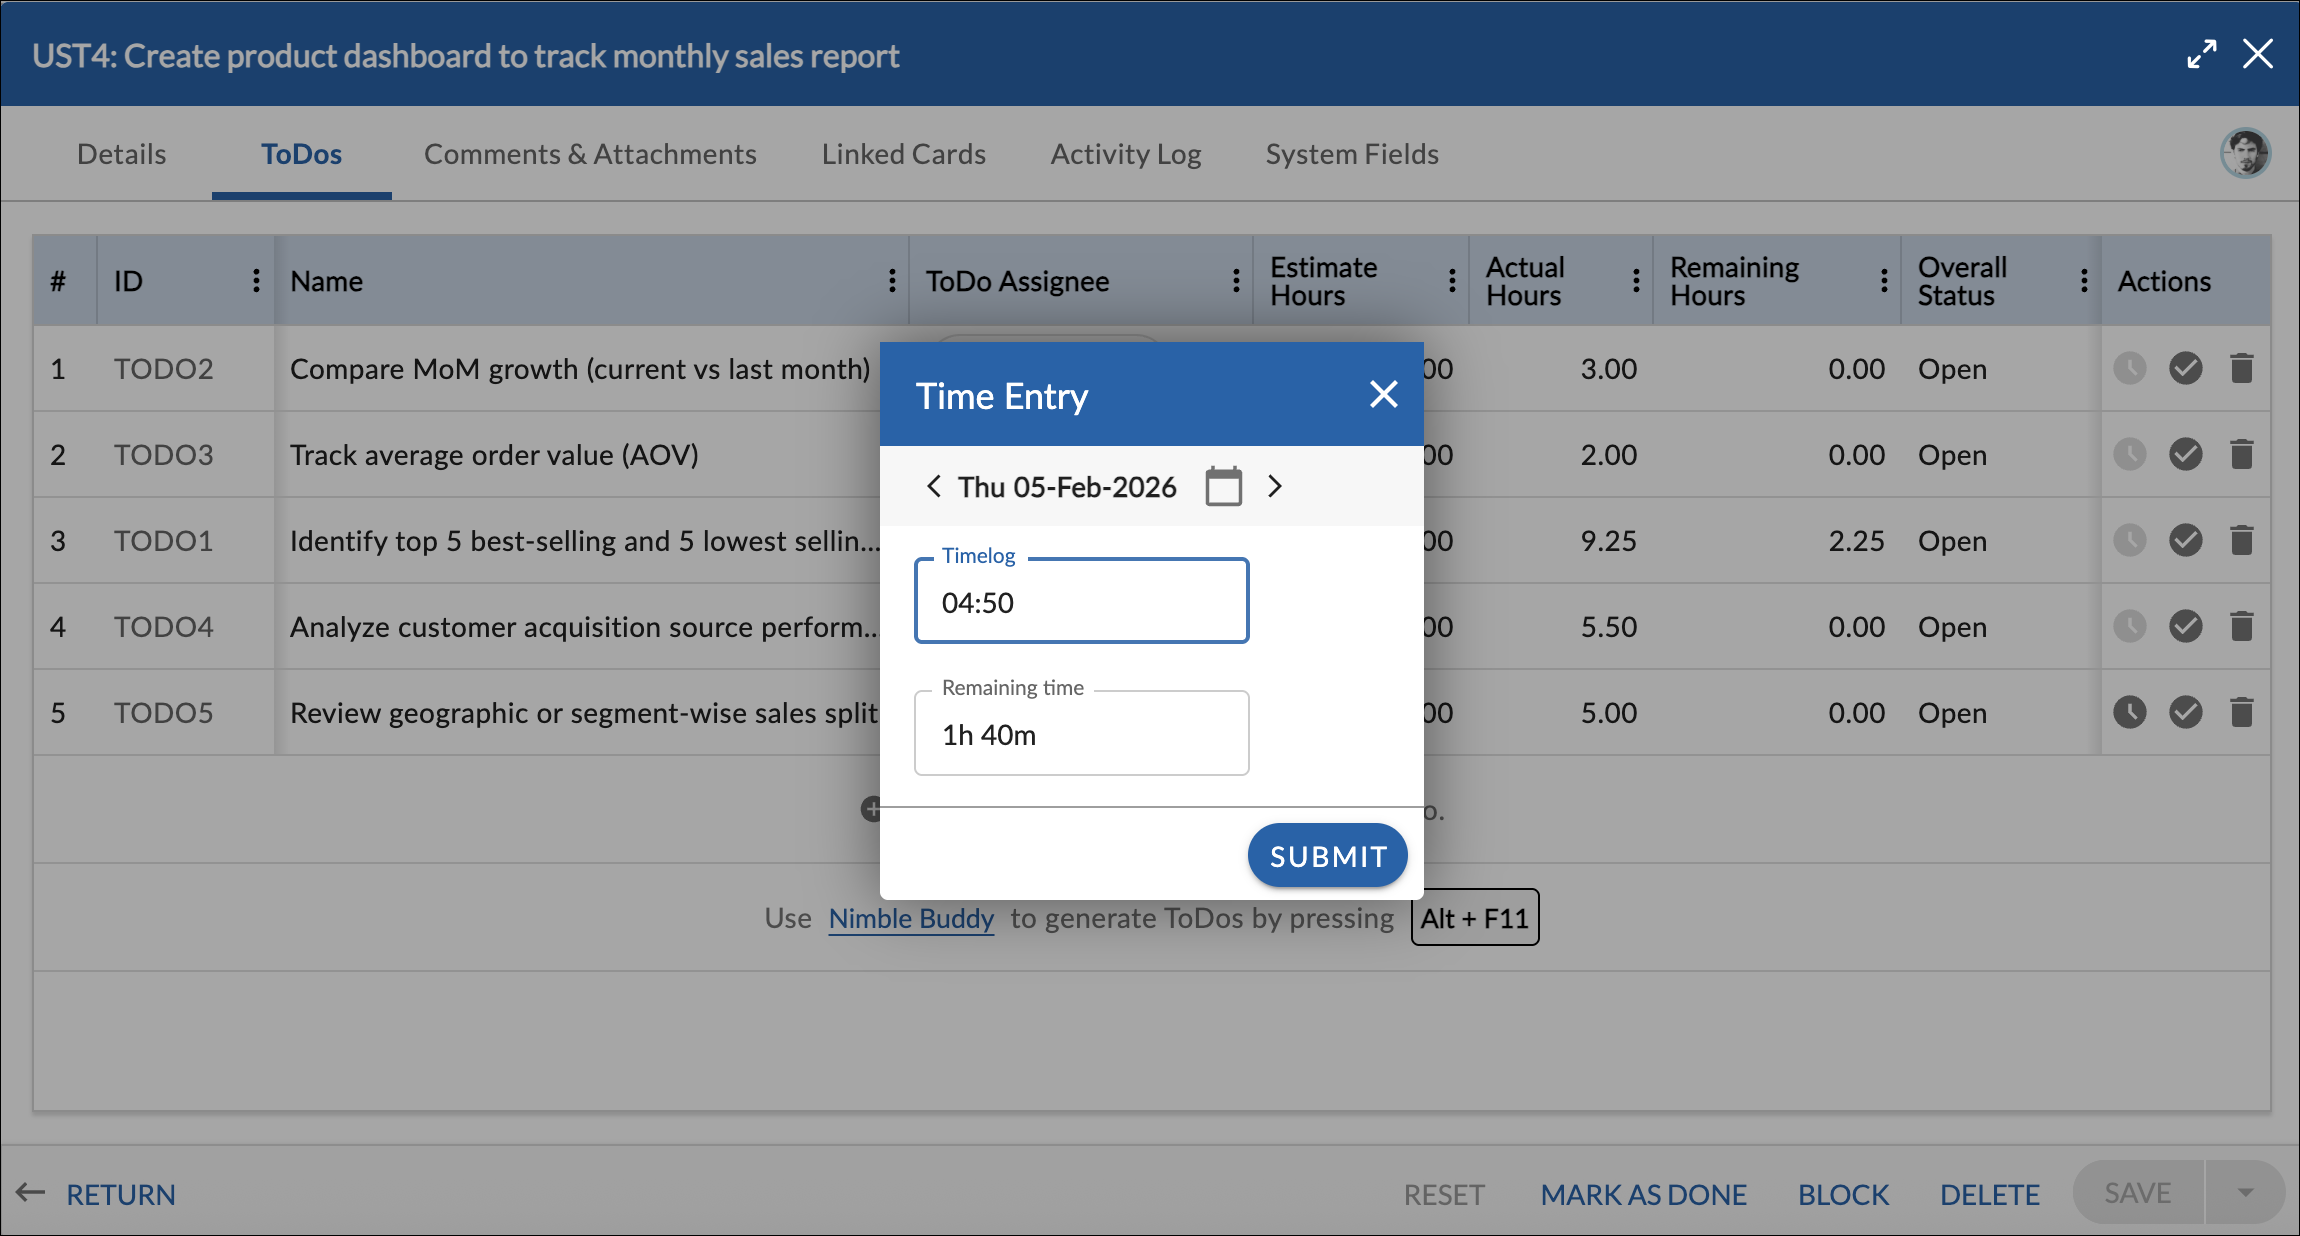
Logging Time from the ToDos Tab (Workitem)
To log time from the workitem:
- Open the workitem.
- Navigate to the ToDos tab.
- Click the Enter Time (clock) icon for the ToDo.
- Enter time in HH:MM format.
- Save the entry.
Actual Effort and Remaining Effort are automatically updated based on the logged time. Remaining Effort can also be manually adjusted to reflect updated expectations.
Logging Time from the Time Tracking Tab (Timesheet Module)
You can also log time on ToDos from the Time Tracking tab in the Timesheet module.
Time logged from the Time Tracking tab updates the same ToDo effort fields and ensures consistent effort tracking across the system.
For detailed instructions on logging time and understanding time statuses, refer to the Time Tracking help article.
Remaining Effort Calculation and Manual Update
Remaining Effort represents the amount of work left to complete a ToDo.
By default, Remaining Effort is calculated automatically using the following formula:
Remaining Effort = Estimated Effort − Actual Effort
Remaining Effort is automatically updated when:
- Time is logged on the ToDo
- Estimated Effort is modified
In addition to automatic calculation, Remaining Effort can be manually updated to reflect the current expected effort required to complete the ToDo.
For example, if a ToDo was originally estimated at 8 hours and 6 hours have been logged, the remaining effort is automatically calculated as 2 hours. If the user determines that 4 additional hours are required, they can manually update Remaining Effort to 4 hours.
When a ToDo is closed:
- Remaining Effort is set to 0.
When a ToDo is reopened:
- Remaining Effort is recalculated based on Estimated Effort and Actual Effort.
- Users can modify Remaining Effort again if needed.
Workitem Effort Rollup from ToDos
Workitem effort values are automatically derived from its ToDos:
- Workitem Estimated Effort = Sum of all ToDo Estimated Effort
- Workitem Actual Effort = Sum of all ToDo Actual Effort
- Workitem Remaining Effort = Sum of all ToDo Remaining Effort
These values are automatically updated and cannot be edited manually.
ToDo Visibility in Time Tracking
ToDos appear in the Time Tracking tab based on:
- Workitem ownership
- Workitem creation timeline
- ToDo activity and lifecycle
Closed ToDos remain visible until the week they were closed, but do not appear in future weeks.
Related Articles
- For detailed instructions on logging time and understanding time statuses, refer to the Time Tracking help article.
- For detailed instructions on reviewing, approving, or rejecting submitted time, refer to the Timesheet Approval help article.