Start with the video first to get a better grasp of the topic!
|
Skip Ahead to: |
Overview
You must be familiar with the Time Tracking features to log time against the workitems.
Navigation
In the left navigation panel, select the Timesheet menu.
Time Tracking Features
The following features in Time Tracking help users to log time against Workitems:
- Update Remaining hours for Tasks
- Save and Route timesheets
- View Project Timesheet Summary
- Timesheet Cell
- Total Hours
- Filter
- More Options
Update Remaining Hours for Tasks
You can specify the amount of work remaining on MSP and Tasks by updating the Remaining Hours column in the current week’s timesheet.
On Updating the Remaining Hours for Tasks
- The updated Remaining Hours cell for the Task is highlighted so that it is apparent it has been modified manually. It is also highlighted to the Timesheet approvers during approval. Upon timesheet approval, the highlight is removed as the change is accepted.
- You can know the ideal remaining hours i.e., the difference between the Planned hours and Logged hours by hovering over the updated Remaining hour’s cell of the Task.
For example, if the planned hours for a Task are 40 Hrs and logged hours are 8 Hrs, then the Remaining hours are auto-computed to 32 Hrs. Now, if you change the Remaining hours to 35, then the tooltip over the Remaining hours’ cell shows“Planned hours – Logged hours: 32.00” - An activity log for the timesheet is generated. “Rem. hours for TSK60 of Web App Acme Systems changed from 32.00 to 35.00”
NOTE: You may update the Remaining hour’s column for ToDos as well. Updating the Remaining hours for a ToDo sets it as the Daily Remaining on the last date on which time has been logged for that ToDo.
On Timesheet Approval for Tasks with Modified Remaining Hours
Based on the logged hours and remaining hours, Planned hours and Resource Assignment% % get updated as follows for MSP & Tasks:
- Planned hours get recomputed as the sum of Actual hours and Remaining hours. So, if the modified Remaining hours have been approved then, Planned hours for the task assignment as well as the Task gets recomputed accordingly.
For example, if the Planned hours for a Task are 40 Hrs. and Logged hours are 8 Hrs. then the Remaining hours are auto-computed to 32 Hrs. Now if you change the Remaining hours to 42 and have this timesheet approved then the Planned hours are recomputed as (8 + 42) i.e. 50 Hrs. - Resource assignment % changes as per the revised Planned hours. Going by the previous example, before the planned hours were updated i.e., when it was 40 Hrs. the percent allocation for the resource was 100%. This is based on the resource calendar hours being set to 8 Hrs. for 5 days of the week. Upon timesheet approval, the Planned hours changed to 50 Hrs. for the same 5 days of the week and hence the percent allocation for the resource gets recomputed to 125%, considering 10 hrs per day need to be worked up instead of 8 hours per day by the resource in the same 5 working days.
NOTE:
1) The above 2 changes happen for MSP Tasks only upon check-out and check-in operations for the Task Plan.
2) The estimated hours of a ToDo do not get impacted based on the changes and approval of modified Remaining Hrs.
Save and Route
When the timesheet is loaded for the first time, the SAVE and ROUTE buttons are disabled by default. When hours of the timesheet grid are edited or changes are made to the timesheet, the SAVE button is enabled. The ROUTE button is enabled only on successful save of the modified changes.
- After saving the changes and routing the timesheet, it is forwarded to the next stage for approval. The user in the Approval stage of the workflow is supposed to approve/reject the Timesheet.
- If the Timesheet Approver has rejected the timesheet, you will see the rejected timesheets in the Status column. You will have to correct the timesheet and route again.
- The Save and Route buttons are only enabled when the Timesheet Approvers have been set, and this functionality extends across all areas of the timesheet entry screens. In cases where the Timesheet Approvers have not been set, only the Submit button is displayed. This means that upon clicking Submit, the timesheet will be automatically routed and closed, eliminating the need for a separate action of clicking the Route Timesheet button.
NOTE: The Save and Route buttons are only enabled when the Timesheet Approvers are set.
View Project Timesheet Summary
To view the timesheet status summary for projects in the current week:
- Ensure that the Status column is added to the Time Tracking View. If not, add the Status column by Column Settings. The Status column is added to the view. It is displayed for all workitem statuses shown. For example, Not Filed, Routed, etc.
- Click the Status Link for the required project. It displays the following Timesheet details:
- Timesheet Status: Current status of the timesheet
- Routed On: Timesheet last Routed on
- Queue: The workflow queue in which the timesheet currently is
- Current User: The approver with whom the timesheet is pending approval.
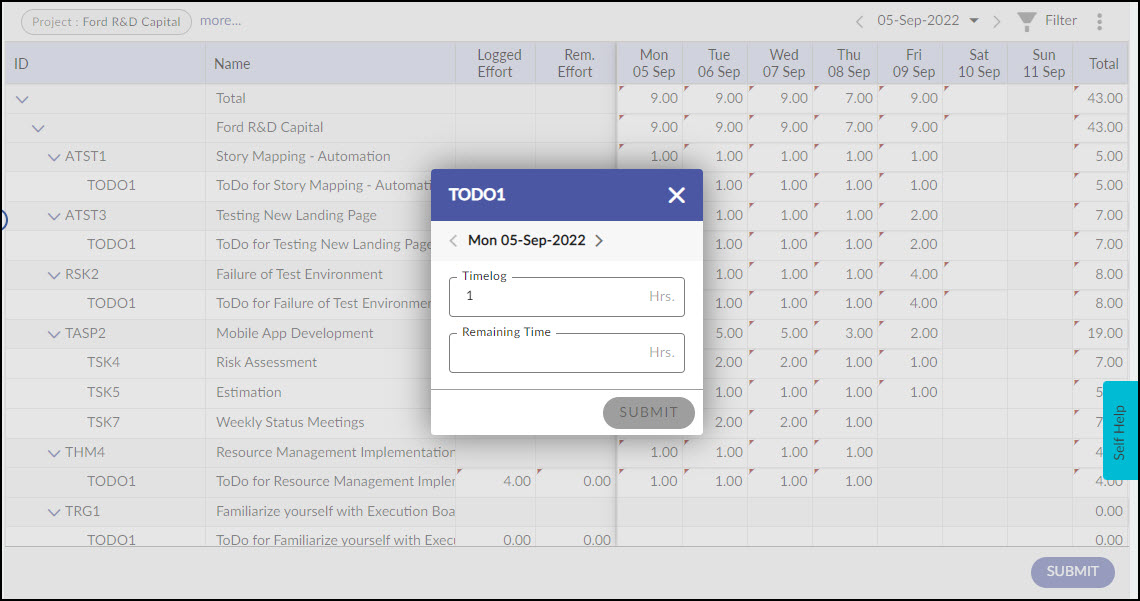
Timesheet Cell
Double-clicking a cell opens a window, which displays TimeLog contents by default. The Timelog and Remaining are shown from the hours entered in the timesheet.
Workflow stages, First Time, denotes the first time hours against the workitem, and Next Time denotes the rework hours. The first time and next time are traced to the Standard Codes in the workitem’s workflow. This will be beneficial when First Time is associated with a corresponding Activity -Standard Code and the Next Time is associated with a rework-related Standard Code. Then the metrics for initial and rework hours can be captured accurately.
SAVE the changes in this window and click the back/forward arrow icons to navigate to the previous day or the next day’s cell to enter the hours for the workitem.
Total Hours
Total Hours displays the total number of hours saved by the user for a week.
Filter
The filter enables you a quick grouping or categorizes timesheet data. The timesheet data can be filtered in several useful ways to enable quick overview or tracking of required timesheets. The filters available in the Time Tracking view are as follows.
1. Project
2. WorkItem Type
Note: By default, the timesheet filter is set to the last accessed project with all card types selected. Any changes to the filter will be saved for future sessions until manually updated.
Project
The project filter will display the timesheets for projects as per the filter criteria selected in the Project filter. You can also select multiple projects for which the timesheet tracking is enabled.
You can select a specific project present in the listing or specify other filters with the project filter to get the required projects. The projects with “Open” status, for which time logging is not enabled as well as projects for which time logging is enabled but not available in the listing of projects can be displayed through the Project filter.
The workitem Type filter lets you select specific forms in the timesheet. This enables quicker view and access as only workitems available in the timesheet for hours tracking is available in the listing. This gives the advantage of quicker time tracking against required workitems that are worked upon regularly/often and also avoids cluttering all workitems available for time logging.
You can select either all or specific workitems for which the timesheets are to be displayed.
Calendar
In the Time Tracking view, the selection of the Calendar will display the timesheet for the week to which the selected date belongs. The Calendar shows the timesheet data in different views based on the date or date range selected. The Calendar comprises the monthly calendar widget from which you can select the required dates. Past or future timesheets can be generated through the Previous and Next navigation icons, beside Calendar in the Calendar widget.
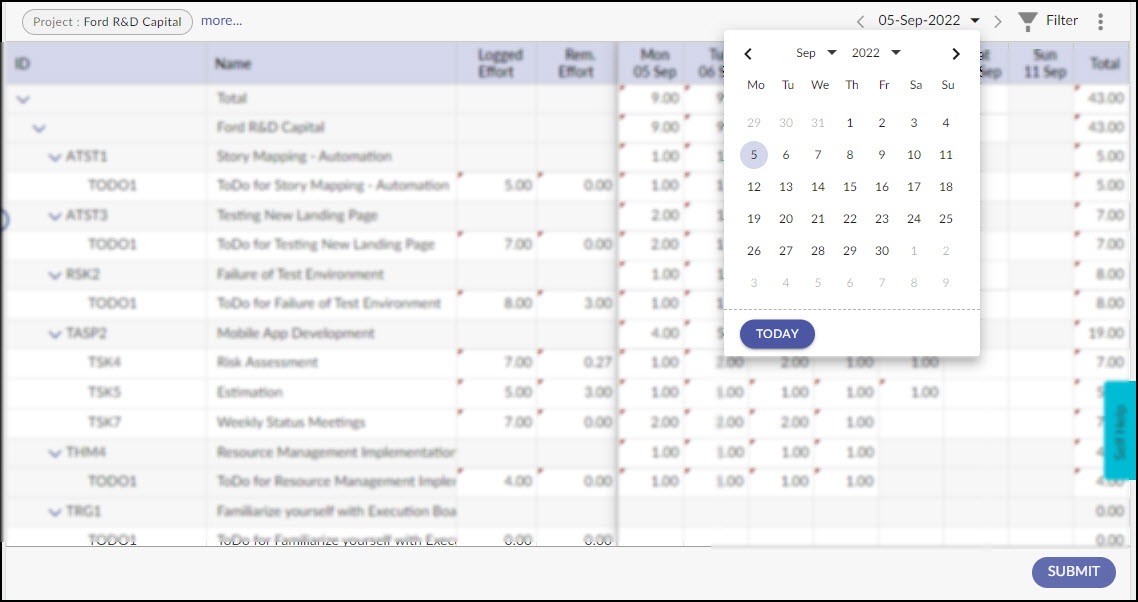
In the Time Tracking view, clicking the previous or next button will show the timesheet for the previous or forthcoming week respectively. So the timesheet is generated for future dates or past weeks, as required. A timesheet list allows the selection of a date range for which the list of timesheets is loaded. Each timed track ends up getting summarized daily and then gets rolled up at a high duration.
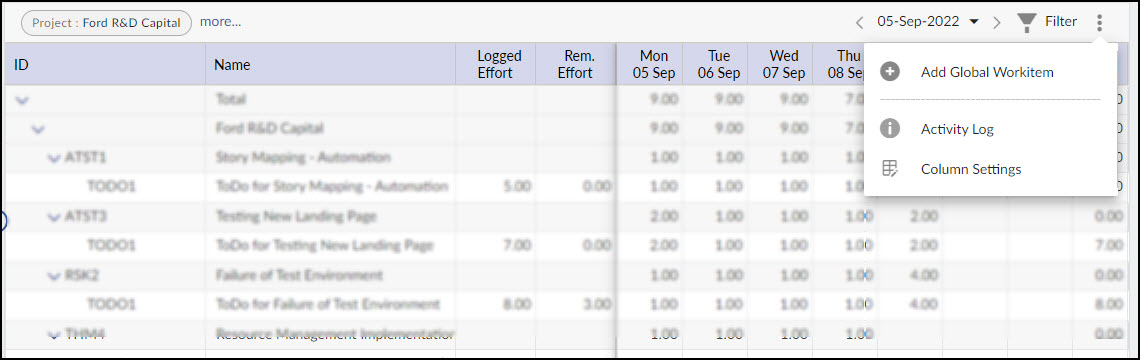
More Options
Click the More Options icon to view the following options.
1. Add Global Workitem
2. Activity Log
3. Column Settings
Add Global Workitem
Sometimes apart from Project Tasks, you need to log time for generic tasks. These are pre-defined in the organizations as ‘Global Tasks’, for example, Meetings, Training, etc. To add an existing Global Task, click the Add Global/Local Task icon, and select the global task from the list of pre-defined Global Tasks such as Company Meetings, Customer Overhead, Leave, Product Training, Power Outages, etc.

You can view Global tasks below project tasks, in the Time Tracking view.
Activity Log
The Activity Log displays a list of operations carried out on the timesheet by various users.
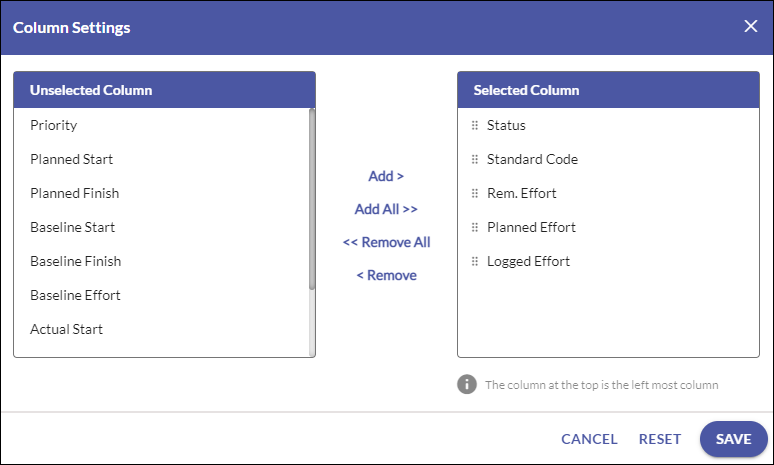
Column Settings
The selected fields are displayed for corresponding workitems under respective columns. By default, the planned hours, logged hours, and remaining hours are shown.
To add/remove a column:
- In the Column Settings window, select the required column from the Unselected Columns list, and then click Add. The column name appears in the Selected Columns list. Select Add All or use CTRL/SHIFT to select multiple columns.
- Click the SAVE button to save the changes or click the RESET button to discard the changes. Click the Cancel button to exit the window.
- To remove a selected column, select the required column name in the Selected Column list, and then click Remove. You can select Remove All or use CTRL/SHIFT to select multiple columns to remove them from the Selected Columns list.