
Start with the video first to get a better grasp of the topic!
|
Skip Ahead to: |
Overview
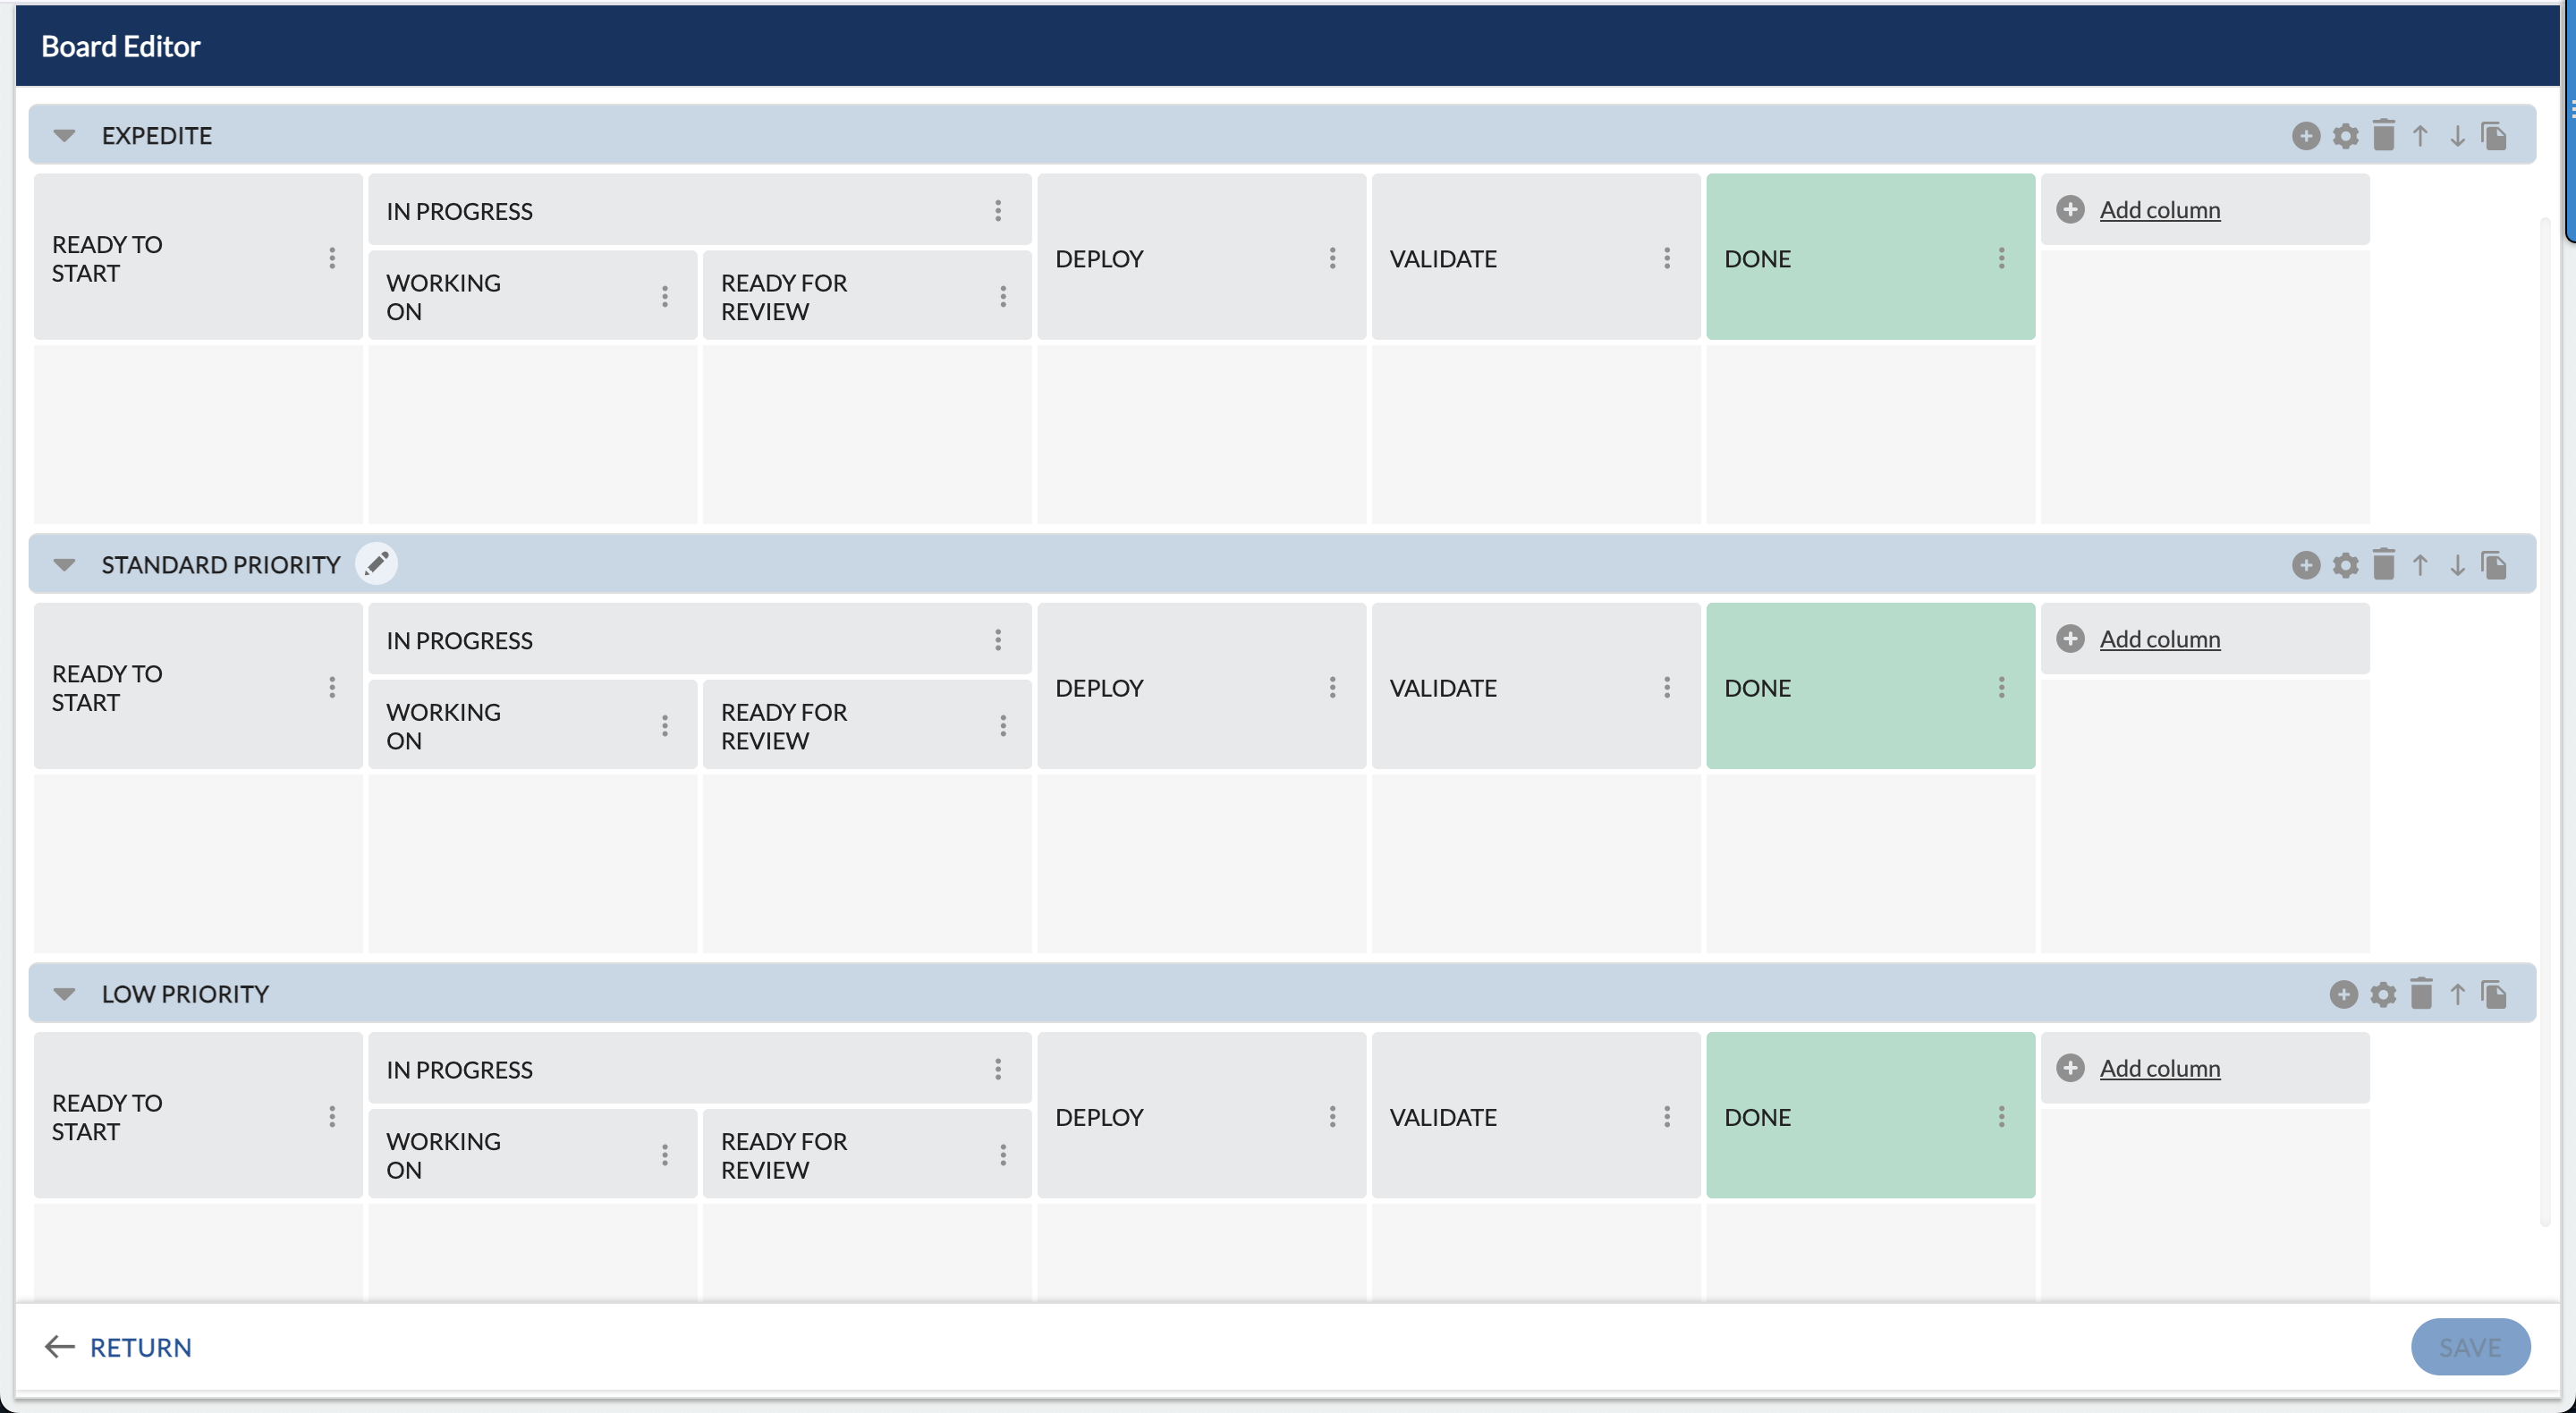
The Work Hub gives you a flexible Board Editor to map your value streams with custom lanes, columns, WIP limits, and progress tracking. Every new project comes with a default Work Hub, which you can easily tailor to your workflow.
There are now two ways to configure lanes in the Work Hub:
- Manual configuration — Add and edit lanes directly using the Board Editor.
- AI-based configuration — If you have a sample board image—whether it’s a product screenshot or a hand-drawn sketch—upload it, and AI will automatically generate digital lanes and columns for you.
You can even set a column in your lane as a Percent Progress Column, where the horizontal position of cards visually communicates % progress, making it easy for stakeholders to track initiatives and projects.
Navigation
Navigate to the breadcrumb at the top and hover over the Project name, expand the Execute module, and select Work Hub. Click on the Board Editor icon on the required lane in the Work Hub.
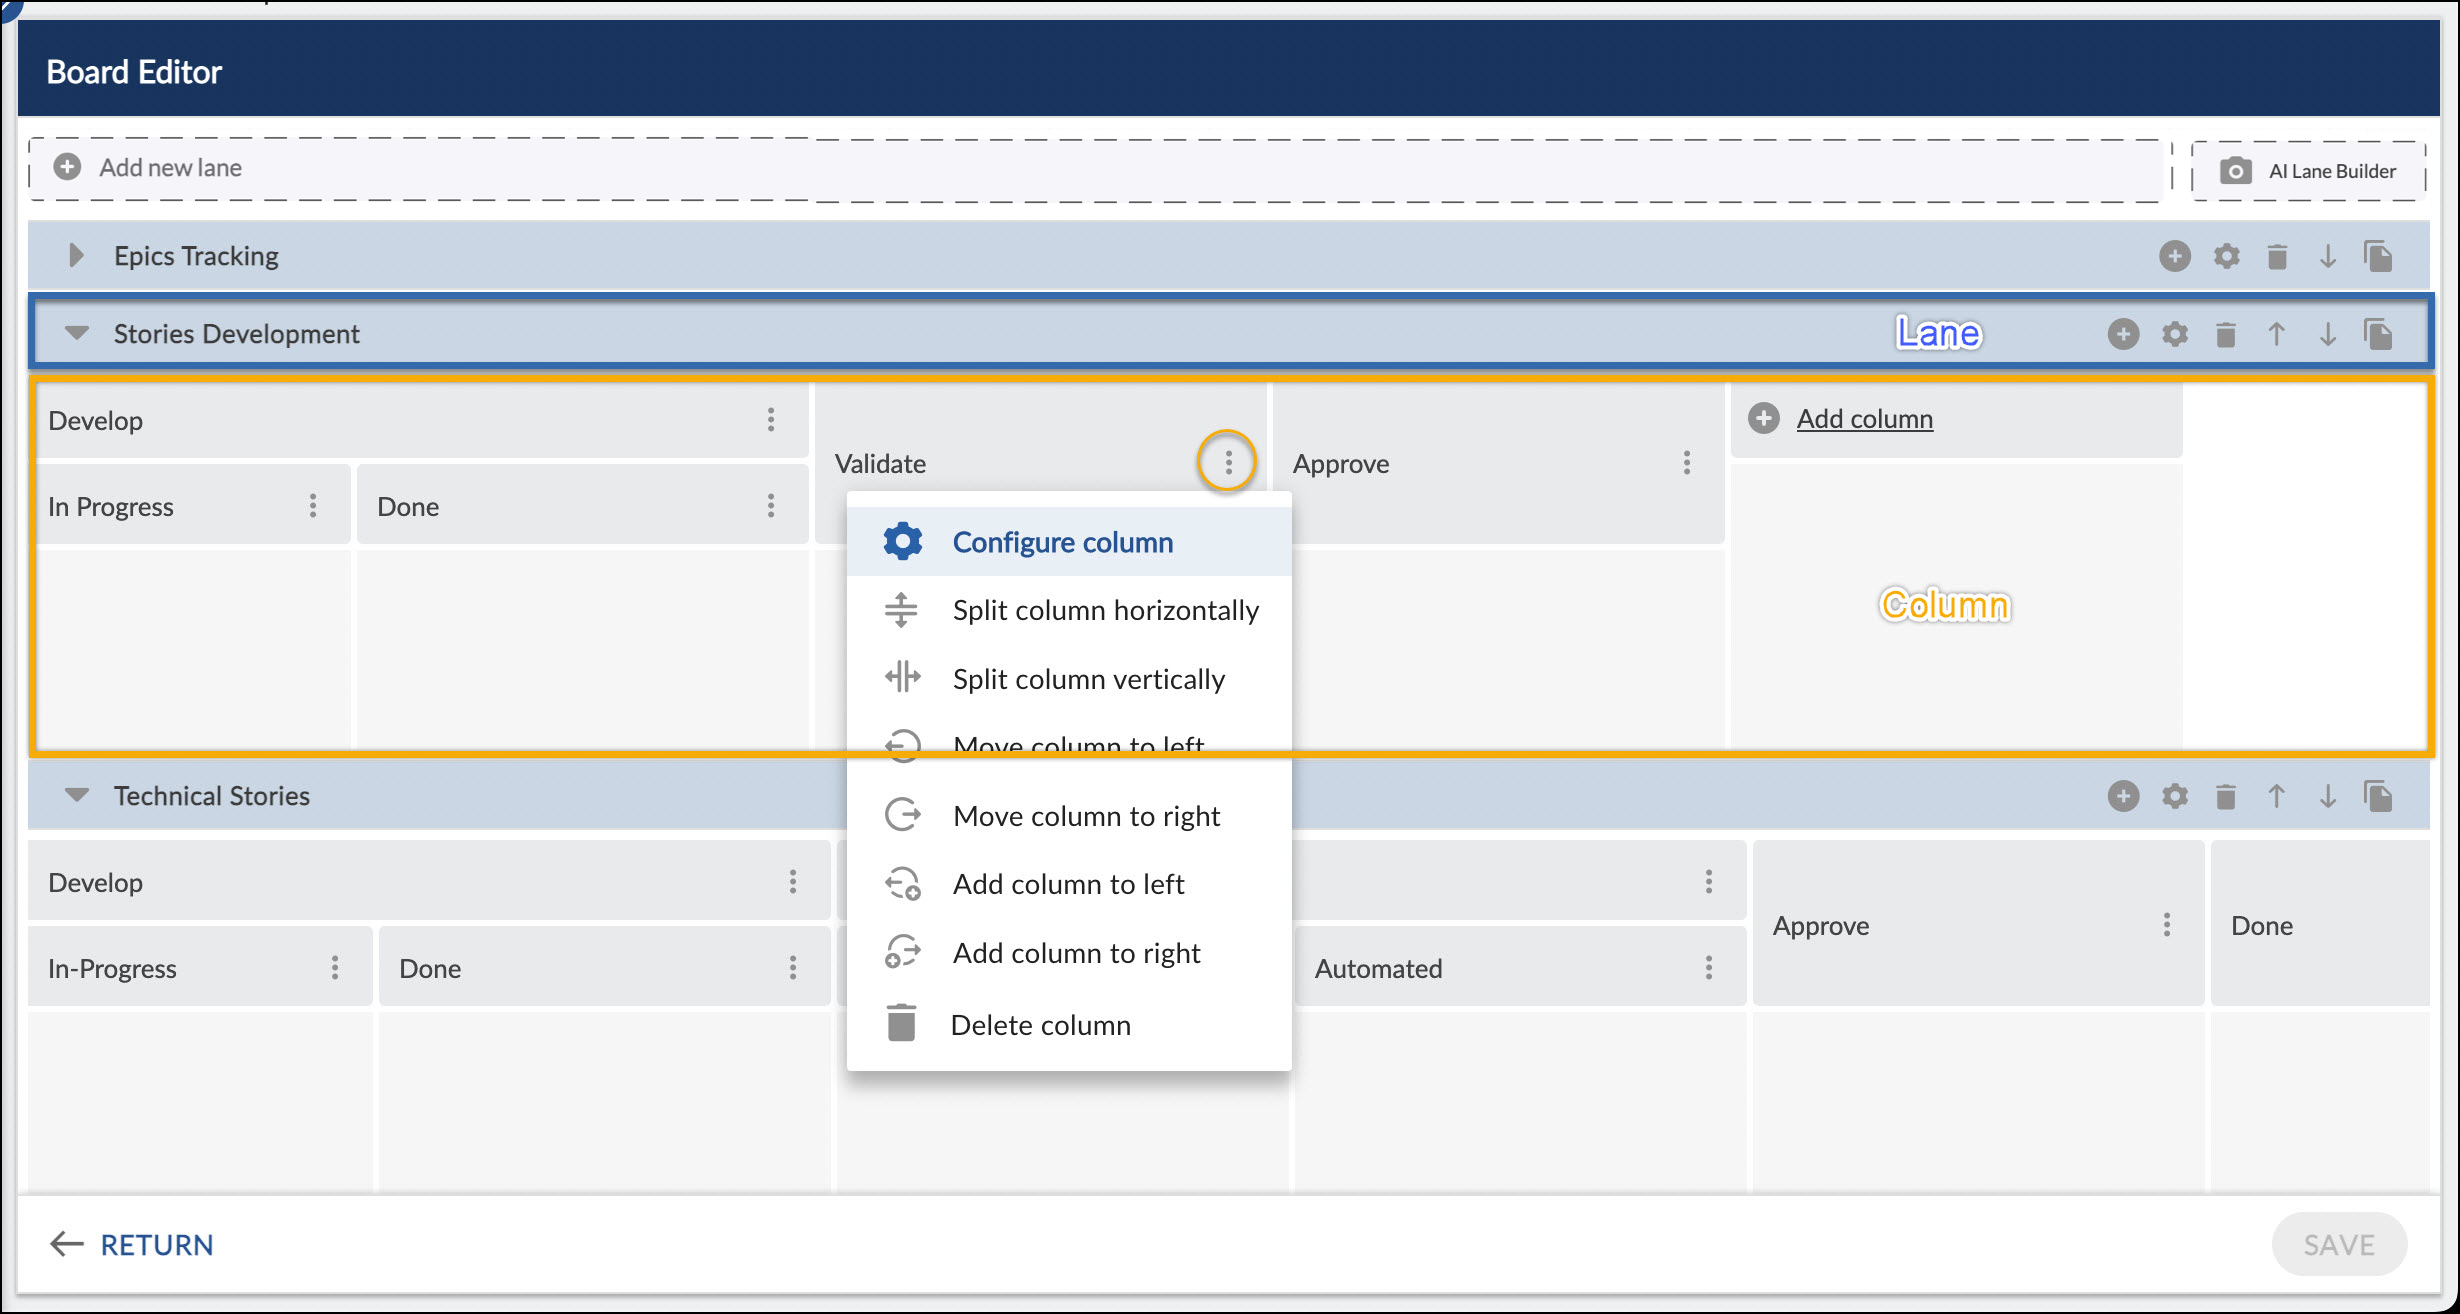
Lane
Steps to Add Lane
To add a new lane perform the following steps:
- Click the Add icon on an existing lane.
- In the Lane Settings pop-up, enter the Title and Description.
- Click Save. The new lane will be seen below the existing lane.
Also, the lanes can be easily added by using an empty placeholder.
Steps to Edit Lane
To edit a lane perform the following steps:
- Click the Settings icon on the lane.
- In the Lane Settings pop-up, update the Title and Description.
- Click Save.
Other Operations to be performed on Lanes
- Delete: To delete a lane, click the Delete icon. Note: If a lane contains cards, then it cannot be deleted.
- Move Up Lane: To move a Lane upwards, click the Move Up icon.
- Move Down Lane: To move a Lane downwards, click the Move Down icon.
- Copy Lane: To copy a Lane, click the Copy Lane icon. In the New Lane Settings pop-up, update the Title and the Description. Click Save.
Columns
Column Types
You can classify a column as a ‘Ready’, ‘In-Progress’, ‘Waiting’, or ‘Done’ type column. It will help you track the progress made by the workitem. Also, if a card is moved to the ‘Done’ column, it will be considered completed.
Column Operations
- Move column to Left: It lets you move a column to the immediate left.
- Move column to Right: It lets you move a column to the immediate right.
- Split column vertically: It lets you split a column vertically.
- Split column horizontally: It lets you split a column horizontally.
- Add column to Left: It lets you add a new column to the immediate left.
- Add column to Right: It lets you add a new column to the immediate right.
- Delete column: It lets you delete a column.
- Configure column: To edit a column, perform the following steps:
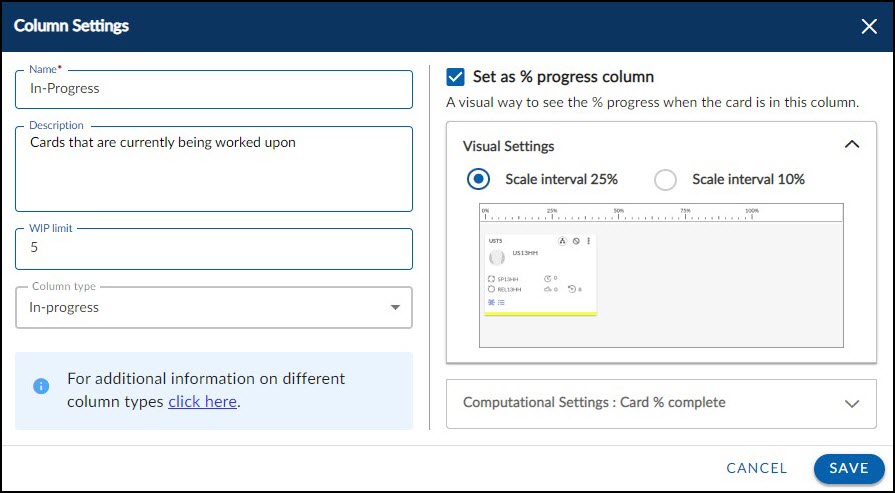
To modify a column, perform the following steps –
- Click the Configure column icon.
- In the Column Settings pop-up, update the Title and Description.
- Column Type:Set as Ready, In-Progress, Waiting, or Done; cards in Done are considered complete.
- WIP Limit: The work in progress (WIP) limit set the maximum cards allowed; exceeding it shows the count in red in the Column Header. For example, 8/5 in red font indicates there are eight cards in the column exceeding its WIP limit of five. Click Save.
- % Progress Column: To enable this column as a % Progress Column, checkmark this option. Once you enable this option, the % Progress Criteria option gets enabled which includes two options: Card % Complete and Child % Complete. To know more about Percent Progress Column, click here.
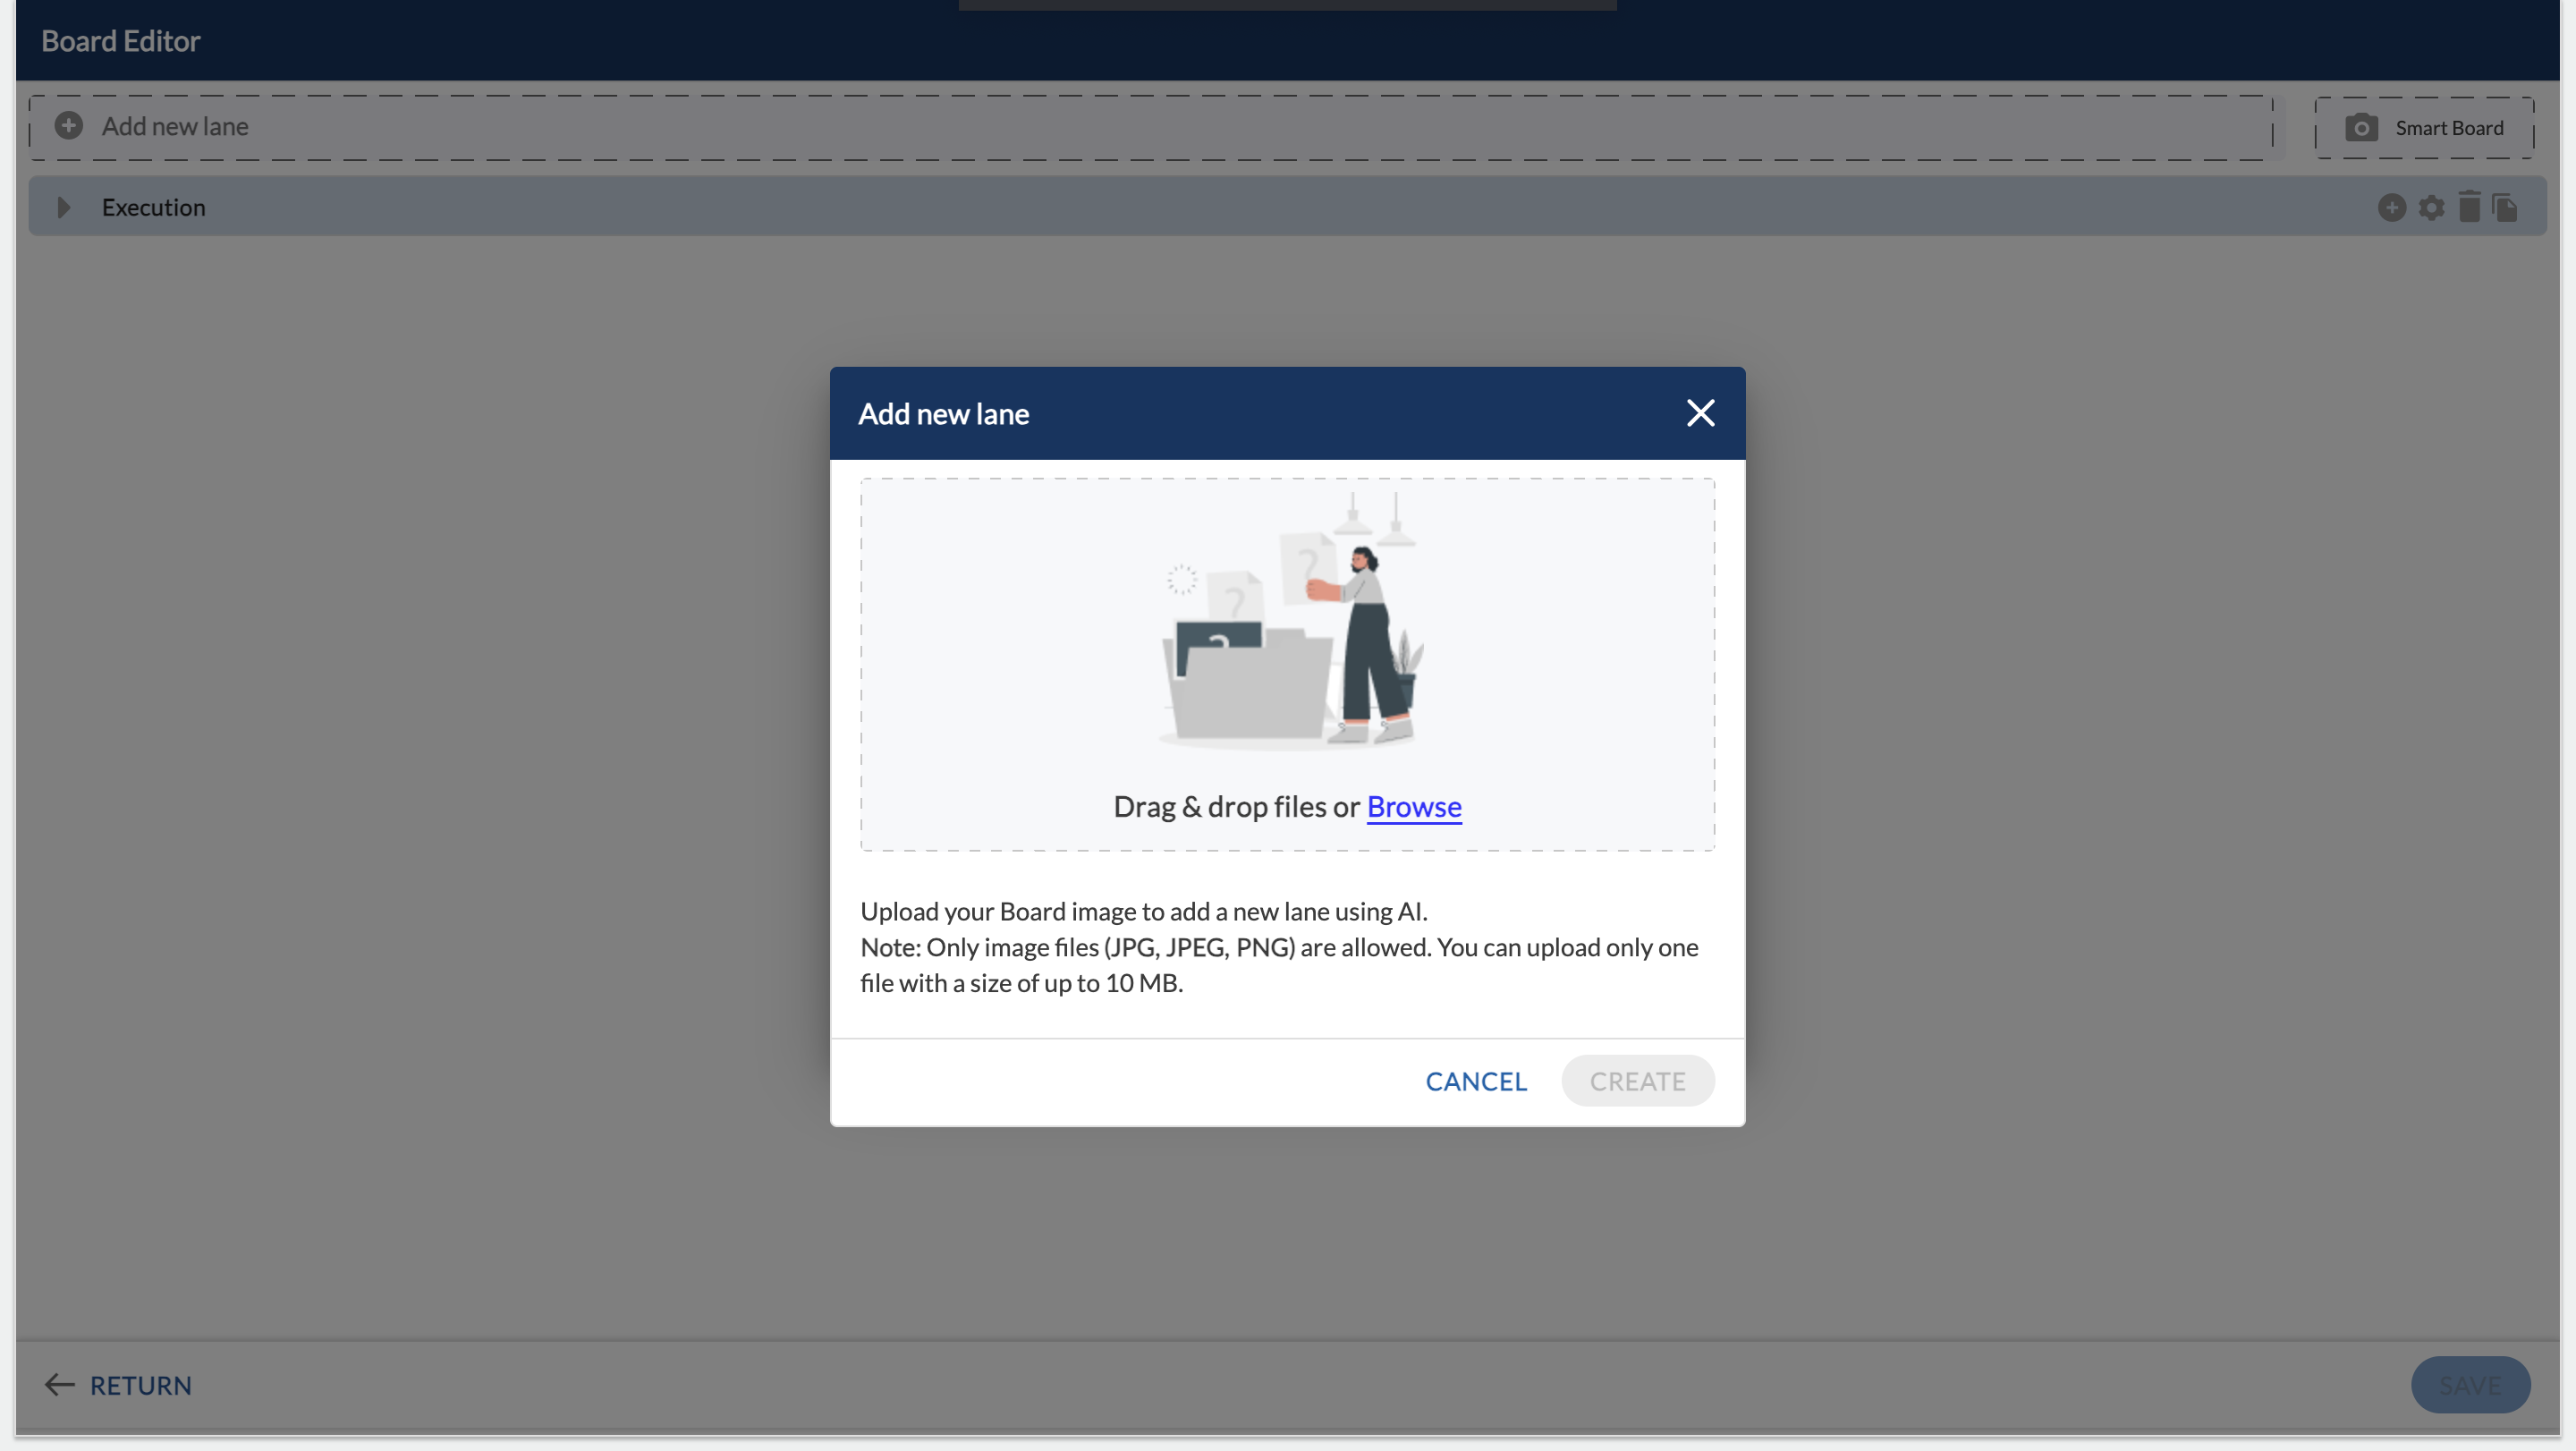
AI-Based Lane Generation from Image Upload
You can now automatically generate lanes in your Work Hub by uploading an image of a product screenshot or a hand-drawn sketch. The system uses AI to analyze the image and create a digital version of the board, including lanes and swimlane names.
Why this matters:
This feature helps teams quickly digitize their existing physical workflows without manually recreating each lane and column, saving time and ensuring consistency between physical and digital boards.
Steps to Generate Lanes via Image Upload:
-
Go to the Work Hub > click Board Editor > select the Smart Board icon in the toolbar.

- Upload a sample or rough sketch image of your board.
- The system analyzes the image and automatically detects lanes and their names.
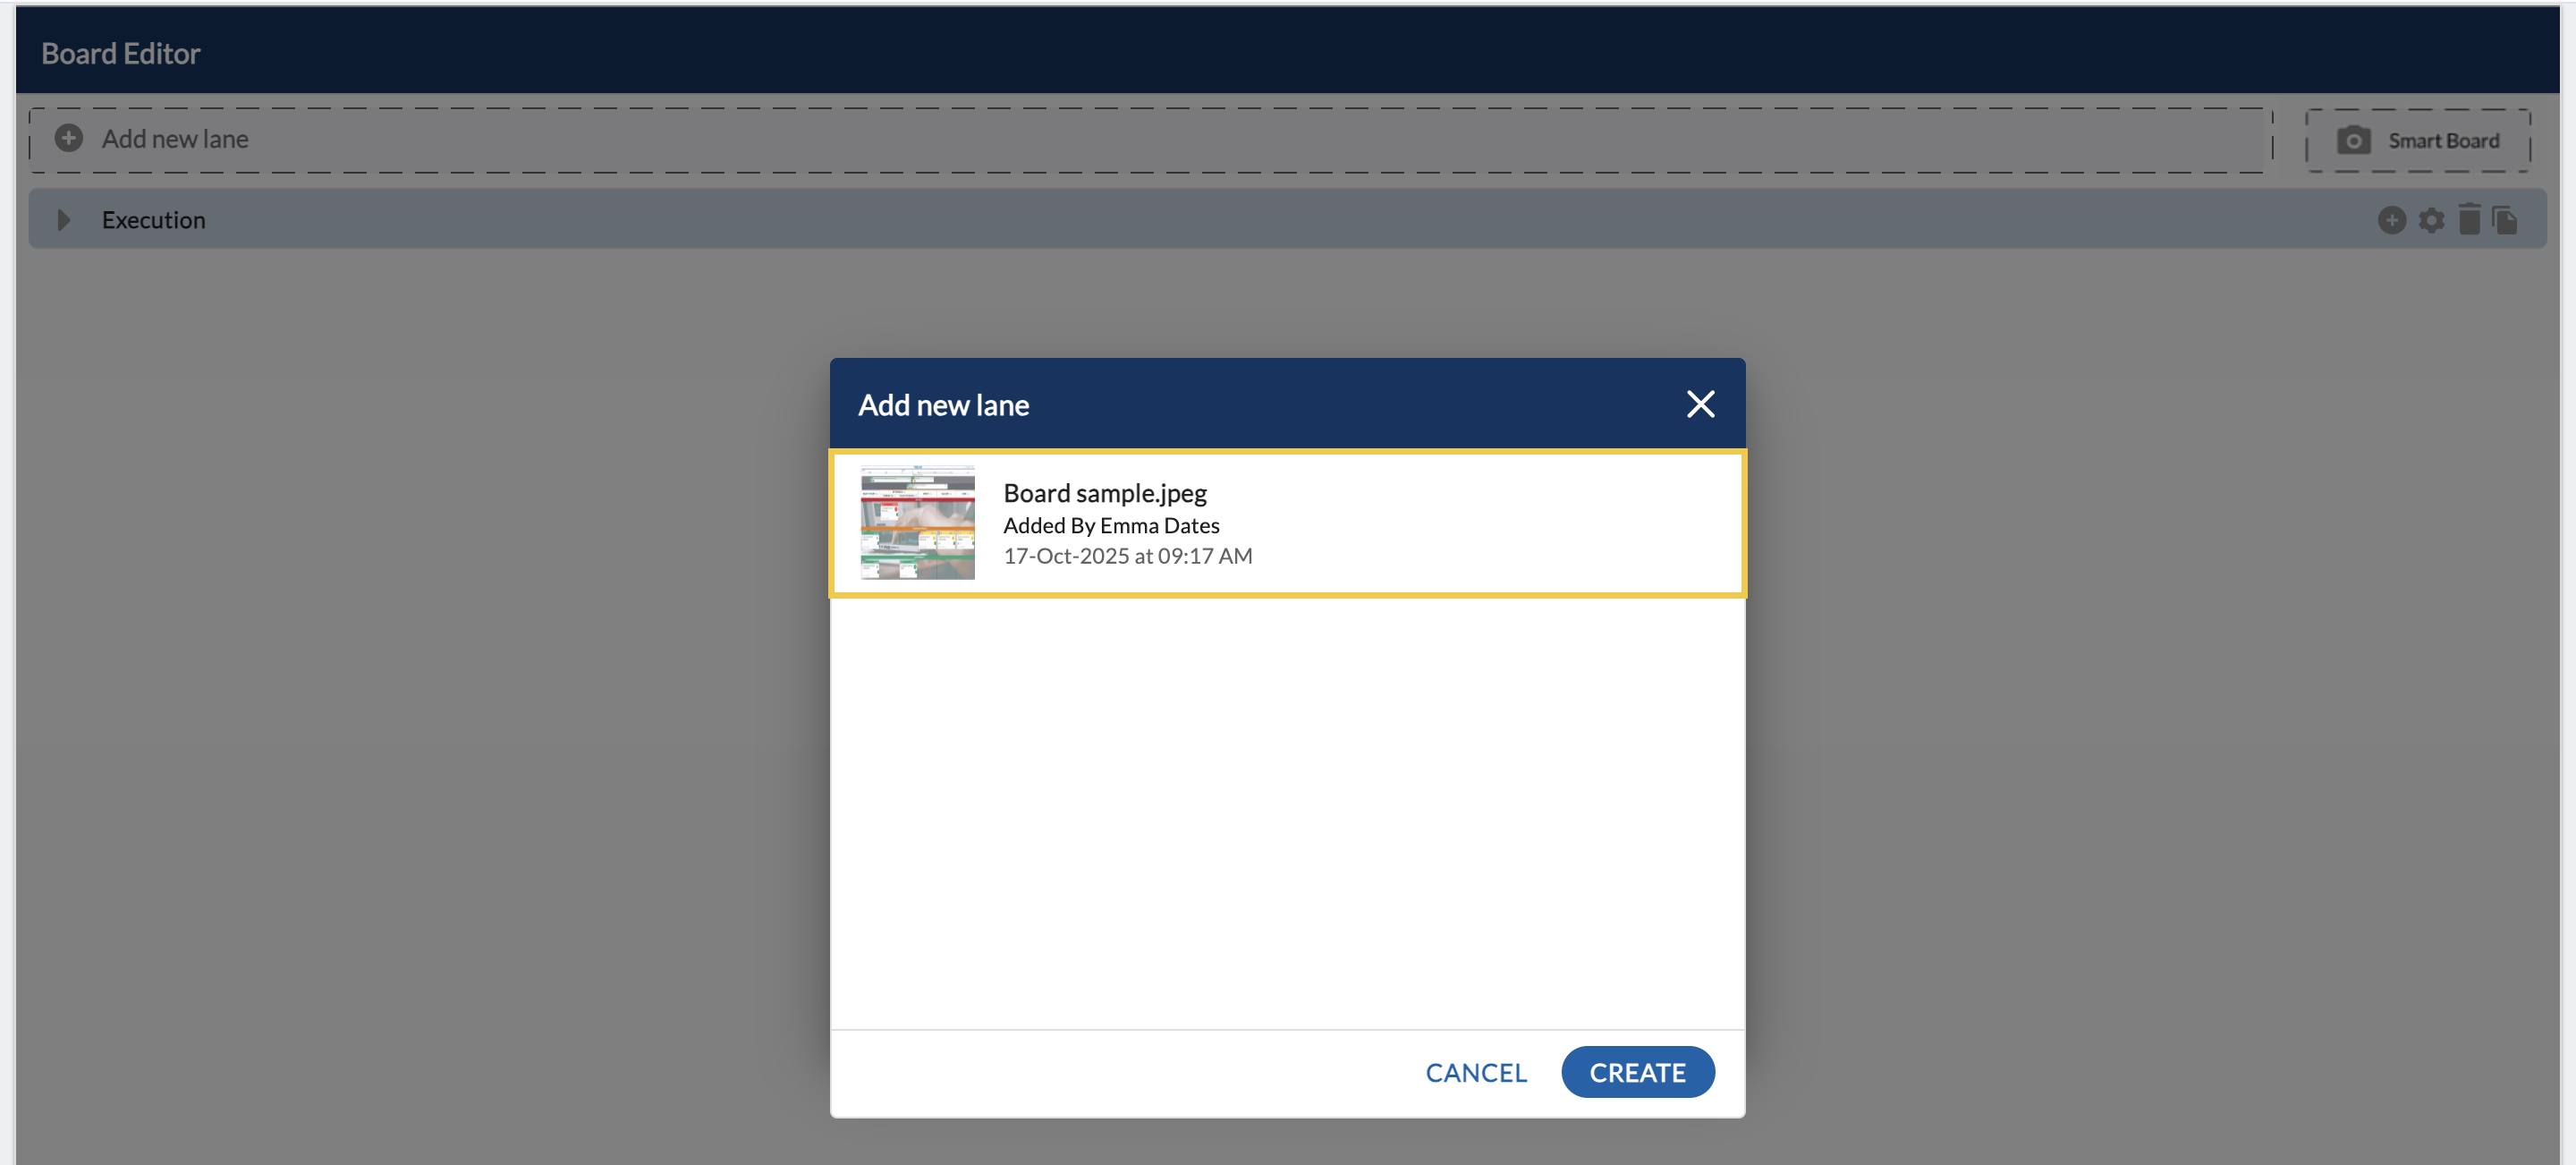
- Review the generated lanes — rename, reposition, or delete them as needed.
- Click SAVE to confirm and create the AI-generated lanes in your digital board.
Note: AI Lane Builder is available as part of the AI-Agent add-on. To use this feature, your organization must purchase the add-on, learn more.