
In this article, we will help you understand how to configure Card Aging and how Card Aging works.
|
Skip Ahead to: |
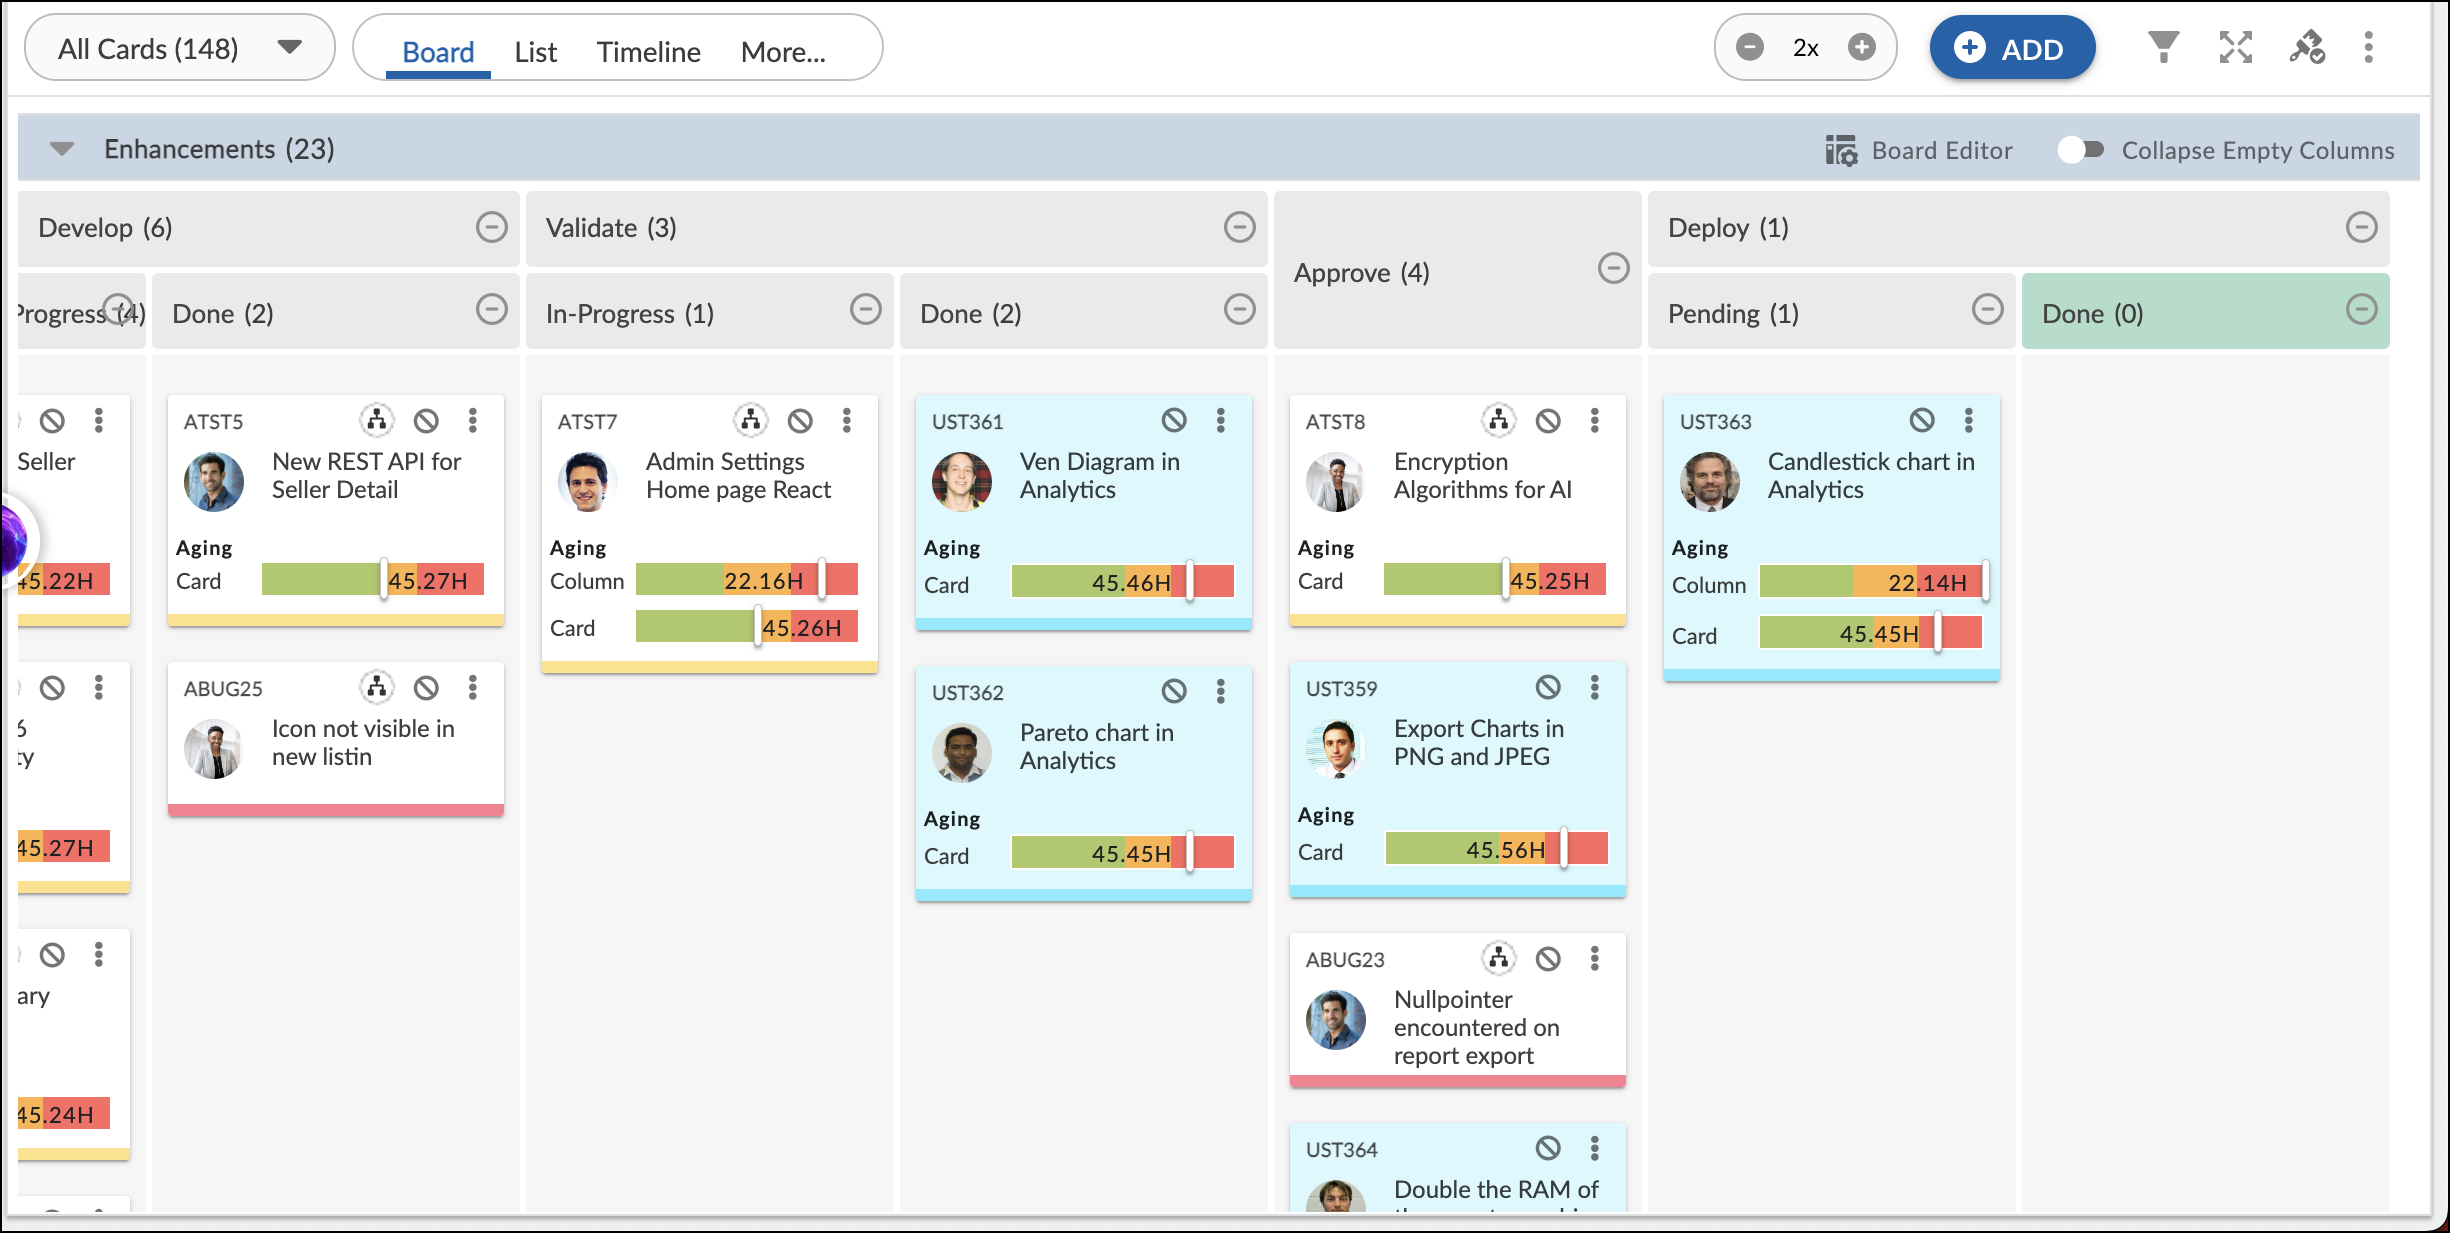
Card Aging in Nimble’s Work Hub provides a valuable mechanism for monitoring and optimizing task completion times. The Card Aging represents the time required to complete tasks or cards, such as user stories, technical stories, features, epics, and more, within the context of your Work Hub. Card Aging measures the time elapsed from when a card is created and pushed to a specific column and lane on the Work Hub. It provides valuable insights into process efficiency and serves as a key performance indicator for project managers. Card Aging for a card is recorded based on the time it spends in a particular column/lane. This is calculated as the number of days or hours a card remains in a column, measured from the Entry Date when the card enters the column to the Exit Date when it leaves the column.
Navigation
Navigate to the breadcrumb at the top and hover over the Project name, expand the Execute module, and select Work Hub. Click on the Board Editor icon on the required lane in the Work Hub. Else, go to More Options, and enable the toggle Show Card Aging. You can easily hide/unhide Card Aging using the toggle option.
Setting Card Aging for Cards
To set Card Aging for cards within a specific lane:
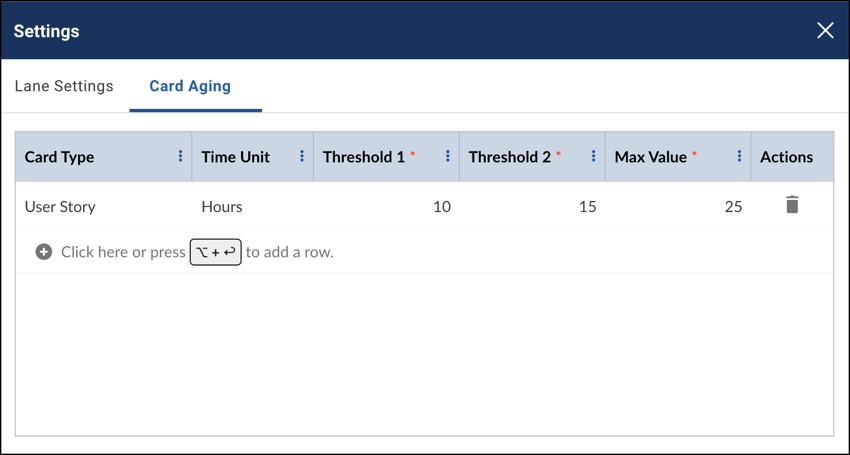
- In the board editor, select the desired lane. Click on the Lane Settings icon within that lane.
- Select the Card Aging section and click the insert button to add a new row, or press the “Insert” button on Windows, or “option + return” on Mac.
Note: By default, the setting applies to all card types, and it will be selected as “Default”. In the Card Aging section, define two thresholds and a maximum value in hours, days, or weeks for the column. - In the Card Aging section, define two thresholds and a maximum value in hours, days, or weeks for the column.
- If you want to edit the row, simply click on it. You will instantly enter edit mode to update the fields, and you can save the changes by clicking outside.
- Toggle the Show Card Aging option under More Options on the Work Hub.
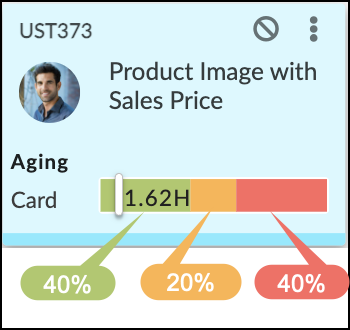
- Now, the Work Hub highlights the current status of the cards in a horizontal line based on the thresholds. Any card under threshold 1 is shown in green, between threshold 1 and 2 in orange, and beyond threshold 2 in red.
For example, if Threshold 1 was set to 10 hours, Threshold 2 to 15 hours, and the Max Value to 25 hours, the Card Aging bar on the card will display as follows: Green (40% of the bar), Amber (20% of the bar) and Red (40% of the bar). Similarly, you can set other lanes as well on the Work Hub.
Setting Card Aging for Columns
Setting Card Aging for columns follows a similar process:
- In the board editor, select the desired column. Click on the Configure Column under More Options.
- Follow the same steps as outlined in the “Setting Card Aging for Cards” section.
How Does Card Aging Work?
Once you’ve configured the Threshold settings for a particular column or lane, you’ll notice the Aging Column and Card bars appearing on the cards. Here’s how Card Aging works:
- After setting the Threshold settings, you’ll see that an individual card will display Card Aging bars. These bars visually represent the aging status of each card.
- The Card Aging Slider, located on each card, is a dynamic visual indicator that moves on the colored bar (Green, Amber, and Red) based on the Threshold values you’ve defined.
- When a card enters a specific column or lane, the Card Aging Slider starts in the Green bar. This initial position indicates that the card has just entered the column.
- As time progresses, the Card Aging Slider gradually moves from the Green bar into the Amber bar and, eventually, into the Red bar.
- The progression is determined by the predefined Threshold settings for that column or lane. The position of the Card Aging Slider serves as a quick and visual reference, instantly conveying how long a card has been in its current location. This makes it easy for team members and project managers to assess the duration of cards.
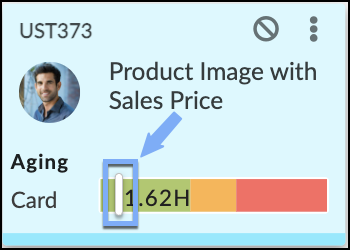
Card Aging Slider
Important Points
- If you have set the card aging threshold for your Lane, then it is labeled as “Aging Card” on the card of your Work Hub.
- If you have set the card aging threshold for your Column, then it is labeled as “Aging Column” on the card of your Work Hub.
- If you set a threshold for a Default card type then no matter the card type on the lane or column, the threshold will be defined over all the card types in the Lane and columns.
- If you set a threshold for the Default card type and you also set a threshold over another card type, for example, the defect card type. In this scenario, except Defect card type, the status of all the other card types will be calculated on the basis of the Default card type threshold. For the Defect card type, the status report will be displayed as per the threshold defined specifically for the Defect card type.
- Card Aging will be based on the date of card was created.
- The calculation considers 1 day as equivalent to 24 hours from the entry time into a column.