
In this article, we will help you understand how to get started with the Backlog Refinement feature.
|
Skip Ahead to: |
Overview
Agile Release planning can be at times challenging and chaotic, especially when you deal with a wide array of workitem types with no clear indication of past velocity or current team capacity. So, as a product owner or scrum master, you might be in constant fear of either over-committing or underutilizing the resource for a sprint.
Backlog Refinement fills up that gap by making the whole sprint planning activity smoother and flawless by executing your work in a synchronous manner. The three-stage grooming process consisting of Backlog, Groomed Backlog, and Sprint Planning provides you enough flexibility to carefully define the work to meet the sprint commitments. And while you go on tagging workitems, you are well updated by the summary points and charts that offer you a clear indication of any recalibration required.
You can add cards from the Backlog Refinement while grooming and prioritizing your cards for the sprints. Depending upon the information provided in the card, it gets added in the Backlog or Sprint Planning section of the Backlog Refinement. For example, if you have not added the Sprint name in the card, then it will be added to the Backlog section and if you have provided the Sprint name in the card, then it will get added
to the Sprint Planning section of the Backlog Refinement.
You also have a full-screen mode that will hide the top panel and left module navigation of the application providing you a bigger view and more focus on the Backlog Refinement.
Note: The Groomed Backlog section of Backlog Refinement will have the same fields as available in the respective workitem listing.
Navigation
Navigate to the breadcrumb at the top and hover over the Project name, expand the Agile Planning module, and select Backlog Refinement.
Sections of Backlog Refinement
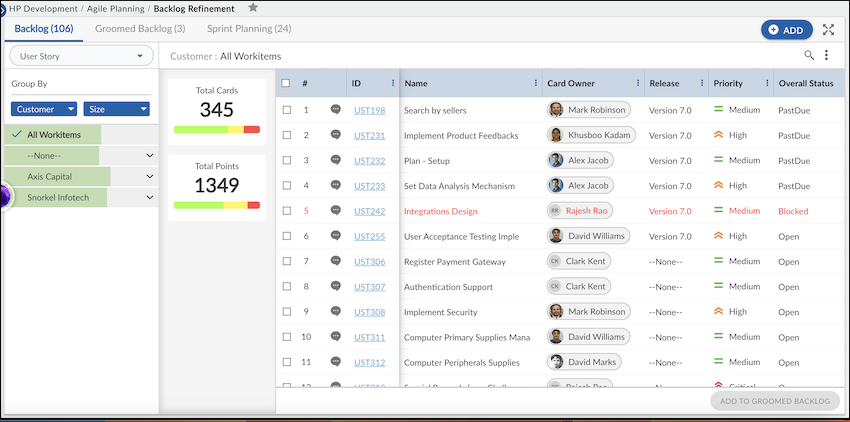
There are 3 sections: Backlog, Groomed Backlog, and Sprint Planning. Each of them has its own set of visual dynamic charts that helps you plan your sprints easily.
- Backlog: The backlog view helps users bucket the agile workitems based on two levels of Grouping. The workitems can be filtered based on the attributes of the groupings. It also shows a horizontal bar of the total workitem divided across its status as Completed, Pending, and In-progress based on counts and points. On selecting the workitem that needs to be moved to Groomed Backlog, the user can see the summarization of points and counts as well. To understand it better, click here.
- Groomed Backlog: It shows the workitems that have been groomed and are ready to be moved for sprint allocation. All the workitems are shown in the form of a pie chart based on workitem type. The summarization points and counts on the selection are also available here. To understand it better, click here.
- Sprint Planning: It is divided into two panes: Ready for Sprint Allocation and Planning for Sprint. As you drag and drop workitems to the Sprint panel, its capacity pyramid and the workitem distribution pie chart gets updated. The average velocity statistics are also available for reference so that you can load the sprint accordingly. Once you have planned workitems for the Sprint, you can launch the Work Hub so that card owners choose their cards, plan necessary ToDos, and move cards as they work on it. To understand it better, click here.