
Start with the video first to get a better grasp of the topic!
|
Skip Ahead to: Advantages of using Story Mapping |
Overview
The Story Mapping Board offers you a comprehensive mapping tool to organize user stories into a visual map that communicates the end-to-end user journey from the big picture to actionable user stories. Inspired by Jeff Patton’s famous model, the three levels of the Story Mapping Board help you to:
- Frame the big picture of user requirements at the first or top-most level that addresses the common goal.
- Decompose it to the smaller, epic-level activities and associate them with the user persona at the second level
- Break the user-driven activities down into smaller building blocks or user stories and associate them with a release strategy.
So, with the Story Mapping Board, you can quickly and efficiently build an MVP version of a product or feature in a Lean-Agile manner and achieve its desired outcomes with a faster turnaround time.
Navigation
Navigate to the breadcrumb at the top and hover over the Project name, expand the Agile Planning module, and select Story Mapping.
Advantages of using Story Mapping
- Helps you visualize your product roadmap.
- Keeps the team members and the customers on the same page about what is happening in the project.
- Depending upon the product requirements, it helps you decide the iterations for the delivery of the project.
- It builds shared understanding and Comments & Attachments among the team members.
- Sizing, planning, and prioritizing the workitems becomes easy.
Structure of Story Mapping Board
The structure of a Story Mapping Board is defined in three levels. Each level should have a unique card type associated with it.
At the top/first level of the Board, identify the Usage Sequence on how the functional flow. These goals are divided into “n” number of smaller parts (for example – epics) at the second level. Along with the epics, their personas are set at this level. You can have more than one epic and its personas at the second level of the board.
These epics are further broken down into smaller and workable parts (user stories) at the 3rd level of the board. Once the user stories are created, planned, and prioritized, they can be tagged to their respective Release or Sprint.
For example, consider you have created two custom cards Theme and Epic, and have associated them with levels 1 and 2 of the Story Mapping Board respectively. You are developing a mobile app for your e-commerce website. Its high-level goals/themes that you are planning to achieve in the next few months are ‘Find a product’, ‘Examine a product’, ‘Add to basket’, etc. These goals can be defined at the top/first level of the board. Now, the goal/theme ‘Find a product can be divided into epics like ‘Browse product category’, ‘Search a product’, etc.
At the same time, you can also define the personas of these epics on the board like Buyer, Seller, Administrator, etc. These epics along with their personas are set at the second level of the board. Once you create user stories of these epics, you can tag them with the release or sprints available at the 3rd level of the board.
By default, Theme is associated with Level 1, Epic is associated with Level 2, and User Story is associated with Level 3. However, you can associate multiple cards with a level.
Important Points:
Before you start using the Story Mapping Board, here are some important points you need to remember:
- Cards Created in the Story Mapping Board Flow to Other Areas of the Application
Cards created on the Story Mapping Board such as Themes, Epics, and User Stories flow from Story Mapping Board to their respective workitem listings. Cards created from workitem listings or other areas of the application are not available in the Story Mapping board. So, it is recommended that cards are created from the Story Mapping board while working on a new feature/module.
- Update in Workitem’s Title, Description, Releases, and Sprints is Bi-directional
When you update any of these four fields in the Story Mapping Board then these changes are reflected in other areas of the application. Similarly, if you change the Name, Description, Releases, or Sprints on a card from other areas of the application then these changes are reflected on the Story Mapping Board. Note: Only the Description fields which are RTF will be synced up in the Story Map.
- Theme Epic Linking Reflected in the Parent-Child Hierarchy View of the Workitem only
Linking of Epic to Theme and User Story/Technical Story to Epic/Theme done in the Story Mapping Board is reflected in the Parent-Child hierarchy view of the work item. But the Theme and Epic fields of that work items are not updated and hence their value in them remains as None. Similarly, if you change the Theme and Epic of the workitem in the application then it is not reflected in the Story Mapping board. Hence, it is recommended, that the linking is done in the Story Mapping board as well as the details view of the workitem as seen in other areas of the application.
- Modification in the Hierarchy View of a Workitem will not be reflected in the Story Map
The planning of a product or a feature is done in the Story map. As the development work gets started and goes on, new workitems (user stories, technical stories, epics, etc.) may get created as the product/feature evolves. Since these workitems are created during the development and are not part of the original plan, these are not reflected in the Story Map.
So, any changes to the hierarchy of workitems made in the Story Map are reflected in the hierarchy view of the workitem but any changes made in the hierarchy view of a workitem will not be reflected back in the SM.
Besides, one may add a new level in the workitem hierarchy which is not configured in the 3 levels of the Story Map. In this scenario, workitem hierarchy cannot be in-sync with the Story Map. Also, the hierarchy may be set across multiple projects which might not be configured in the Story Map. Hence, it is recommended that you plan the product/feature roadmap in the Story Mapping Board and refer to it only from the initial scope point of view. Further updates to the hierarchy should be seen in the hierarchy view of the respective items alone.
Prerequisite
- To use the Story Mapping feature in the application, one must have a supporting license. Please contact the sales team to know how to avail of it. As soon as you insert the Story Mapping license in your Setup, the Story Mapping field will be visible in all the Agile forms along with Theme and Epic.
- Story Mapping Server URL, instance URL, and admin’s login Id and password must be set in the Story Mapping Setup screen.
- This is compatible with Agile projects only so make sure you have Agile projects.
- The Story Mapping board has three levels so make sure you have at least three unique card types defined in the project to associate with the three levels of the board.
Steps to Add Story Map
- Click the ADD button.
- Enter your Name and description.
- Click the SAVE button.
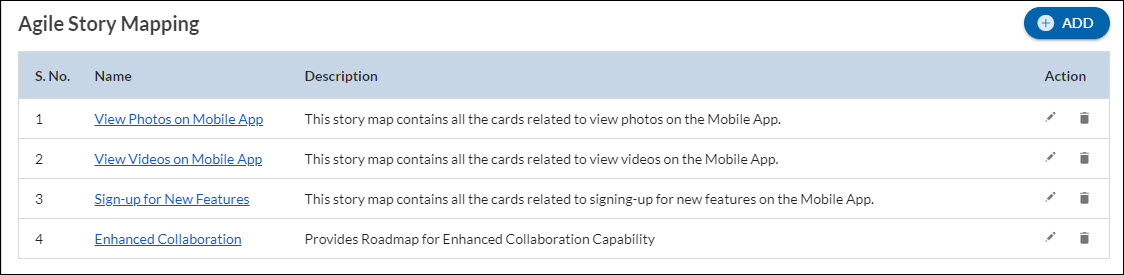
The Story Mapping listing Page appears. By default, it has a default story map named “First Story Map”. However, you can change its name once the board has cards on it. You can create multiple boards in a project.
The Story Mapping Board gets loaded with default card types associated with three levels (Theme at Level1, Epic at Level2, and User Story at Level3) and the open Releases and Sprints at the bottom of the board. Once the Board is loaded, you can create your cards, tag them to the release and sprints, update the existing cards, link the cards, and move them on the board.
Story Mapping Multiple Board
At a time, a project can have multiple functionalities/features running in parallel. In such a case, planning all the features/functionalities on a single Story Map can be inconvenient/chaotic. For such a scenario, you can create multiple story maps – each story map to plan an independent feature. These multiple-story maps in a project are independent of each other.
In the above example, we have created a story map for a mobile app for an e-commerce website. Now in the same project, we need to create a Sign-up Programme and a web application. So, the Mobile app development can be planned on one Story map, while the Signup program and Web application development can be planned on two separate story maps.
Any workitem type selected in a story map can again be selected in another story map. For example, if you select Theme Form in the Mobile app story map at level 1 then this selection will be limited to this board only. The Theme Form can be selected at any level in Sign Up Programme or Web Application.
Operations to perform on Story Map
- Modify: You can edit the name and description of the story map by clicking the Edit icon against the story map name on the listing page.
- Delete: You can delete a story map by clicking the Delete icon against the name of the story map on the listing page. You can’t delete the default map of the project. It can be modified only.
Story Mapping Board Layout
The Story Mapping Board in the application has the following sections.
- Toolbar
- Level 1
- Level 2
- Level 3
Toolbar
The toolbar in the Story Mapping board helps you perform the given operations.
Zoom level
As the name suggests, the Zoom level helps you get better visibility of the cards (with their Id and name) on the board. You can see the Board on three different levels.
Steps to Add Card on Board
- Click the ADD button.
- Select the card type that you want to add. Depending upon the selected card type (and the level it is associated with), the level of the board opens in a pop window showing the position of the columns. The columns that are already occupied are shown in a dark shade while the available spaces are shown in light space.
- Select the column or position of that card on the board.
- Click the Next button. The Card details window/popup appears.
- Enter the card title, and description, and select the Releases and Sprints for the Card.
- Click the SAVE button. The card is saved successfully on the selected locations.
Note: The card created in the Story Mapping board will also be shown in the User Story (or in the respective form) list in the project. Also, any card created on the Story Mapping Board can be deleted from the Story Mapping Board itself.
Notification
It shows a notification if any update or synchronization between Story Mapping Board and Application is failed.
Full-Screen view
The Full-screen view helps you see the Story Mapping board in full screen.
More Options
The More Options include the following options in it –
- WBS On/Off
- Layout Editor
- Refresh
- Settings
WBS On/Off – WBS stands for Work Breakdown Structure. So, when you click the WBS On/Off slider, it shows you the WBS code on the level 1, level 2, and level 3 cards along with their ID and Name. It helps you to know the linking between the cards at the three levels. Note: The WBS code is shown on level 3 cards only if they are linked to level 2 cards.
Layout Editor – The layout Editor helps you add a new column or delete an existing column on level 1 of the board.
To add a new column or delete an existing column –
- Click the More Options icon on the toolbar and select the Layout Editor option. A small toolbar appears on each column of level 1 excluding column 1.
- Click the Insert 1 Column left, Insert 1 Column right and Delete Column to add or delete an existing column. The column is added or removed.
Note: You can’t delete a column if it has cards in it. Only an empty column can be deleted.
- To go back to the board view, click the Back to Board button on the Toolbar.
Refresh – As the name suggests, it refreshes the Story Map screen.
Setting – It helps you set cards/forms at the three levels, set personas at the second level, and select the option (Releases or Sprints or both) that you want to tag cards to at the third level.
To do the settings of the Story Mapping Board, click the More Options icon on the toolbar and select the Settings option. The Story Mapping Settings dialog box appears with the following sections in it-
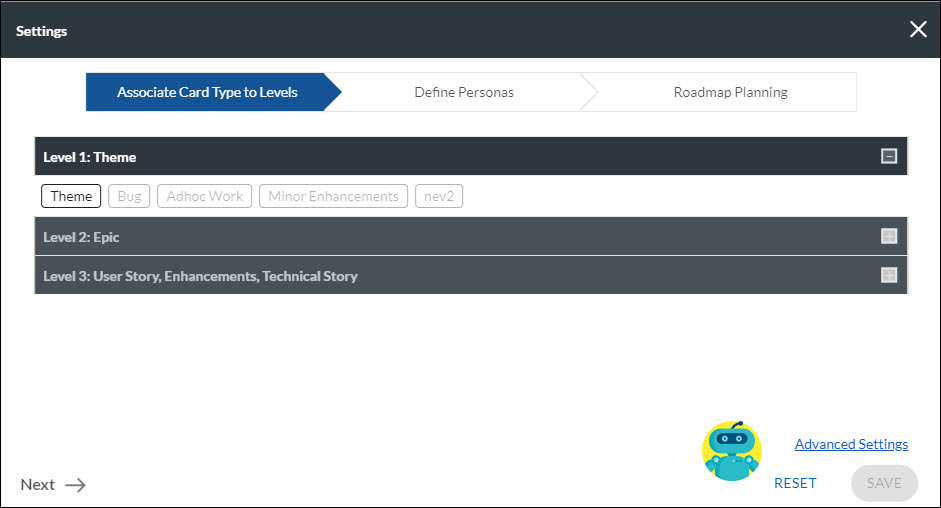
Associate Card Type to Levels
In this tab, you can set the Forms to be used at the three levels of your board. It enlists all the Agile Forms that are defined in your project. Once you select a Form for level 1, it won’t be shown for levels 2 and level 3. Similarly, the Form selected for level 2, won’t be shown for level 3. You can associate more than one Form for any level of the board.
To select a Form, select its name under the bar of that level, and similarly, to remove a selection, click another Form and deselect the previous one.
Note: Each level must have at least one Form associated with it.
After selecting the Forms for the three levels, click the SAVE button. To make any changes to the existing settings, click the RESET button.
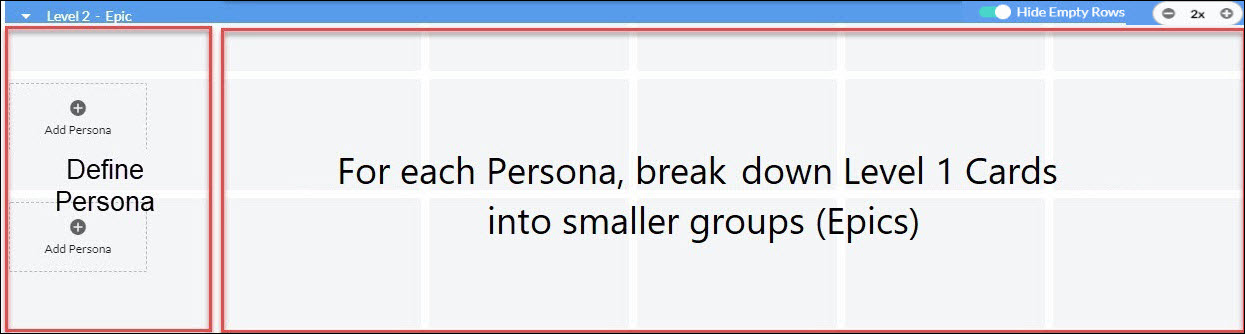
Define Persona
This tab helps you define the personas of your project at the second level of the Board. You can set multiple personas at this level (each row having a unique persona). By default, there are two personas on the board.
To set a persona, click the Define Personas tab in the Story Mapping Settings dialog box and enter the following details-
- Icon: Contains the profile picture of the persona. You can either select from the given icons by clicking the drop-down icon or upload an image from your system by clicking the image and selecting the Attach option.
- Name: Enter the name of the persona which will be shown on the board along with their profile picture.
- Persona: Enter the persona like Buyer, Seller, etc.
- Position: Shows the position of the persons in the Story Mapping Board. For example, persona Buyer, the first row, and persona Seller are in the second row of the board then their positions are 1 and 2 respectively. You can change the position of the persona by simply dragging and dropping them using the drag-drop icon in the left corner of the row. On reordering a persona, all its cards move along with the persona. For example, if the persona Buyer has three Epics in its row then moving the Buyer persona up or down will also move its three Epics with it.
- Abbreviation: Short name for the persona. For example, for Buyer, you can set Buy, for Seller, you can set Sel, etc.
- Description: Contains a short description of the personas.
- Action: It contains two icons Save and Deletes. As the name defines, the Save option helps you save the detail of the persona you have entered and the Delete option allows you to delete the filled details.
After saving the details of the persona, click the SAVE button at the bottom of the diagram.
Roadmap Planning
It helps you set the Releases or Sprints or both for the Mapping board (3rd level of the Story Mapping board).
- Releases: Select this check box to show all the open releases of your projects on the mapping board. You can tag a card on the board to one of the releases on the board.
- Sprints: Select this check box to show all the open sprints of your projects on the mapping board. You can tag a card on the board to one of the sprints in the roadmap.
- Recommended – It will show both releases and sprints of your projects on the mapping board. You can tag a card on the board to the given releases and sprints.
After selecting the required check box, click the Save button to save the changes.
When you select the option as both the Releases and Sprints for sprint planning then the cards planned for a Release but not for a Sprint will be visible in the “No Sprint Set” row in Level 3 of the Story Mapping Board and not in the unallocated row.
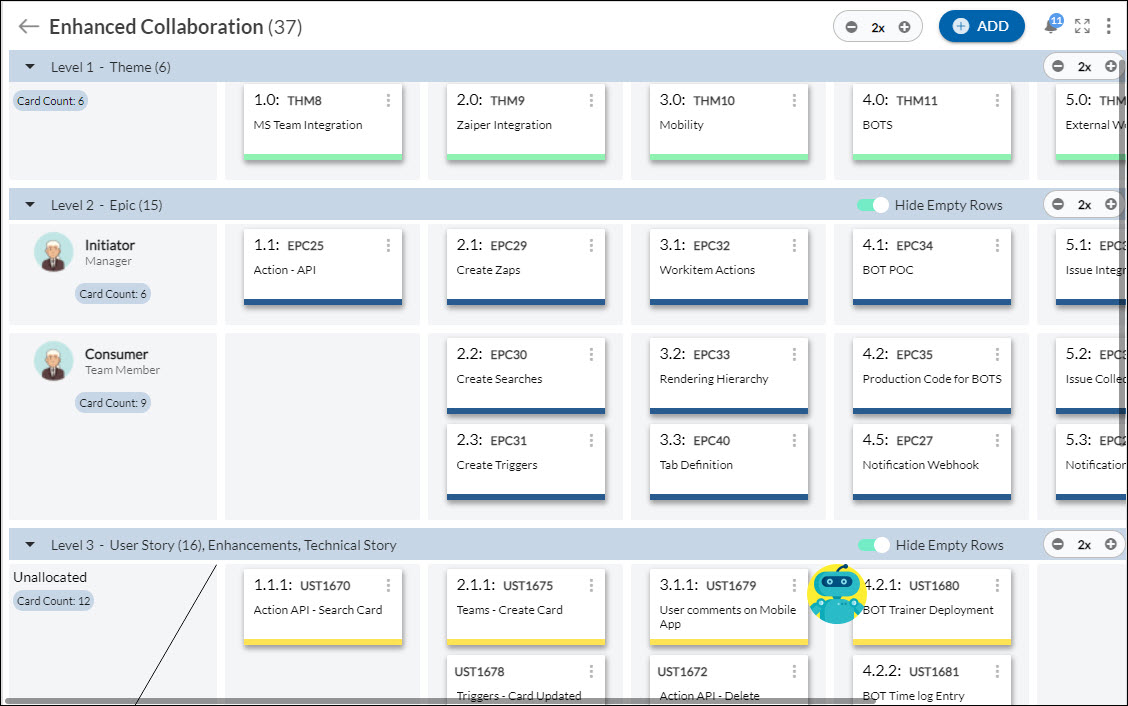
Level 1
At this level, the Usage Sequence (on how the functional flow of the project will be) is defined. This usage sequence is broken down in detail in the rest of the two levels. For example, if the Theme is the high-level activity of your project then it is set at level one and can slice and diced in level 2 and level 3. You can associate multiple cards/ Forms with level 1.
In level 1, one column can have only one card. You can link it with a card in level 2 as well as level 3. The cards at level 2 or level 3 which are placed in the column of the level 1 card are automatically linked to it. The stretch of a column in level 1 is considered before the next card in the same row. For example, If there is a card in column 1 and another in column 4, then until you add any cards in columns 2 and 3, they are considered a stretch of column 1’s card. So, all the 2nd and 3rd level cards in columns 1, 2, and 3 are considered as column one.

Level 2
The functional flow of the project at level 1 is broken down into smaller parts at level 2 so they can be tracked and managed easily. The cards at this level are associated with their personas. You can define more than one card type at this level and add cards accordingly. You can also move the cards to any column you want or link them with the cards at level 3. The Personas at this level can also be reordered along with their cards.
By default, there are two personas on board. You can add more personas as per your requirement from the Story Mapping Configuration Box. The Personas at this level can also be reordered along with their cards.
Level 3
The granular level cards defined from the level 2 cards are set at this level of the board. You can set more than one card type for this level. These cards can be linked to level 2 cards that are already linked to level 1 cards and can be moved to any column across level 2 cards.
Cards at the three levels are recommended to be created in the Story Mapping board as they flow from SM to other areas of application. However, if you make any changes to the four fields of the cards– Name, Description, Releases, and Sprints in the application then those changes are synced up in the Story Mapping board. Note: If the Description field is not an RTF field, then it will not be synced up.

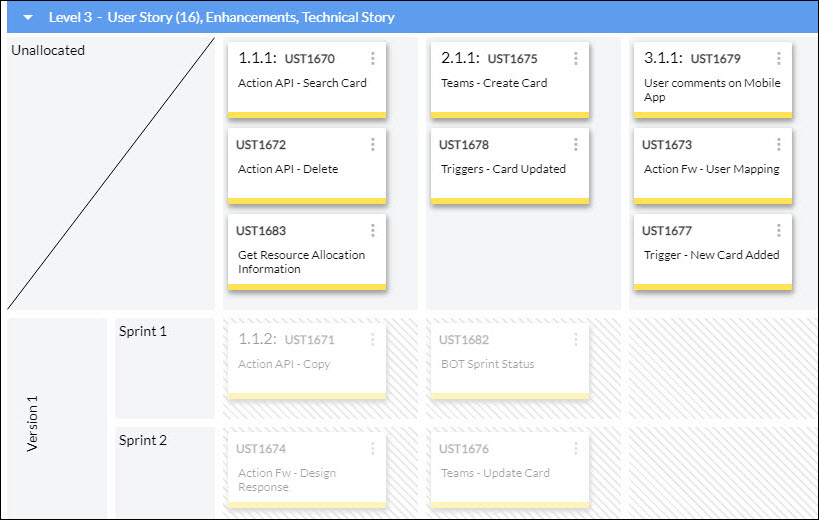
The rows of level 3 of the Story Mapping board are:
Unallocated: When neither Releases nor Sprints are planned for a card then it is visible in the Unallocated row.
No Sprint Set: When a card is planned for Releases but not for Sprints then it is visible in the No Sprint Set row.
Zoom Level and Hide Empty Column Options at Each Level
The bar of level 1 shows the name of the forms/workitems that have been configured for that level in Settings. The zoom level icon on the right side helps the user to see the card of that level in three different levels. Users can see the cards of these three levels in different sizes at the same time. You can also hide empty rows of a particular level by toggling on/off the Hide Empty level toggle option.
The card count in every row represents the total number of cards that are present in a particular row of the story mapping board.
Release and Sprint Planning
This level of the board has Releases Sprints or both (as selected in the Story Mapping Configuration box). The level 3 cards are by default placed in the Unallocated section. Once planned for the upcoming releases or sprints, they can be moved/ tagged to the respective release and sprints in this level using drag and drop or by directly tagging the card to Release or Sprints.
NOTE: Only open Releases and Sprints of the application are shown in the Story Mapping Board in chronological order.
All the cards that are tagged to the past closed releases and sprints will be shown greyed off. Note: If both sprint and release are closed, only then the cards tagged to them will be greyed off.
Board Activities
How to add a new card?
There are two ways to add a card to the Story Mapping board.
a) Add a card by right-clicking.
b) Add a card using the ADD button on the toolbar.
To add a new card by right-clicking-
- Right-click the column in which you want to add a new card. From the drop-down list, select the card type. (Note: Only those card types/ Forms will be shown that you have associated with that level in the Story Mapping Configuration dialog box).
- Enter the name of the card.
- Click the SAVE button. The card appears on the board.
- To enter more details about the card, click the card. The card pop-up view opens.
- The top bar shows the Card type and the Card Id while the main window consists of two tabs– Details and Activity Log.
- In the Details tab, fill the details.
- Click the SAVE button.
- You can see all the activities performed on the card like the date of modification, modified by, and any description for that by clicking the Activity Log tab.
To add a new card using the toolbar-
- Click the ADD button on the toolbar.
- Select the Card type that you want to add to. For example, if you have associated Epics at the second level, then selecting Epic will allow you to add a card at the second level only. Similarly, if you have associated Themes with level one, then Selecting Themes will let you add a card at the first level only.
- From the Select Column to add Card pop-up window, select the cell position where you want the card to be placed.
Note: Cells that are already occupied with cards on them are shown in dark color and cannot be selected to add a new card. - Click the Next Button. The card pop-up view opens.
- Fill in all the details of the card as mentioned above and click the SAVE button.
How to delete a card?
To delete a card, right-click the required card and select Delete. Once you delete a card from the board, it can’t be retrieved.
How to link a card to another card?
You can link a card from one level to another level on the Story Mapping board. When you link two cards at the two different levels of the board then the card at the upper level is automatically set as a Parent card and the card at the lower level is set as a Child card. For example, if you associate Card Type Theme at level 1 and Card Type Epic at level 2, then Theme and Epic cards are automatically set as parent and child cards. Similarly, when you link an Epic with a user story, then Epic is set as a parent card while the user story is set as a child card.
Note: The automatic linking of Epic and User Story is applicable only if there is one Epic in a particular column. If there are multiple epics in a column then the card at level 3 (e.g. User Story) will not be linked to it automatically.
This linking can be seen with the help of the WBS code. When you click the Show WBS button, all the cards are shown with their WBS code on them, which shows their linking with each other.
Note: One card can have only one parent card at a time but one parent card can have multiple child cards.
1. Linking of level 1 cards with level 2 cards:
The Card Types you associate with Level 1 and Level 2 in Story Mapping Board automatically get linked with each other. So, whenever you create a level 2 card, it gets linked with the level 1 card of the same column. In case, the same column doesn’t have any card at level 1, then it is linked to the level 1 card in the left column.
2. Linking of level 2 cards with level 3 cards:
To link a level 2 card with a level 3 card, perform the following steps-
- Right-click the level 2 card that you want to link with level 3 cards and select Link.
- Select Add Children. A bar appears at the bottom of the page.
- Select the card(s) in level 3 that you want to link to the level 2 card and click the Save button.
Note: The card at level 3 can have only one parent card. Those cards which are already linked won’t be shown for new linking. - Click Reset to select a different card.
Note: The linking of cards is persisted to the Story Mapping Board only and does not get reflected in the application.
How to move a card?
Cards in level 1 can only be moved to an empty column which means all the rows starting from level 1 to level 3 of that column should be empty. The level 2 and the level 3 cards can be moved across all the columns in that level.
To move a card, select the card and drag it to the required column before dropping there.
Note: Moving a card may break the existing relationship. For example, moving a card at level 2 to another column will break the relationship with its parent card at level 1 and will re-establish a new relationship with another parent card at level 1 based on its column position.
Story Mapping Multi Project Feature
Many a time, the success of a product or service delivery significantly depends on the right orchestration between the product management and development team. As the product management team makes a fine alignment between the organization’s portfolio objectives and churns out high-level functional goals in the form of epics and features, the development team ensures they are well executed in smaller units like User Stories in an incremental fashion.
The whole planning and development activity can happen in a single project or Board or even across multiple projects or Boards. In a multi-project scenario, the upstreaming or grooming of epics or themes can be managed in a product-planning project, whereas the execution of those high-level activities can be managed and monitored in the form of smaller workable parts or user stories in a development project.
But managing the seamless synchronization among workitems of different natures (themes, epics, user stories) across the various projects can at times be difficult if we are not able to see their end-to-end mapping visually. The multi-project feature of the Story Mapping Board helps you overcome this problem as it helps you map the end-to-end journey of the product delivery across multiple projects in a single place only. It not only saves the time and effort of managing workitems and their linking across multiple projects but also keeps all the stakeholders on the same page.
For example, considering the above example of developing a mobile app for an e-commerce website, its themes, and epics can be defined in one project while its user stories and technical stories can be defined in another project. In such conditions, you can have all the themes, epics, and user stories across multiple projects in one Story Mapping Board to visually map the end-to-end product journey and keep all the stakeholders aware of what is happening in the system.
Note: While using the Story Mapping Board for multiple projects, you need to ensure that the set of Releases and Sprints are the same across all the projects so that the cards of the Story Map board are synchronized in all the projects.
Settings for Multi-projects in Story Mapping Board
To set the multiple projects on a story mapping board, perform the following steps:
The settings for configuring the Multiple Project settings are available under the Advanced Settings in the Story Mapping Settings dialogue box. To access it, perform the following steps –
- Click the Settings icon from the toolbar.
- Click the Advanced Settings link at the right-bottom corner. The Advanced Settings dialog box is displayed.
- In the dialog box. perform the following steps:
a) Project – Here you can select the projects that you want to configure on your Story Mapping Board. Note: You can select any number of projects.
To select the projects:
- Click step 1 and click on the fields.
- When you click in the field, it shows all the projects.
- Select the projects that you want to access on your Board.
b) Card Type – Here you can select the card types that you want to access from multiple boards.
To select the card type:
- Click step 2 on the left side.
- Each project that you selected in step 1 is listed here where you can select the card type for each project.
Note: You can select one card type from one project only.
For example, if you have selected Themes and Epics from Project A then you can’t select the same from Project B. Similarly if you select User Stories and Technical Stories from Project B then the same can’t be selected from Project A.
Note: The Themes and Epics in Project A that are tagged to the User Stories in Project B will be limited to the Story Mapping Board only. Since these Themes and Epics are not present in Project B, the user stories will be tagged to None back when seen from their respective project. A message informing the same is also displayed in the Activity Log for that workitem.
c) Project for Releases and Sprints – Here you can select the project for your Release and Sprints.
To select the project, click step 3 on the left side. Select the Project from the list.
Note: Both Releases and Sprints should be selected from the same project only. Also, as mentioned above, the name of Releases and Sprints must be the same across all the projects so that the cards of the Story Map board are synchronized in all the projects.
Note: If a project having its cards on the story mapping is closed in the source system, then you can’t create, delete or modify its instances on the story mapping board. However, if that project is reopened in the source system, then its instances can be added, modified, or removed from the Story Mapping board.
Accessing the Multi-project Board
The Story Mapping Board remains available under all the projects which are configured in it. All the team members having access to these boards can access the Story Mapping Board for multi projects.
To open the Story Mapping Board of multiple projects, click the Plan menu from any of the multiple projects which are configured in the Board and select Story Mapping.