
Start with the video first to get a better grasp of the topic!
|
Skip Ahead to: |
Overview
Get your Release and Sprint planning at the center stage with the Releases & Sprints view. With this board, you can see release and sprint planning effectively using the individual and combined view of the backlog and Release and Planning. The page helps you see a set of features that the team has decided to provide in the upcoming release and sprint. Along with the features, you can see the estimated points/time required to complete each workitem.
Note: For a template with a Release and Sprint menu, the first release and sprint are created by default.
Navigation
Navigate to the breadcrumb at the top and hover over the Project name, expand the Dashboard module, and select Releases & Sprints.
Releases & Sprints Layout
The Releases & Sprints screen has two sections:
- Toolbar
- Releases and Sprints Summary
- Releases and Sprints listing
Toolbar
The releases and Sprints toolbar has the following options:
![]()
Filter:
You can filter the list as per the workitem types or Release and Sprint by selecting the respective check box.
Maximize:
You can see more work items by using the Full-Screen Mode.
Releases and Sprints Summary
- A release is a time box during which the development of the scoped workitems takes place and is delivered to the customer for actual end-user usage.
- A Sprint is a short, recurring iterative cycle under a release during which potentially releasable product increment is developed and delivered to the customer.
- Releases and Sprints view is a hierarchical view of your planned workitems. A release is a first-level parent row whereas a sprint is a second-level parent row. Workitems tagged to a Release and sprint are displayed under the sprint. Workitems tagged to a release but not to a sprint are displayed under the None parent row.
- The Release name and the duration is specified for each release row. Next to the Release name is the total number of Sprints in it. Example: v3.0 (4) – Here v3.0 is the release name and 4 is the number of sprints under it.
- Similarly, the Sprint details are shown in the second-level parent row under the release.
- By default, the Future, Current, and Previous Releases are loaded. The order of the Releases and Sprints will be from the latest to the oldest.
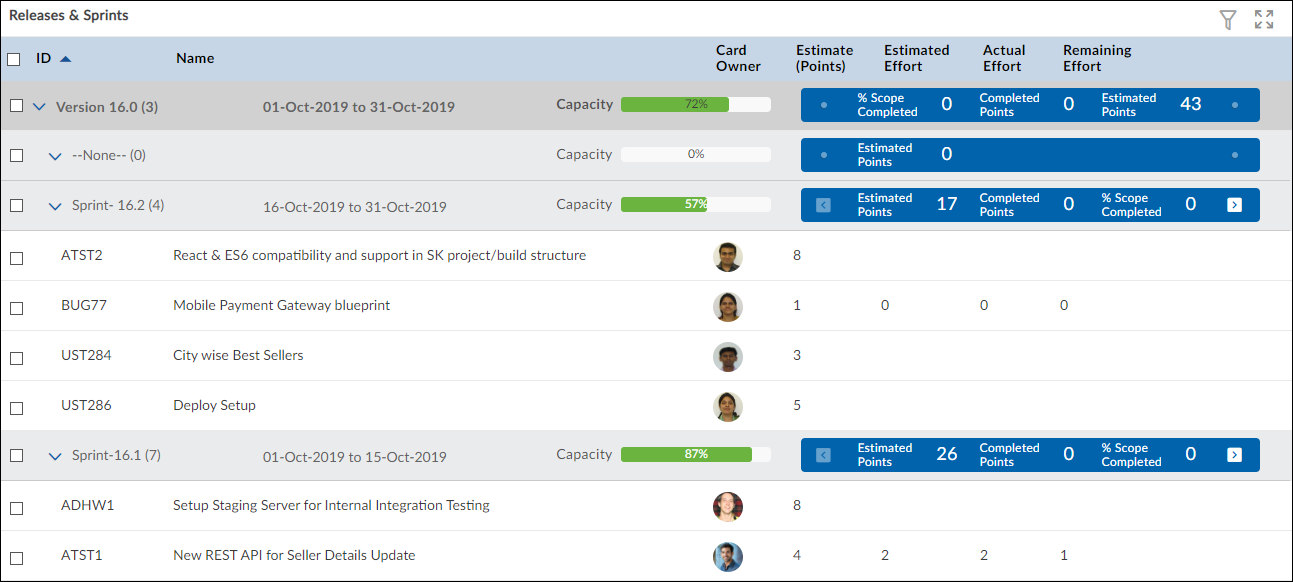
- You can expand or collapse the Releases or Sprints by clicking on the respective icons against their name. You can expand or collapse All the Releases and Sprints by clicking the Filter() icon next to any of the columns.
- A color-coded Capacity Planned bar for the Releases and Sprints indicates, to what extent the release or sprint is planned with respect to the capacity.

where Estimates are referred from the Estimate (Points) field on the workitem
Capacity is referred from the Capacity field on the Releases/Sprints.
- Hovering over the Capacity Planned bar will show the values for Remaining Capacity, Planned Capacity, and Total Capacity respectively.
- Next to the Capacity bar, you see a bar that shows the overall status of the Release/Sprint. You can switch between the Statistics using the Previous and Next icons.
- To understand these Statistics, let us take an example.
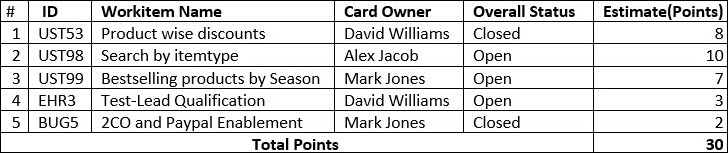
We have a sprint S1.1 whose Scope Freeze Date and End Dates are 3rd April 2019 and 15th April 2019 respectively. The sprint contains 5 workitems as mentioned in the below table.
- The statistics are:

a. Estimated Points [Available at Release and Sprint Level]
It is the sum of the Estimate (Points) field of the workitems tagged to the Release or Sprint. In the above example, the Estimated Points statistic is 30.
b. Completed Points [Available at Release and Sprint Level]
It is the sum of the Estimate (Points) of all the closed workitems tagged to the Release or Sprint. In the above example, workitems- UST53 and ABUG5 have been completed. So the Completed Points statistic is 10.
c. % Scope Completed [Available at Release and Sprint Level]
It is the percentage of estimated points completed over the total estimated points planned for the Release or Sprint.

In the above example, workitems- UST53 (Est Points: 8) and ABUG5 (Est Points:2) have been completed. So the % Scope Completed statistic is calculated as follows:
% Scope Completed = [(8+2) / (30)] x 100 = 33

d. Planned Points [Available at Sprint Level only]
It is the sum of estimated Points of the workitems at the start of the Scope Freeze date. In the above example, the Scope Freeze Date of the Sprint is 3rd April. So the Planned Points is the sum of estimated points at the end of 2nd April.
As per the above example, the Planned Points will remain at 30 even if there is a workitem added or removed during or after the sprint.
e. Net Points Increased or Decreased [Available at Sprint Level only]
If workitems are added or removed during the sprint after the Scope Freeze Date then the sum of the estimated points of those workitems is shown here.
Net point Increased or Decreased = Estimated Points – Planned Points
If the value is zero or positive then it will show as Net Points Increased else it will show as Net Points Decreased.
- In the above example, the Scope Freeze Date and End Date of the Sprint are 3rd April and 15th April respectively. The Planned Points for the sprint are 30. On 5th April, two new workitems BUG2 and UST56 are added to the sprint. The Estimate (Points) of each of the workitem is 5. So, as per the above formula, Net Points Increased is (30+5+5) – (30) = 10
- Continuing with the above scenario, if BUG5 and UST53 are removed on April 10th, where the Estimate (Points) are 2 and 10 respectively. So, as per the above formula (40-2-10) – (30) = -2, and will be shown as Net Points Decreased.
- Now, on 16th April, if BUG2 is removed then also it will show Net Point Decreased as 2 only since the scope change has happened beyond the Sprint duration.
f. Workitems Planned [Available at Sprint Level only]
It is the total number of workitems tagged to a sprint at its Scope Freeze Date. In the above example, the Workitems Planned is 5 and even if there are workitem added or removed during the sprint duration, the Workitems Planned will remain constant.
![]()
g. Workitems Added [Available at Sprint Level only]
It is the total number of workitems tagged to the Sprint between the Scope Freeze and the End date of the sprint.
Note: If a workitem is added and removed during the sprint then it won’t be counted in the statistic.
In the above example, the Scope Freeze Date and End Date of the Sprint are 3rd April and 15th April respectively. Suppose on 12th April, 2 new workitems (UST12, UST21) are added in the sprint then the Workitem Added statistic is 2. But on 14th April, UST21 is removed, then the Workitem Added will show up as 1.
h. Workitems Removed [Available at Sprint Level only]
It is the total number of workitems untagged from the Sprint between the Scope Freeze Date and End Date of the sprint.
Note: If a workitem is added and removed during the sprint then it won’t be counted in the statistic.
In the above example, suppose on 12th April, an existing workitem (UST98) is removed from the sprint then the Workitem Removed is 1.
Now if a new workitem (UST21) is added from the backlog to the sprint and later removed then the Workitem Removed count remains 1.
i. Team Size [Available at Sprint Level only]
It is the total count of unique team members assigned as a Card Owner or ToDo Owner on the workitems tagged to the sprint. In the above example, the Team size is 3.
Note: The statistics are always calculated across all the workitems tagged to the Release/Sprint.
Releases and Sprints Listing
- Each workitem’s row shows the ID, Name, Card Owner, Due Date, Overall Status, ToDo Estimated Efforts, ToDo Actual Effort, ToDo Remaining Effort, Overall Status, and Estimate (Story Points).
- The workitem ID is shown along with the color band of the workitem type. Clicking the ID opens its Details view.
- To view the Card Owner’s name, click the Profile Picture.
- You can also replay a workitem by dragging it from one group to another.