Start with the video first to get a better grasp of the topic!
|
Skip Ahead to: Modifying the Form Section Settings for Projects |
Overview
The default sections appearing on Forms are Details, Comments & Attachments, Linked Cards, System Fields, and Activity Log.
Forms consist of standard sections available for various activities such as gathering input, assigning users at different workflow stages, setting Linked Cards, etc. You can also create your own sections to gather input, review, track, and so on.
Default Sections in a Form
Following are the standard sections in a Form:
- Details: The Details section displays, gathers, and tracks all information related to the project item.
- Linked Cards: Linked Cards help you to set relationships between workitems and trace them while working with them. You can set relationships between project items and link them to work in an integrated system.
- Activity Log: The Activity log displays the list of operations in reverse chronological order for activities performed such as updating, routing, rejecting, closing, reopening, etc. In the Activity Log, you can view the various versions and the differences between the two versions of a workitem. For more information, see Viewing the Previous Versions of a WorkItem.
- Comments & Attachments: When a project item requires more data for reference, you can attach files that can be downloaded, edited, and uploaded. The members of the workflow can also add comments related to the project item which are then listed in the Comments section.
- System Fields: The system fields are read-only fields or un-editable fields that are available on most of the forms, such as User Stories, Technical Stories, Action Items, etc. These fields are automatically generated by the system which includes fields like the Date Created and Created By.
To add your section to a standard or a custom Form, see <Steps to Add a Form Section> and <Modifying Forms Section>
To configure a Form section, you can perform the following functionalities:
Navigation
In the left navigation panel, expand the Recent Projects menu and select any Project. Hover over the Project breadcrumb at the top, expand the Configure module, and select Forms.
Steps to Add a Form Section
You can add or modify sections to both, standard and custom Forms. The new sections will be available for new projects and new templates only. These sections can be used to capture, display, or track information related to the project item. You can select the section type based on the type of information you want to capture or display.
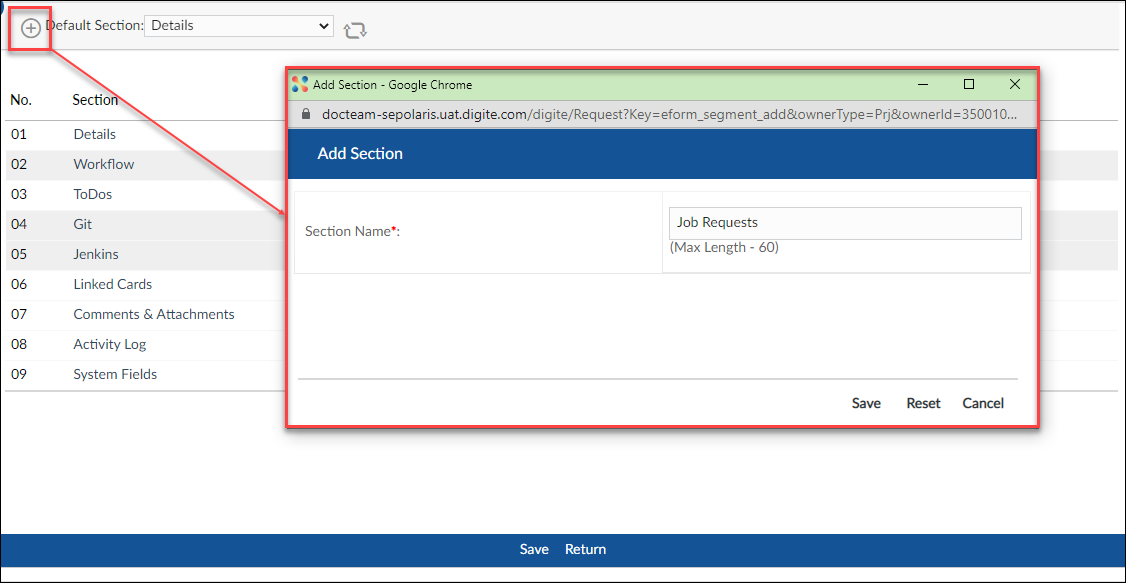
To add a section to a Form:
-
Click the Add icon from the toolbar.
- Enter the fields as explained below:
- Section Name: Enter an appropriate name for the Section
- Project Level Section Settings: Select the project-level settings to allow a user to Rename or Hide the section for a project.
-
Click the Save button to save, or the Cancel button to discard and exit from the window. Click the Reset button to discard the entered values and select new values.
Modifying Forms Section
You can modify the following attributes of custom sections by clicking on them if required:
-
Section Name: Edit the name of the section. The workitems are created to display the new name in the projects.
-
Hide: If the section should be hidden for viewing across the organization, select Yes. If it is hidden, click No to unhide it. You cannot hide the Details section.
-
Column Layout: Select the number of columns in which the fields in the section should be distributed in the section. Select a one or two-columnar layout. This is available for Field Type of Segment only.
-
Print: Select your option for the section details, if allowed to be printed or not.
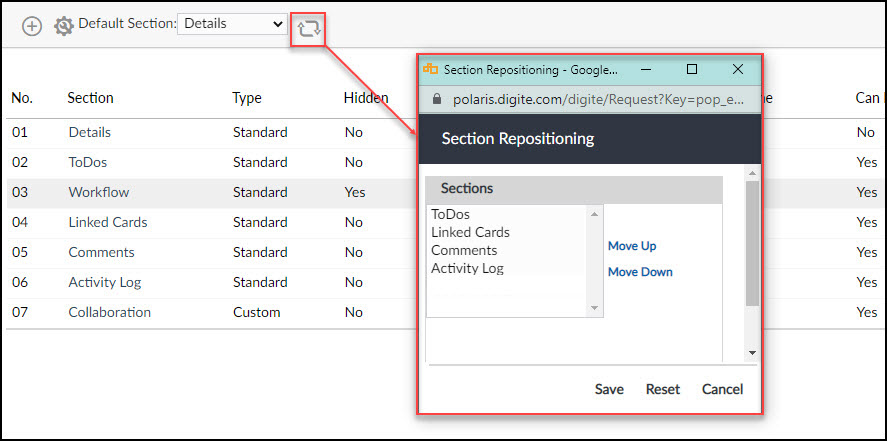
Repositioning the Forms Section
You can change the sequence of the Forms section in which they will appear at the instance/item level. By default, the sections appear in the following order— Details, Linked Cards, Comments & Attachments, Workflow, and Activity Log followed by custom sections if any.
To change the order of the Forms sections:
- In the Sections List view, click the Section Repositioning icon.
- In the Section Repositioning window, select the name of the section you want to reposition from the Section list box available and click the Up or Down button as required.
- Click the Save button.
Defining Form Print Settings
You can print the workitems into an MS Word document for sharing and collaborating leveraging the MS Word Integration capability of the product. Before you print details from a Form instance, you should configure the Form for printing.
The Form Print Setting will be applied when the section-wise details have to be printed for an item in the following different outputs:
-
Rich Text Format (using the Save To File option)
-
PDF (using the Save To File option)
-
Output to Screen
To configure a Form for printing:
-
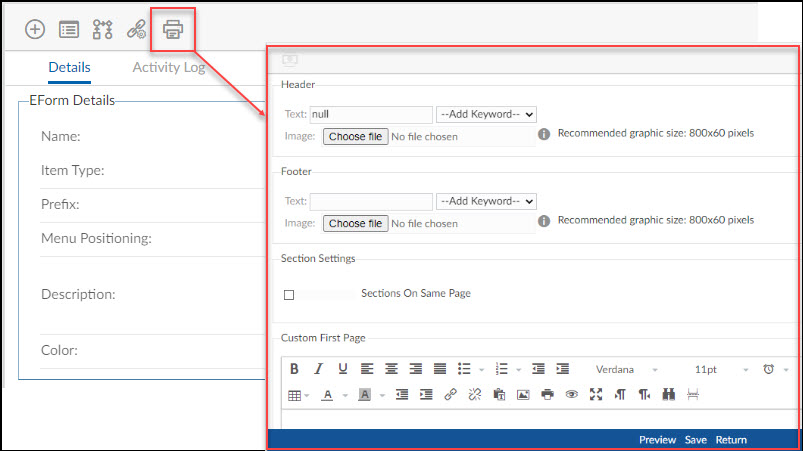
Go to the Form to be configured for printing. In the Form view, click the Print Settings icon.
- In the Print Settings view, customize the header, footer, and first/cover page settings.
- In the Header section, type the text you want to be displayed in the header of the print output and include a date, Form name, etc. by selecting the required keyword. You can also upload an image from your system.
- Set the footer for the print output as you set the header.
-
Select the Sections On Same Page option for continuous printing, else every section will be printed on the next page.
-
In the Custom First page section, type the text or add an image using the icons for Rich Text Editing.
-
To change the sequence of the sections in which they will appear at the Form instance/item level, click the Form Section Print Setting icon. In the Form Section Print Setting window, select the section and click the Move Up or Move Down arrow. Click the Save button to save the settings.
- If any new section is added to the Form, it will be appended to the last in the section list by default. If any existing section is deleted in the Form, it will be removed from the section list and the list will get rearranged automatically.
-
After configuring the print settings, click the Preview button to preview a sample MS Word output.
-
Click the Save button to save the settings.
The Header and Footer will be displayed for Forms printed in RTF and PDF formats only, and in Excel for Forms having ECR Segments.
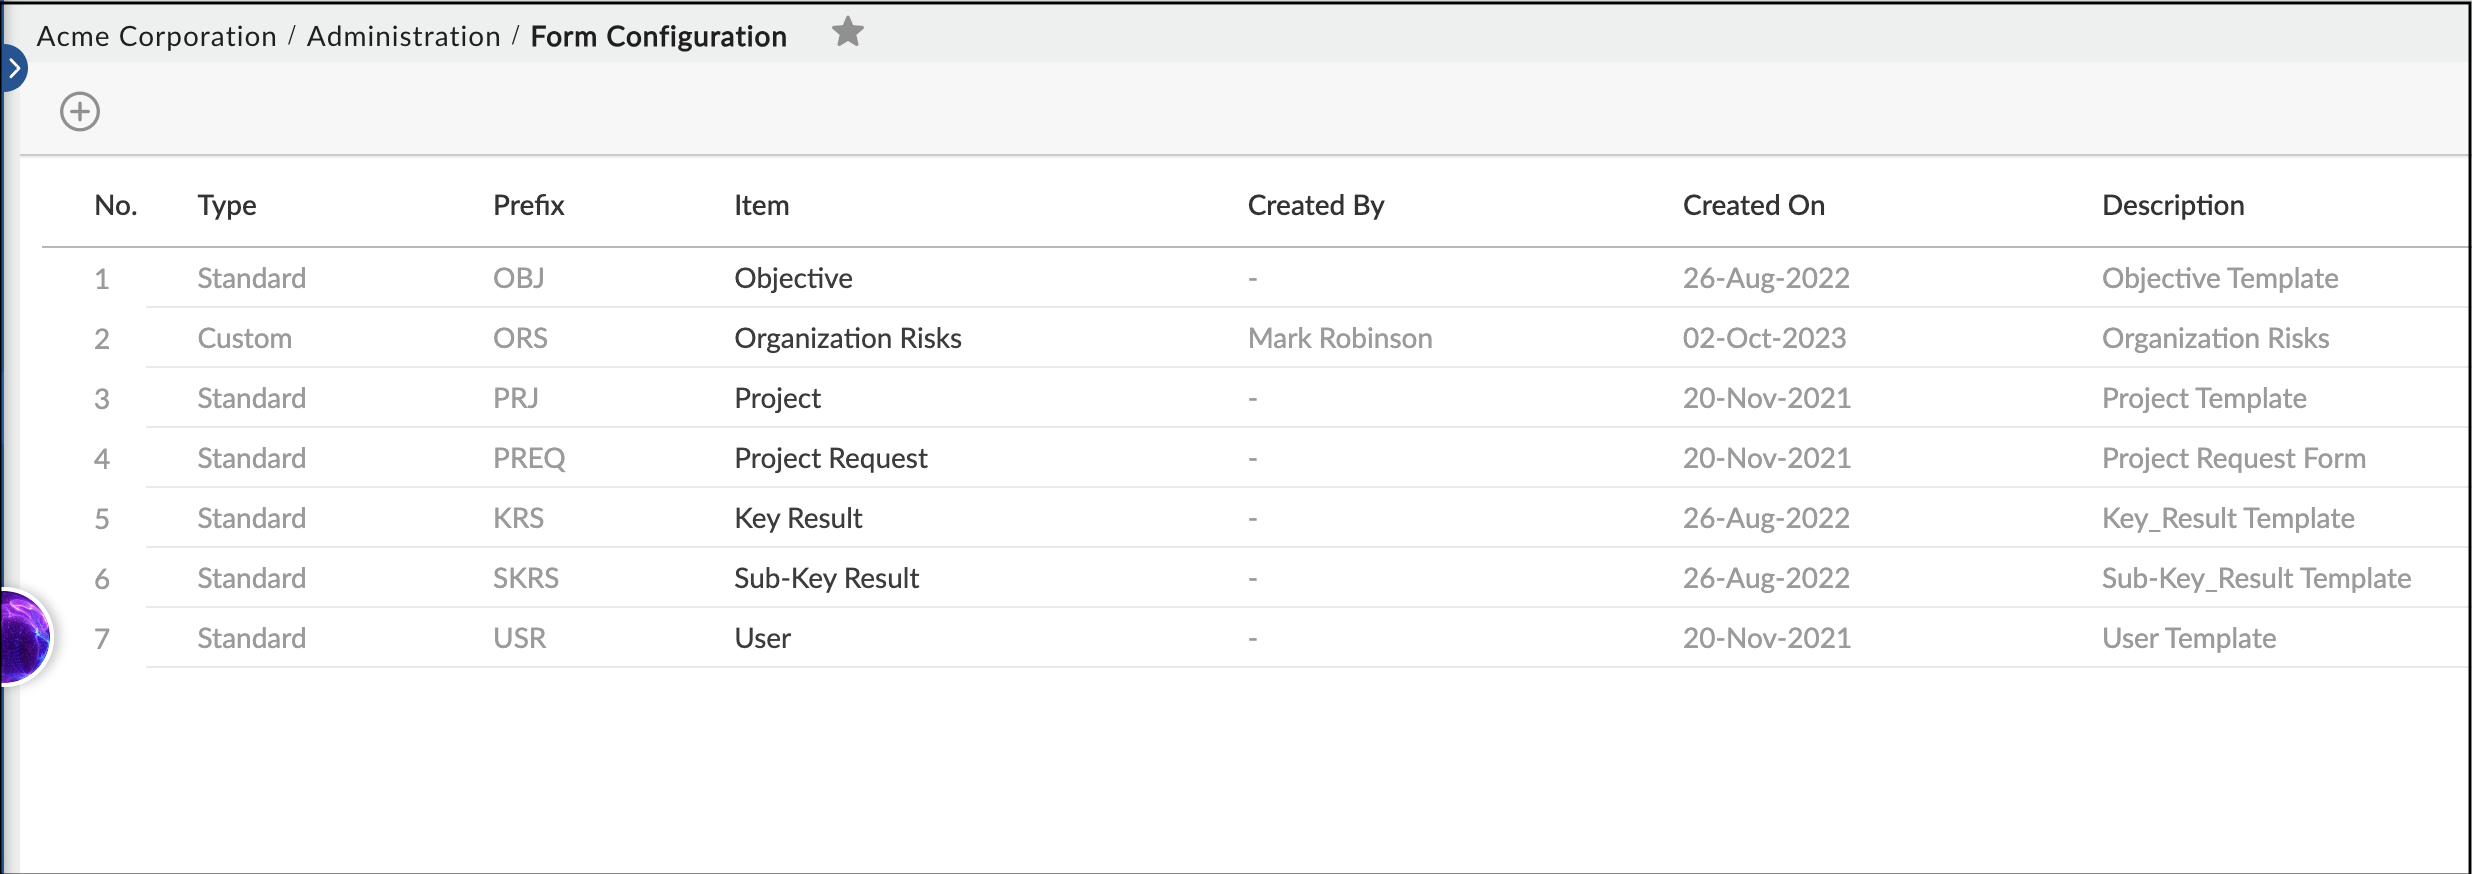
Configuring Form at Organization Level
Just like configuring forms at the project level, we can also configure a form at the Organization level. Forms configured at the Organization level are available in all the projects by default.
To configure a form at the Organization level, navigate to the Organization Name > Administration > Form Configuration. Click the Add icon and specify all the details like Name, Description, etc.