
This article provides an overview of simple scheduling and its options. It also explains how to create a task plan and the tasks within it.
|
Skip Ahead to: Adding Task Plan and its Tasks |
Overview
Simple Scheduling is best suited for small to medium-scale projects with small teams, consisting of around 2000 tasks. Using Simple Scheduling, Project Managers can control their project schedule and make the necessary updates using simple scheduling capabilities. The Simple Scheduling capabilities will be available to you as per your Enterprise plan. To use more capabilities of Simple Scheduling in your plan or upgrade it, please contact the support team.
Toolbar Options
In a simple scheduling system, tasks can be managed directly in real time, with different options available to help you organize and update them efficiently.
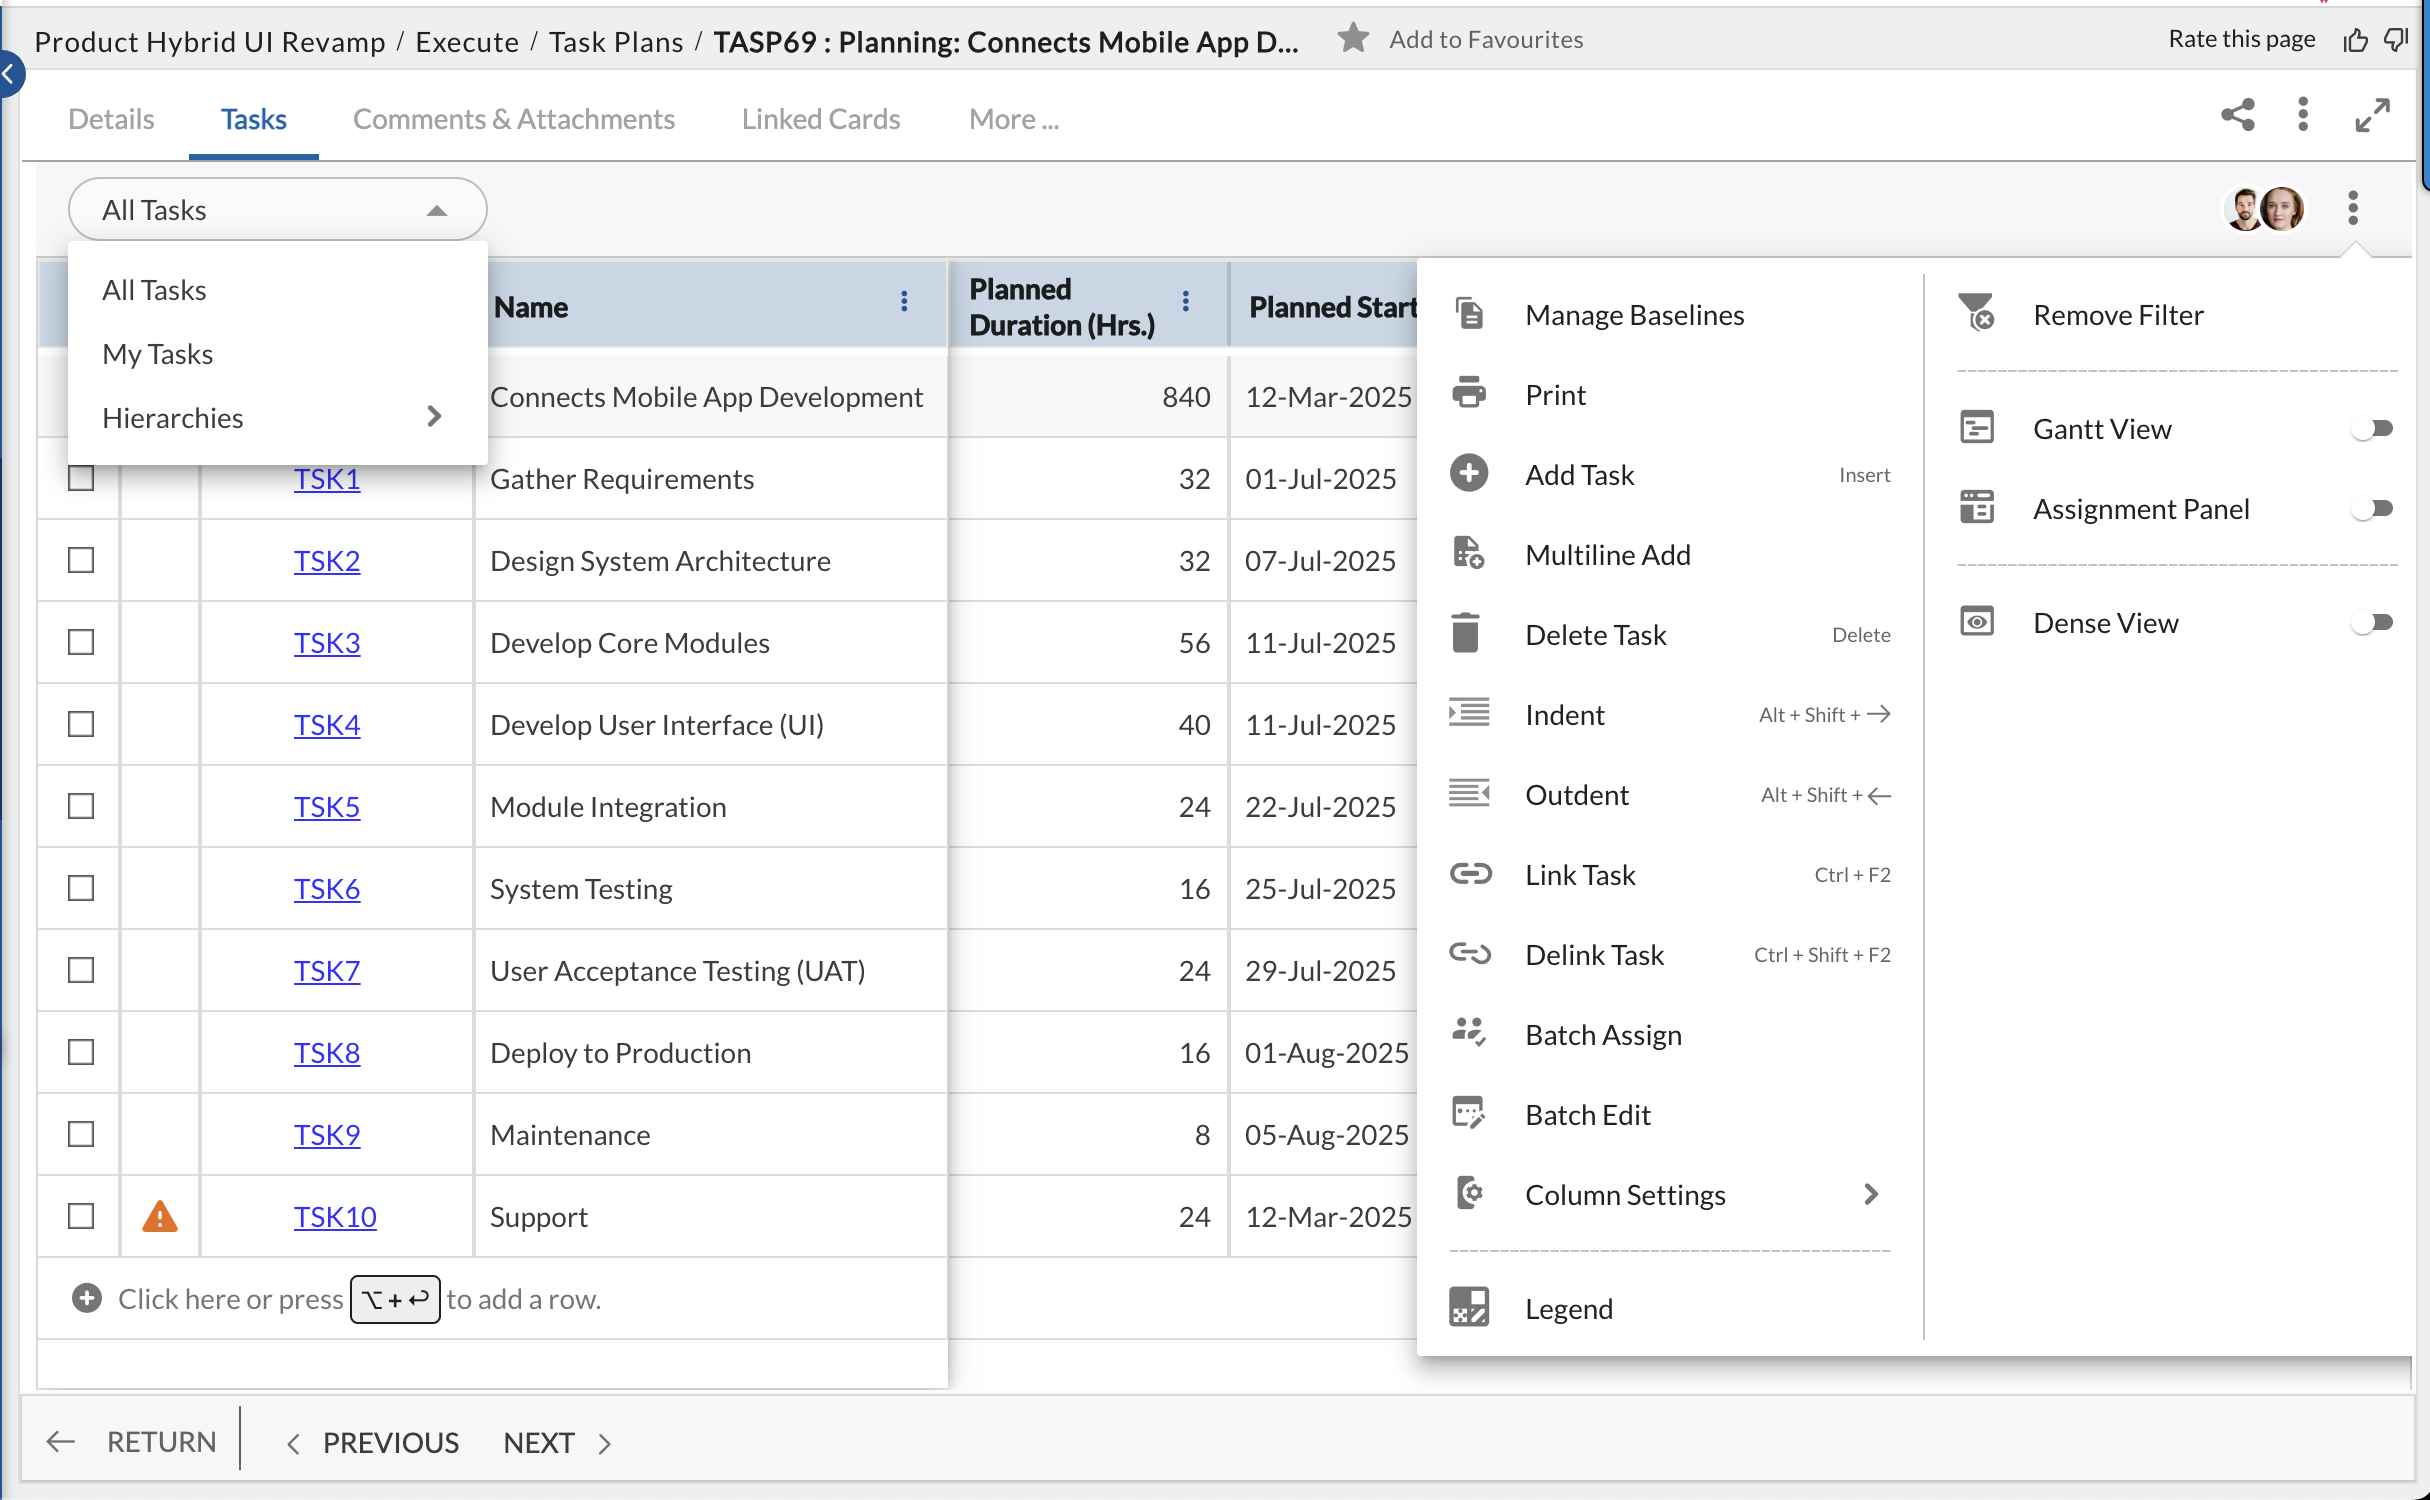
Based on the mode selected the All Task drop-down as All Tasks, My Tasks, and Hierarchies options and the More Options contain many features that let you view Gantt View, Assignment Panel, Dense View, Last Failure Details and other features like Remove Filter, Undo All Changes, Add Task, Indent, Outdent, Link Task, Delink Task, Batch Assign, Batch Edit, Column Settings, and Legend.
Add and Manage Tasks
To learn how to create a Task Plan, click here.
To learn how to create the Tasks in a Task Plan, click here.
Tracking Time through Timesheet
If the “Task Actual Tracking Mode” option is set as “Based on timesheet data”, then the Actual Start, Actual Finish, and Percent Complete fields on the task are driven according to the Actual Hours logged in the timesheet.
- Log time for tasks in Time Tracking and submit your timesheet to update values such as Planned Hours, Actual Hours, Actual Start Date, % Work completed, and Remaining Hours in Task Plan:
-
- As you work on tasks within your Task Plan, you can log your time spent working on each one by going to My Workspace > My Work > Time Tracking and submitting your timesheet.
- This will update various values associated with each task such as its Planned Hours (which may change if your actual time spent differs from initial estimates), Actual Hours (the total time you’ve spent working on that task), Actual Start Date (when you started working on that task), % Work Complete (how much progress has been made towards completing that task) and Remaining Hours (how much more time is estimated until completion).
Note:- If timesheet approvers are specified in the workflow, the timesheet must be approved. Otherwise, it must be submitted. Learn more
-
- If the Actual Hours is greater than or equal to the Planned Hours, an additional 0.02 hours will be added to both Planned and Remaining Hours and the % Work Complete will also be less than 100%:
-
- If it turns out that you spend more time working on a specific task than was initially planned for it (i.e., if its Actual Hours exceed its original Planned Hours), then an additional 0.02 hours will be added to both its Planned and Remaining hours.
- Additionally, its % Work Complete value will be less than 100% since it’s taking longer than expected to complete.
Note: The % Work Complete is calculated by (Actual Hours * 100) / Planned hours.
-
- To mark a task as complete, select it and click the Complete Task option under More Options. This sets % Work Complete to 100% and changes the task status from Open to Close.
Tracking Time Manually
If the “Task Actual Tracking Mode” option is set as “Manually updated”, then the Actual Start, Actual Finish, Actual Hours, and Percent Complete fields on a task become editable to enter values in them. As per the values in these fields, the Remaining Hours and the Planned Duration of a task are recalculated. When you enter Actual Hours, the Percent Work Complete field gets updated accordingly. Likewise, if you update the Percent Work Complete, the Actual Hours field gets updated accordingly.
Note: The Actual Hours field is editable only when a resource is allocated to the Task.
When Actual Hours Less Than Planned Hours
If a task has Planned Hours and you enter Actual Hours less than the Planned Hours, the Percent Work Complete field is updated based on these values. Also, the Planned Start date is copied to the Actual Start field.
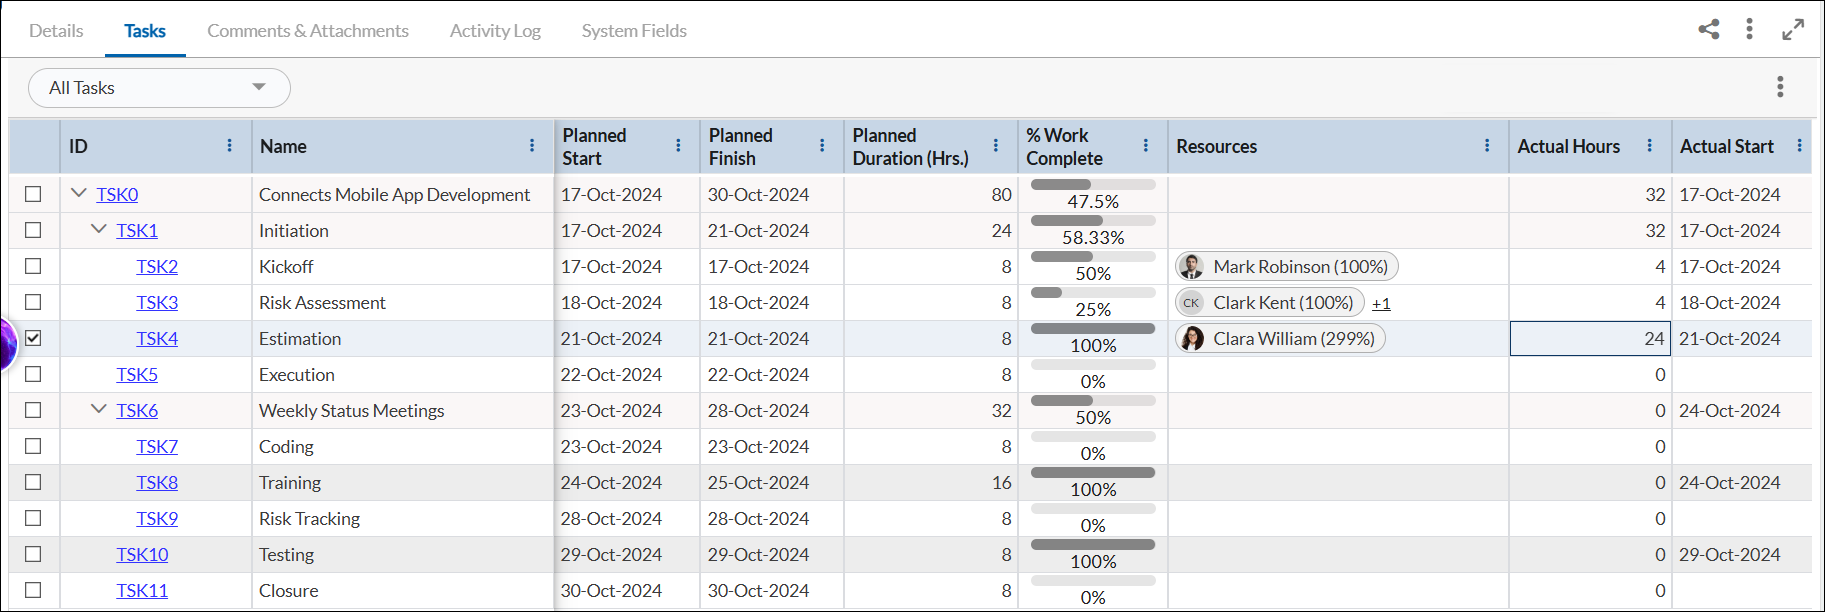
- Example: If PH (Planned Hours) is 8 hours and you enter AH (Actual Hours) as 4 hours, the Percent Work Complete is set to 50%. The entered AH can be seen in the assignment panel for the allocated resource. [Refer Task TSK2]
If multiple resources are allocated to a task and you enter Actual Hours, the Percent Work Complete field is adjusted accordingly. This updated percentage is reflected in the Assignment panel for each resource. The AH of the resources is computed as per the PH and Percent Work Complete of the resources.
-
Example: For a task with two resources (each with 100% allocation) and AH entered as 6 hours, 3 hours is distributed to each resource. [Refer Task TSK3]
Note: If AH is added to a task before adding a resource, the new resource will not have the AH against it.
When Actual Hours More Than Planned Hours
If Actual Hours (AH) exceed Planned Hours (PH), the AH value is copied to the PH. Since PH and AH are the same, the Percent Work Complete is set to 100%, marking the task as complete. However, the Planned Duration remains unchanged, and the % Unit of assignment adjusts accordingly. The same behavior is followed in the Assignment panel for the allocated resources. To reopen task, make the Percent Work Complete less than 100%. [Refer Task TSK4]
-
Example: If AH is 10 hours while PH is 8 hours, the AH becomes the new PH, and the task status changes to 100% complete. [Refer Task TSK4]
Note: When a task reaches 100% completion, it is marked as closed, making all fields non-editable except Percent Work Complete and Actual Finish. Adjusting the Percent Work Complete field below 100% is the only way to reopen the task.
Formula for Calculating Remaining Effort
The Remaining Effort of a task is calculated using the formula:

Editing Closed Tasks
You can modify the Actual Finish and Percent Work Complete fields of closed tasks, but this is currently under evaluation and may change in future updates.
Additional Information
- Tasks set to manual time tracking mode do not appear in the Timesheet, as time entries are made directly in the Tasks grid.
- When you first enter time in the Actual Hours field, the Actual Start date defaults to the Planned Start date. Similarly, entering 100% in Percent Work Complete sets the Actual Finish date to the Planned Finish date. You can manually adjust the Actual Start and Actual Finish dates if needed.
- Example: If a task’s Planned Start is 17-Oct-2024 and Planned Finish is 21-Oct-2024, entering time in Percent Work Complete sets the Actual Start as 17-Oct-2024. Setting it to 100% sets the Actual Finish as 21-Oct-2024.