Overview
This article shows how to set up a full Purchase Order (PO) process using Nimblework’s Forms 2.0. You’ll configure seven logical blocks (from PO details to payment tracking) with screenshots and tables for each, helping Procurement get control, clarity, and accuracy.
Problem Statement
As TechNova Inc. expanded operations across departments, it began facing challenges with traditional procurement practices. IT and Admin teams frequently raised hardware and software requests, but these were submitted via spreadsheets or paper forms, leading to:
- Manual data entry errors scattered, siloed records across departments
- Slow approvals due to lack of standardization
- Difficulties tracking vendor performance and purchase history
These issues not only slowed operations but also introduced compliance risks and reduced financial transparency.
Business Scenario
To streamline procurement, TechNova adopted Forms 2.0. The goal was to create a single, standardized Purchase Order form that captured all necessary data in a structured and trackable way. With this setup, the procurement team could:
- Access real-time PO data
- Visualize spend categories
- Automate approval workflows
- Ensure compliance through consistent formats
Let’s walk through how the team configured the PO form using Blocks 1 to 7 in Forms 2.0.
Key Participant
The Project Manager (Configurator) will be responsible for creating blocks, adding fields, configuring validation rules, and publishing the form.
Form Structure
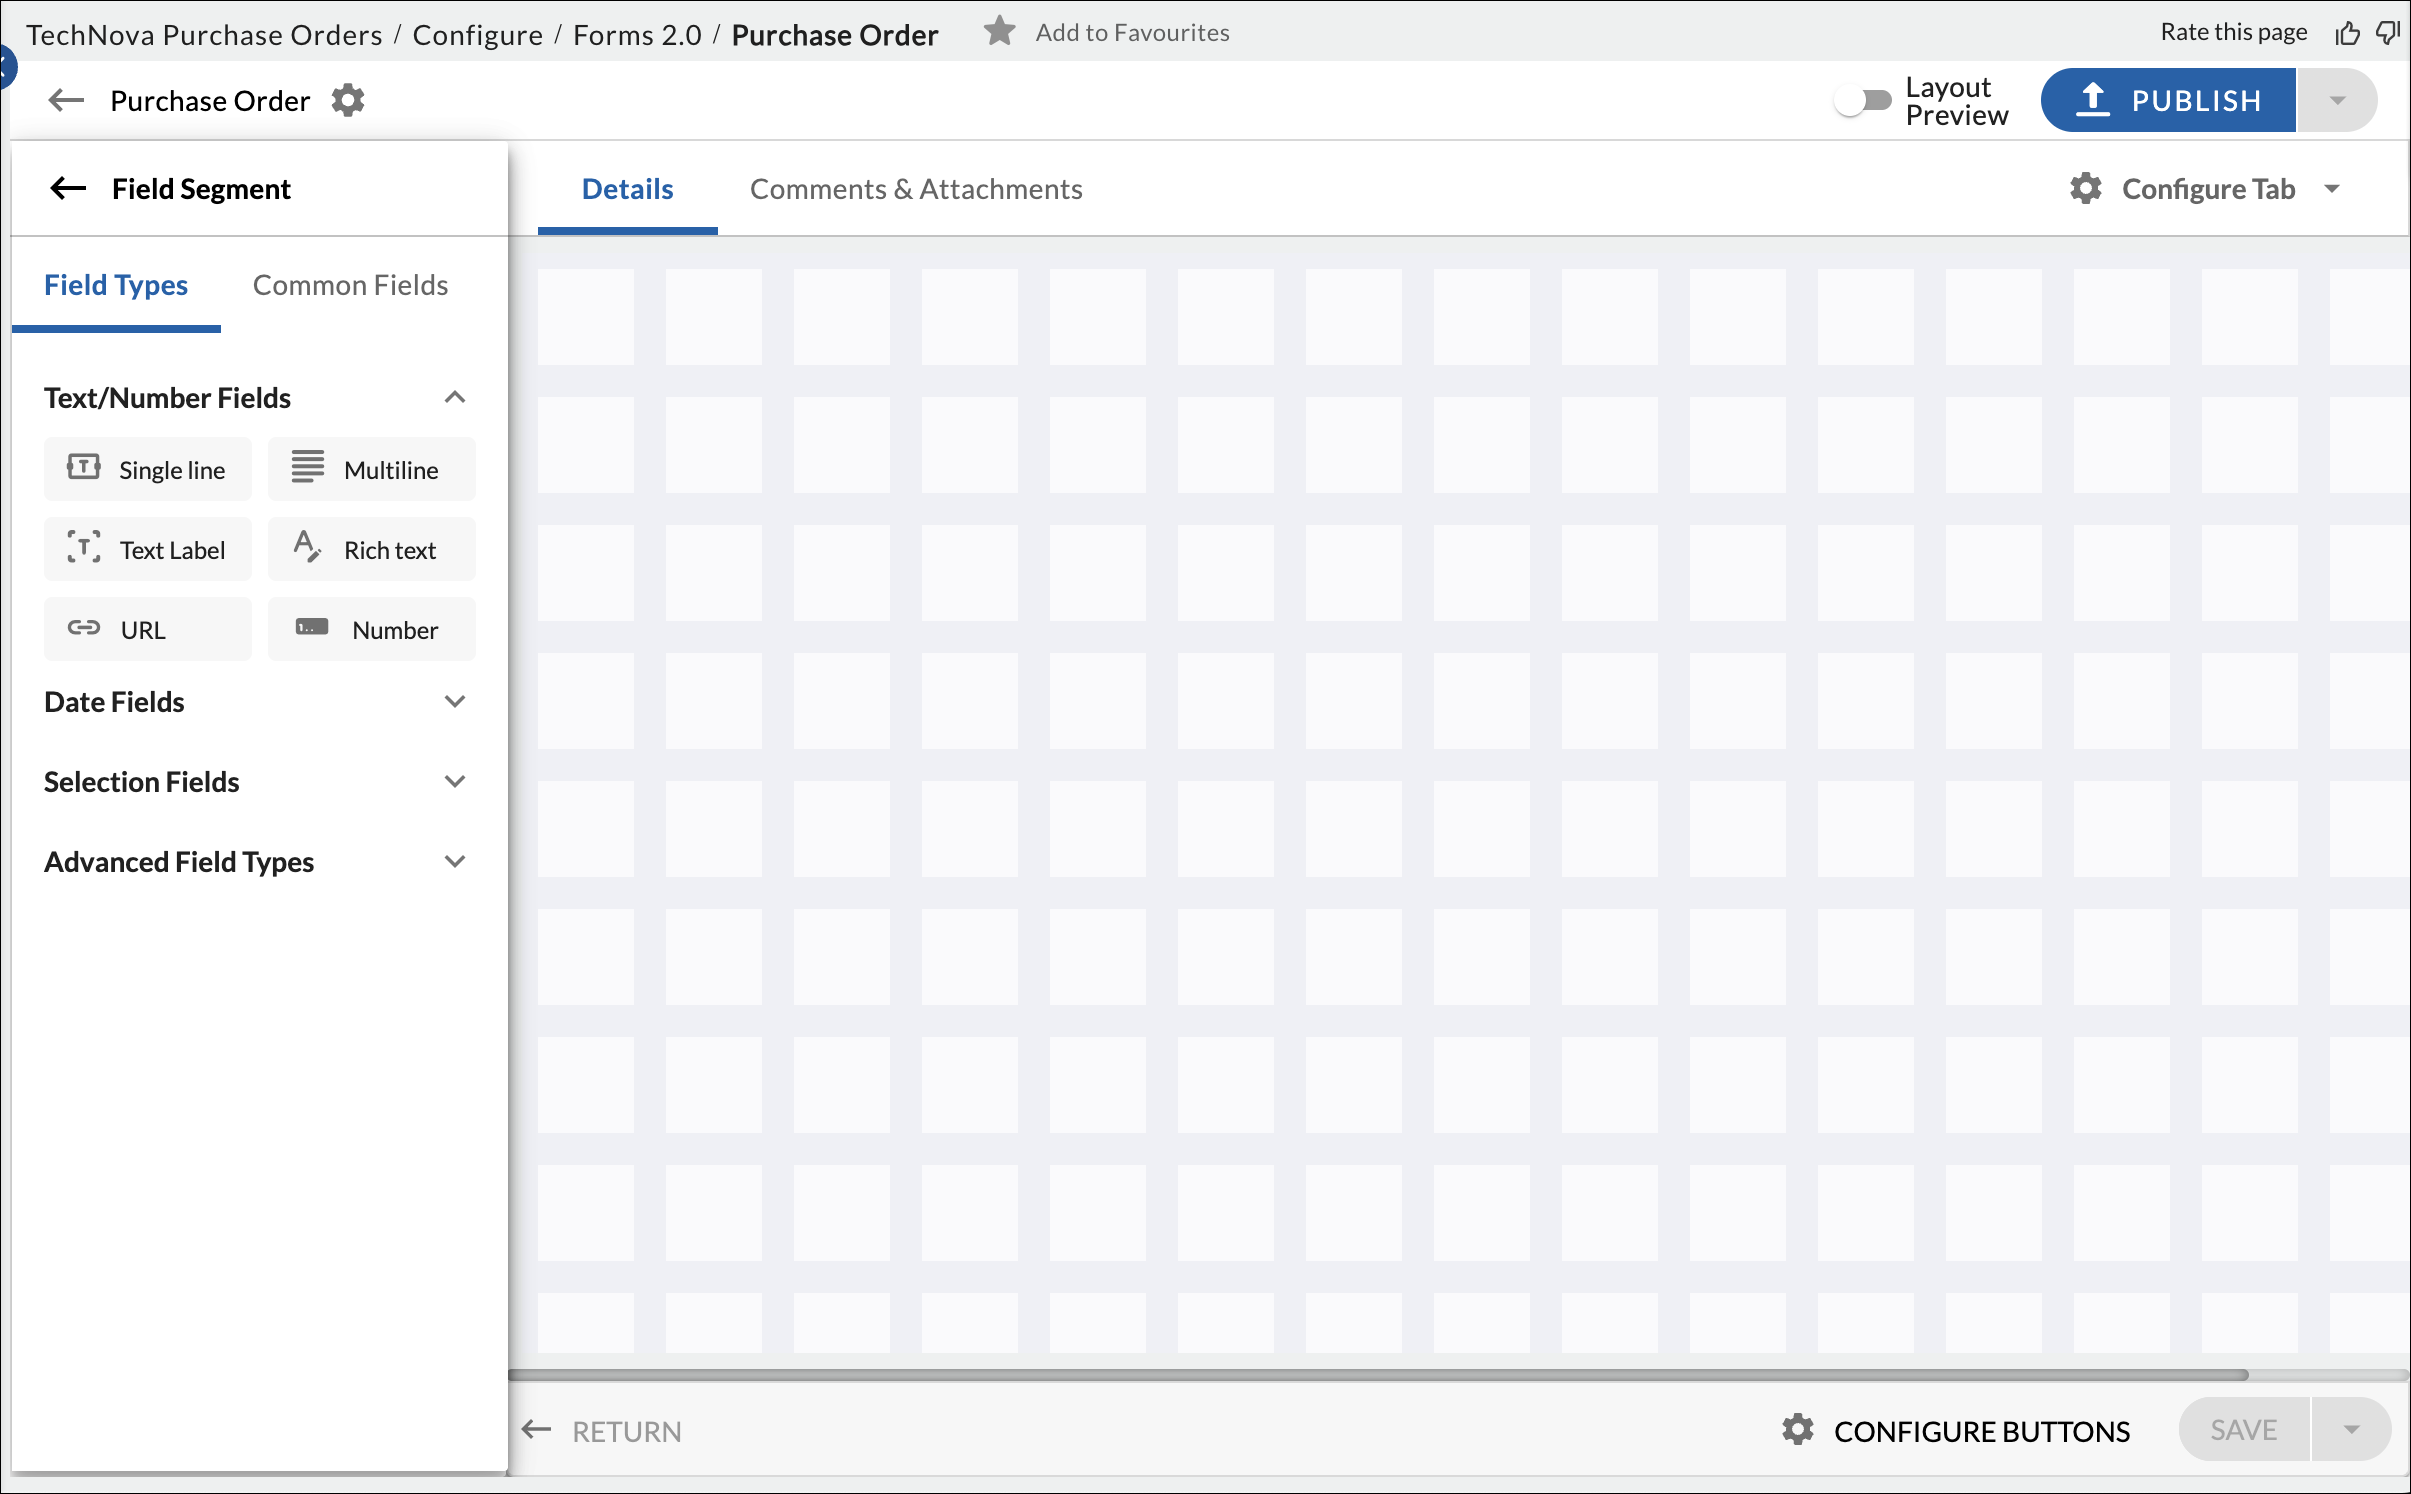
The Configurator designs and configures the Purchase Order form within Nimblework using the intuitive Form Builder. This powerful capability allows for a highly structured and dynamic form that precisely adapts to specific business needs and user input.
For detailed steps on how to create and configure forms and fields within Forms 2.0, please refer to the Configure a Form using Form 2.0 article.
Screenshot below shows the Form Builder — the workspace where you configure your form. To make sure all key information is captured for a Purchase Order raised by the IT team, the following blocks (Block 1 to Block 7) should be added for effective PO management and tracking.
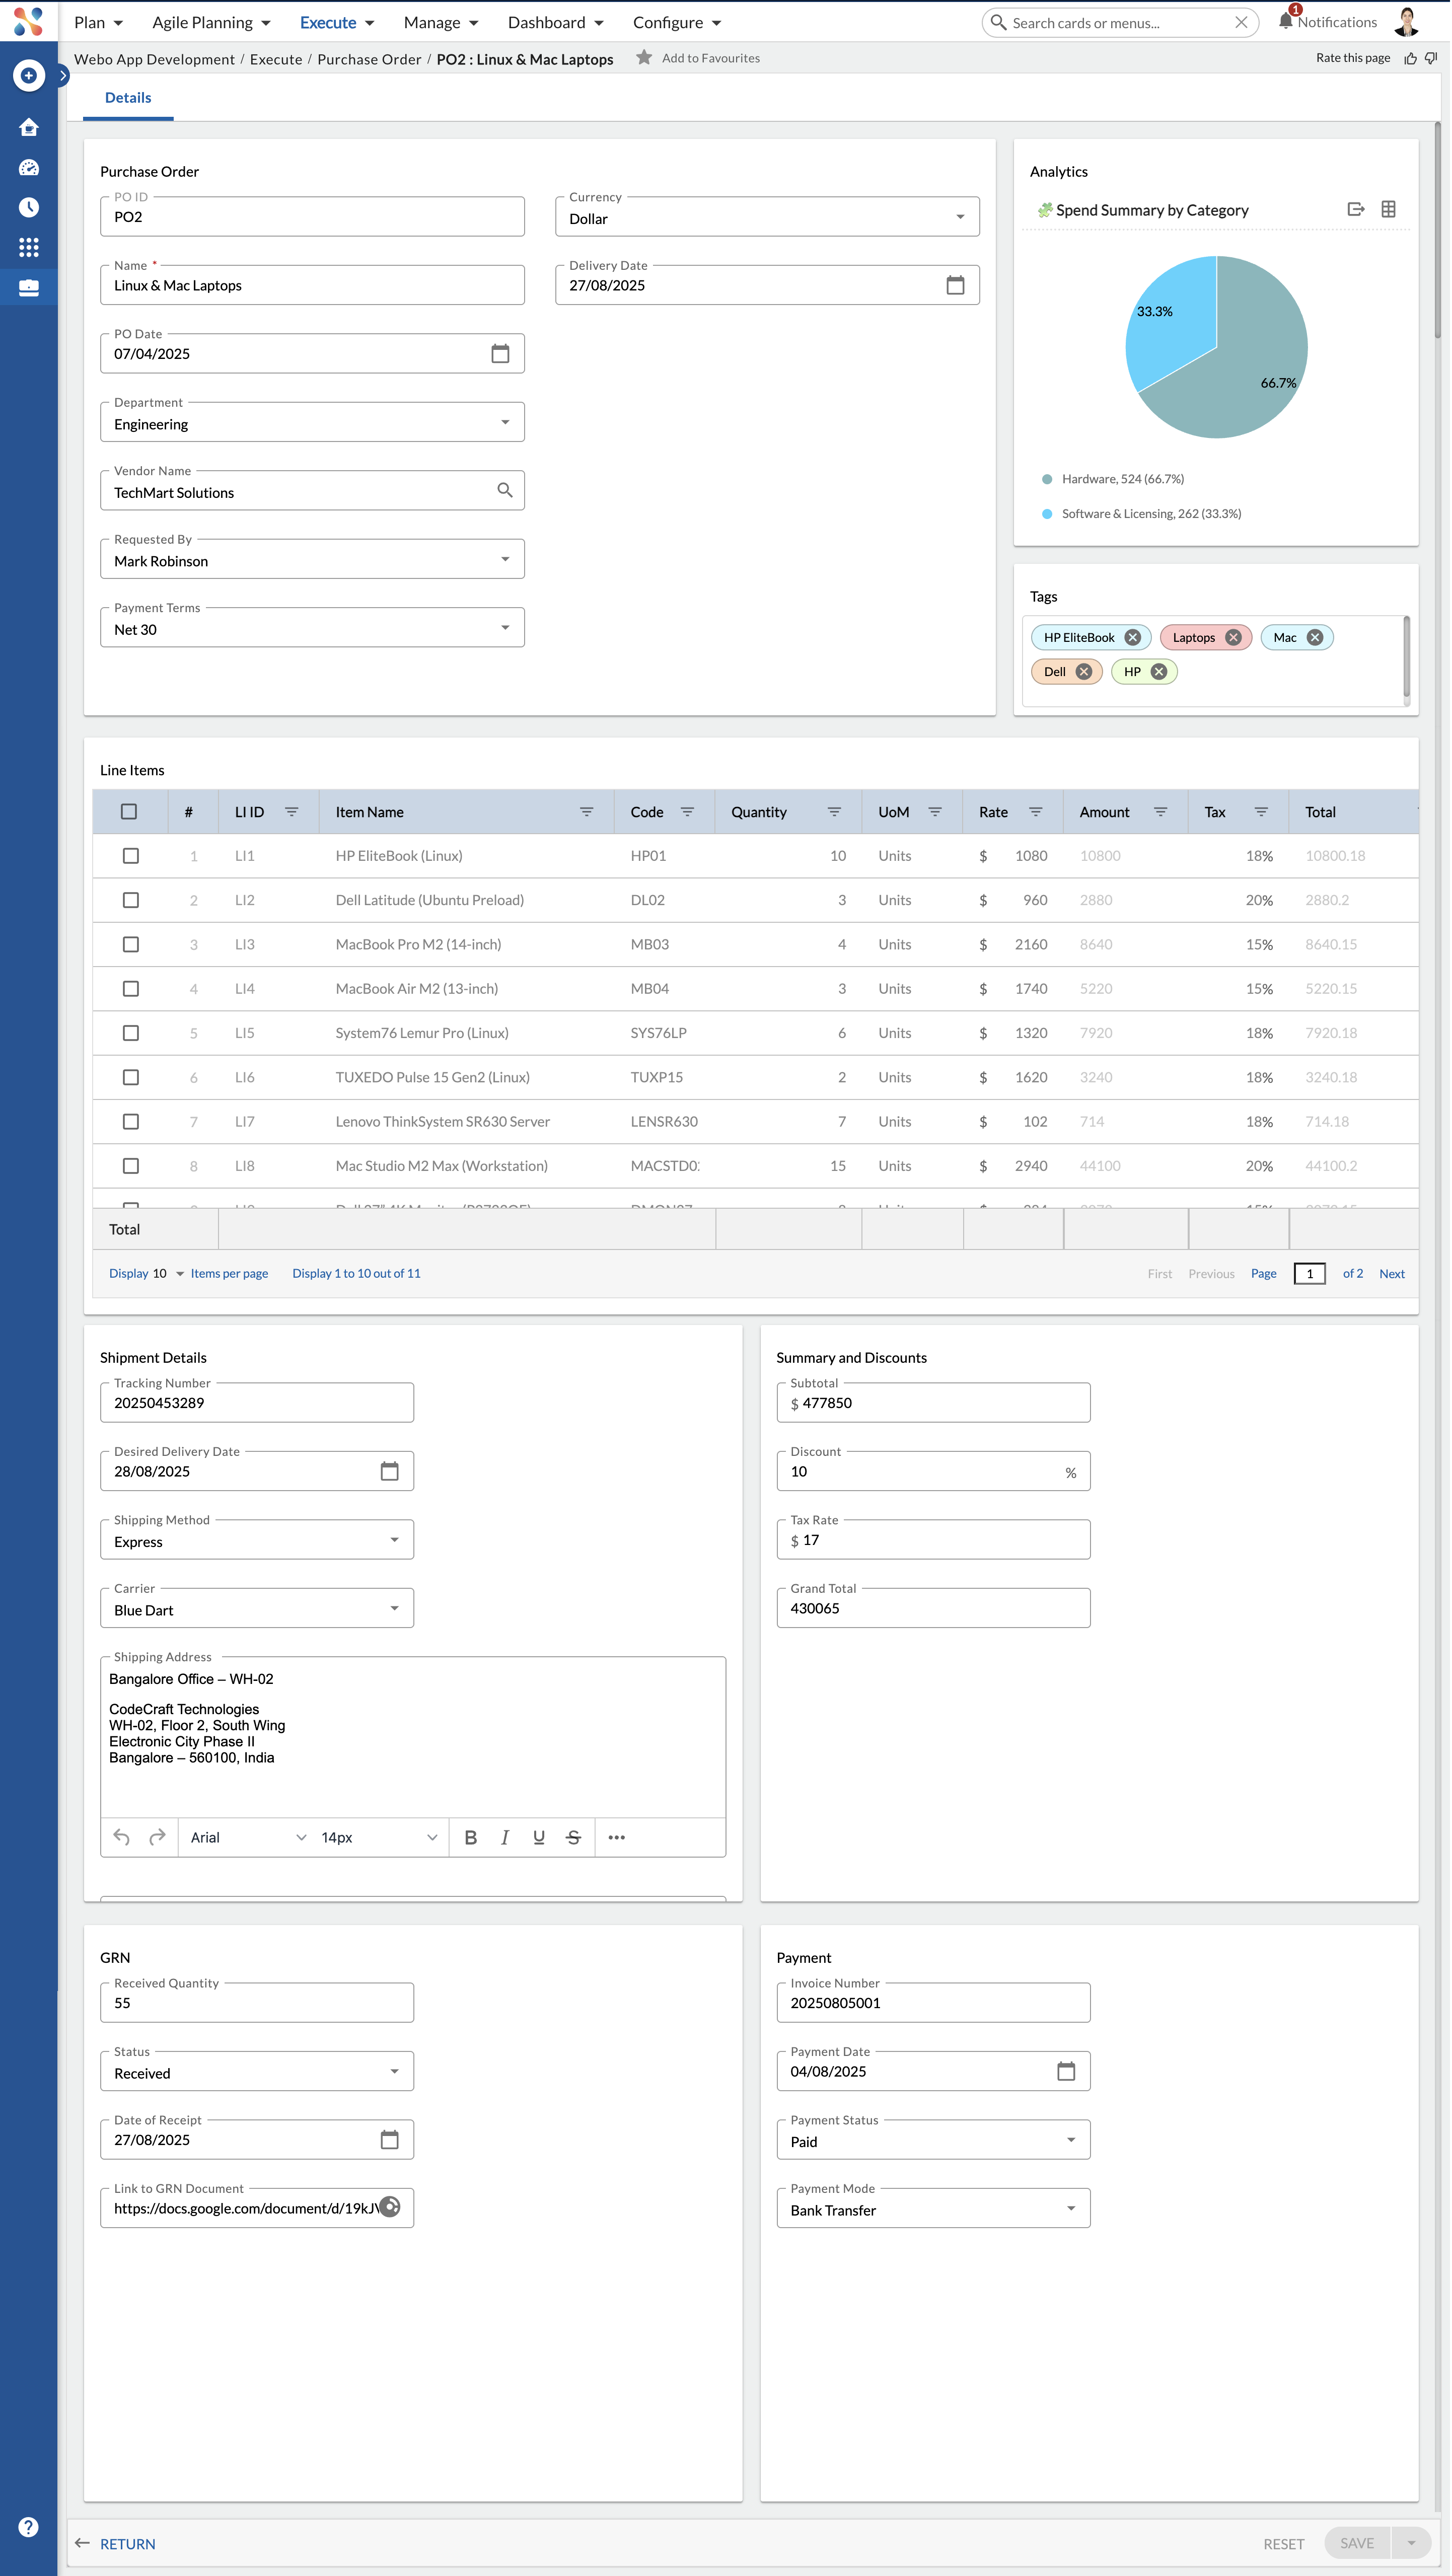
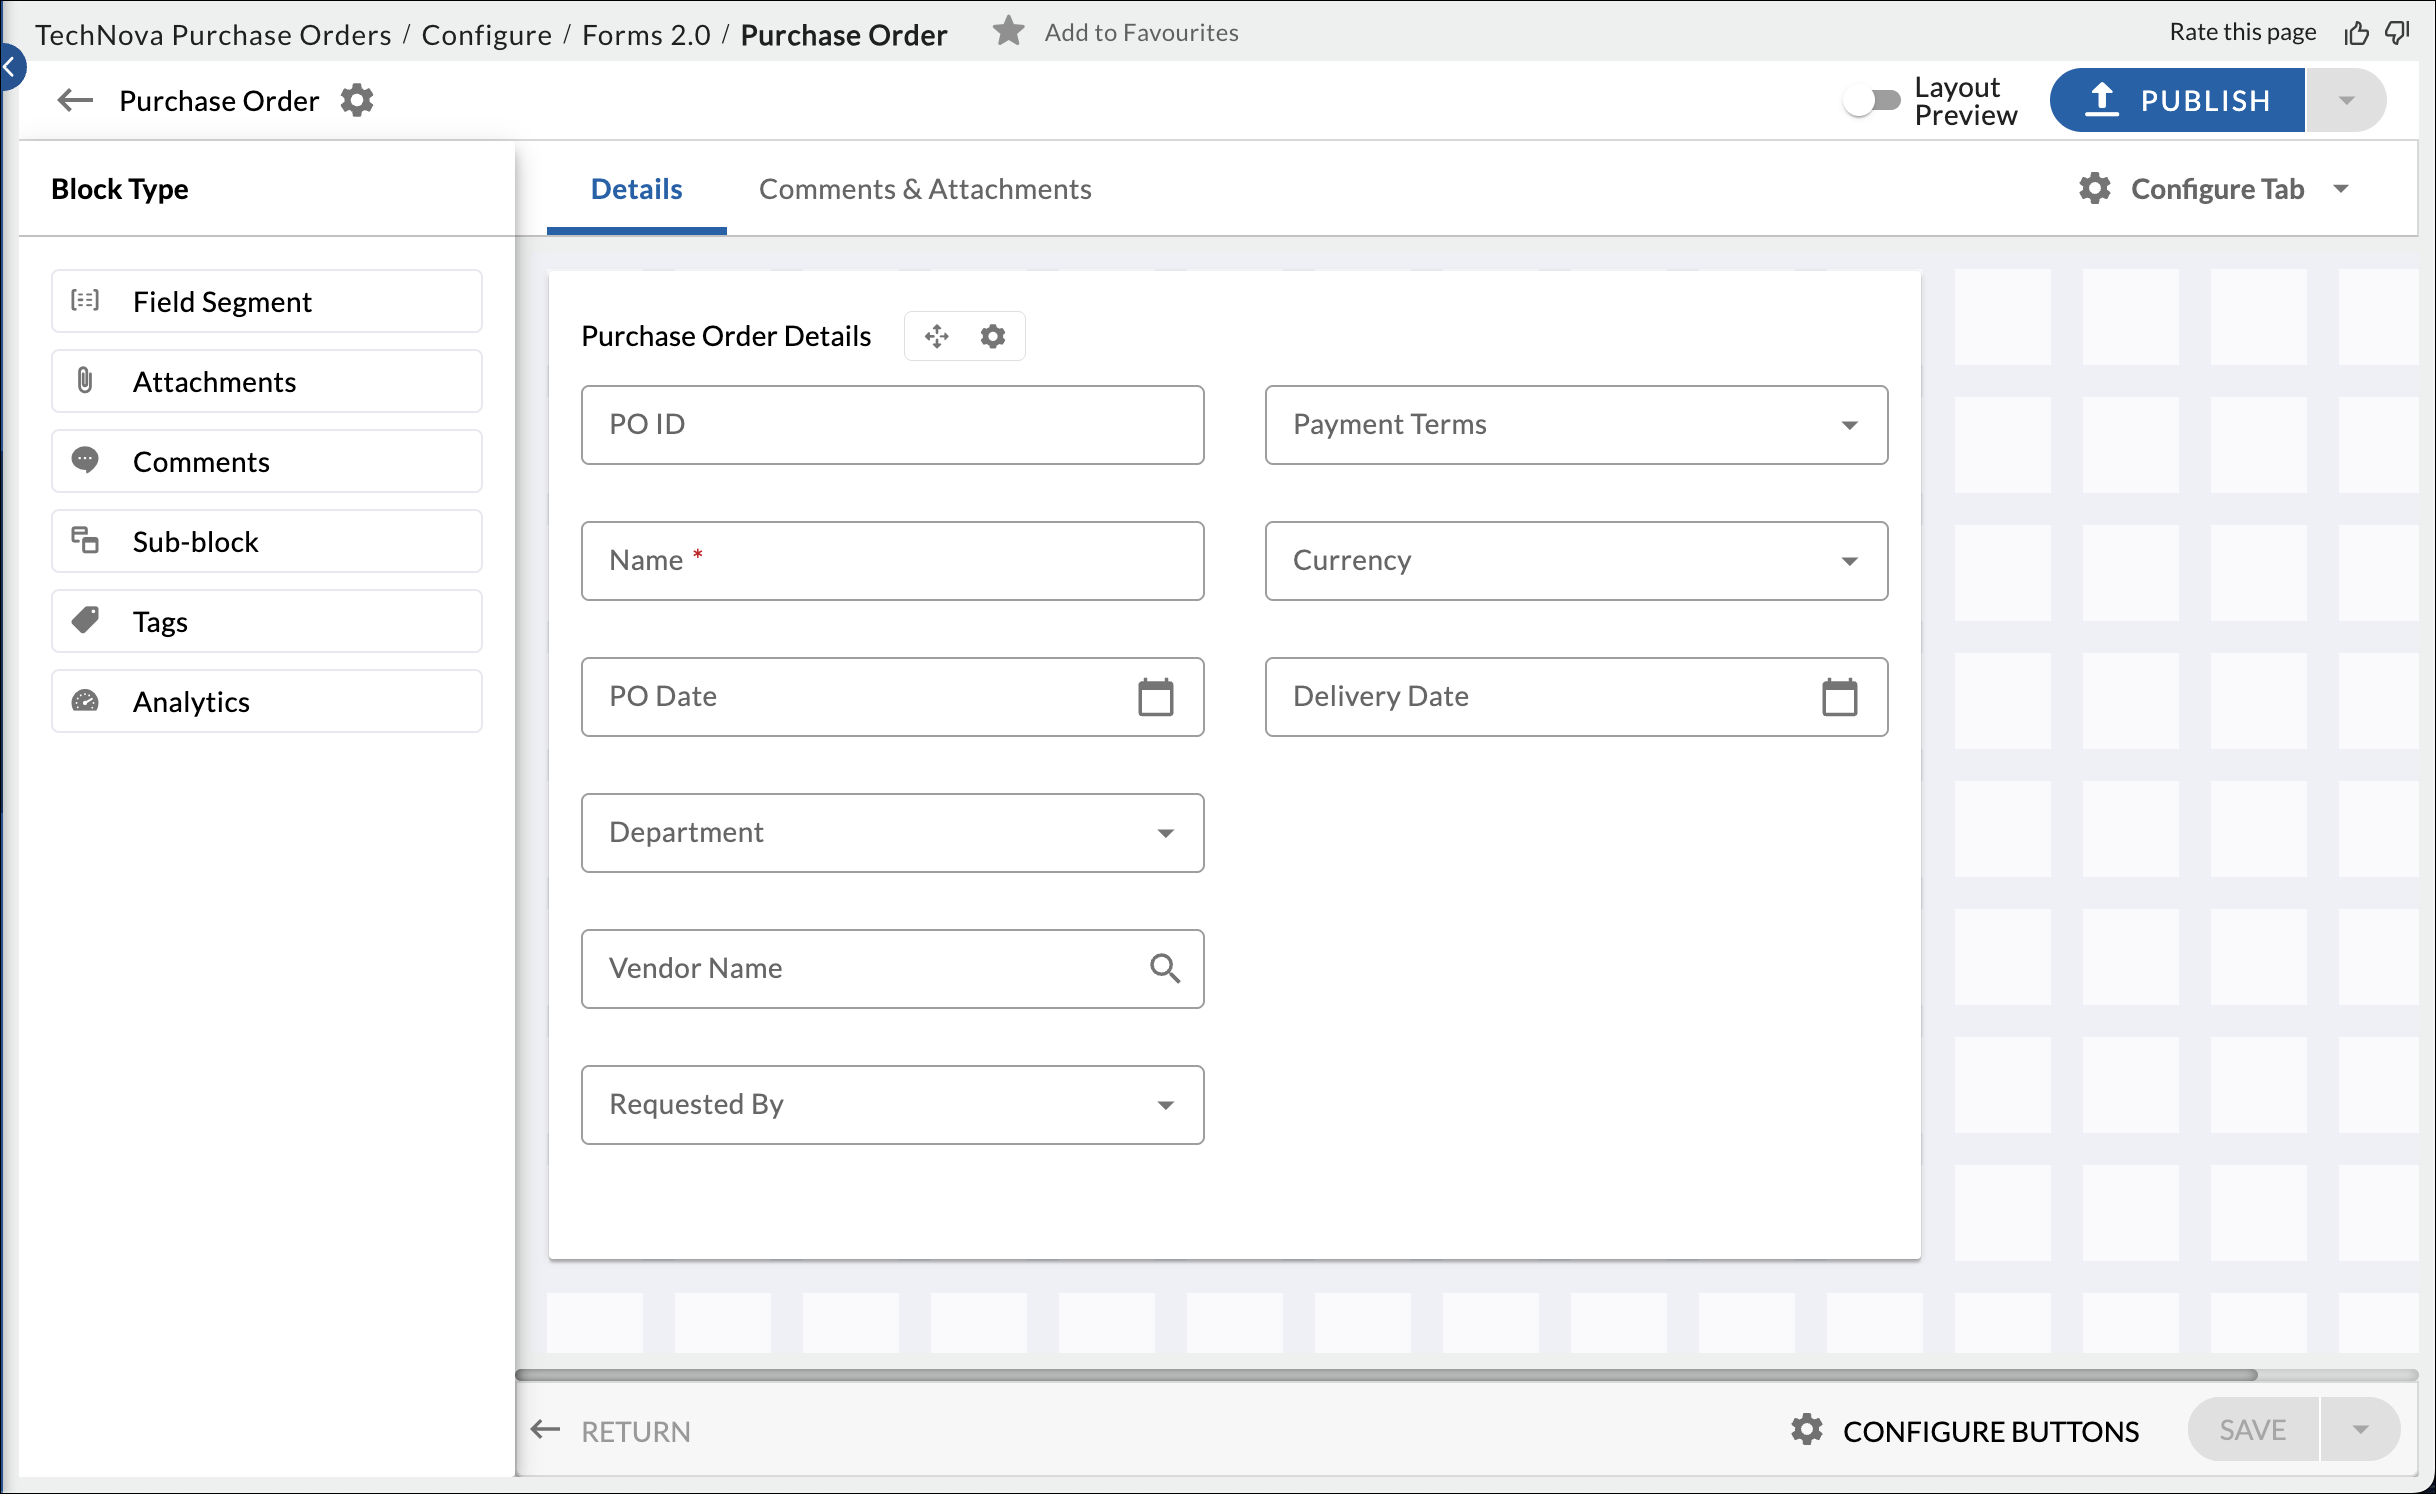
Block 1: Purchase Order Details
This is the header block of the PO form. Think of it as the starting point of your configuration—where basic but critical information about the order is captured. Below are the key fields, their types, and why they matter. To know more about how to add blocks and fields, click here.
| Field | Field Type | Reason |
|---|---|---|
| PO ID | ID (Auto-generated) | Unique identifier for tracking and auditing throughout the procurement lifecycle. |
| Name | Single Line Text | Captures the descriptive name or title of the purchase order for easy identification and reference — for example, “Linux and laptops for engineering team,” so that anyone reviewing can quickly understand the purpose of the order. |
| PO Date | Date Picker | Records official PO creation date, crucial for timelines and financial periods. |
| Department | Static Dropdown (Hierarchical) | Links PO to a specific department for budget allocation and cost tracking. Users navigate large organizational structures efficiently. |
| Vendor Name | Static Dropdown (Searchable) | Identifies the supplier. Users quickly find correct vendors using search. |
| Requested By | Static Dropdown | Identifies the individual initiating the purchase request for accountability. |
| Payment Terms | Static Dropdown | Defines agreed-upon payment conditions (e.g., Net 30, Due on Receipt), critical for financial operations. |
| Currency | Static Dropdown | Defines PO amount currency, essential for international transactions and accuracy. |
| Delivery Date | Date Picker | Specifies expected delivery date, aiding planning and tracking. |
To know more about field types, click here.
Block 2: Spend Summary by Category
This block helps you visualize where the money is going in your purchase order. Think of it as a quick snapshot that shows how your budget is spent across different categories (like hardware, software, services, etc.). It’s useful when someone reviewing the PO wants to understand the financial impact without reading every line item.
By adding this block, you’re giving decision-makers instant clarity on spending patterns and helping them make faster, informed approvals.
Block 3: Line Items
This is where you capture all the specific items being ordered—like different types of laptops for developers. You’ll enter each item’s name, quantity, rate, tax, and unit of measure. Think of this block as your main order list.
It uses a dynamic grid, which means you can add multiple rows and it will automatically calculate subtotals and totals for you. This makes managing big orders easier and reduces the risk of manual errors.
To know more about different block types, click here.

| Field | Field Type | Reason |
|---|---|---|
| Item ID | Number | Unique alphanumeric identifier for the item, crucial for inventory management and system integration. |
| Item Name | Single line | Provides a clear, descriptive name for the product or service being ordered. |
| Quantity | Number | Specifies the numerical amount of the item being purchased, critical for inventory and cost. |
| Unit of Measure (UoM) | Dropdown | Defines the unit by which the quantity is measured (e.g., “Each”, “Box”, “Hour”), ensuring clarity. |
| Rate | Number | The cost per unit of the item, essential for accurate financial calculation. |
| Amount | Number | Automatically calculates the subtotal for each line item (Quantity * Rate). |
| Tax | Number (Percentage) | The applicable tax amount for the line item. Can be manually entered or calculated based on rules. |
| Total | Formula (Auto-calculated) | Automatically calculates the final total for each line item based on Quantity, Rate, and Tax (Amount + Tax). |
To know more about field types, click here.
Block 4: Shipment Details
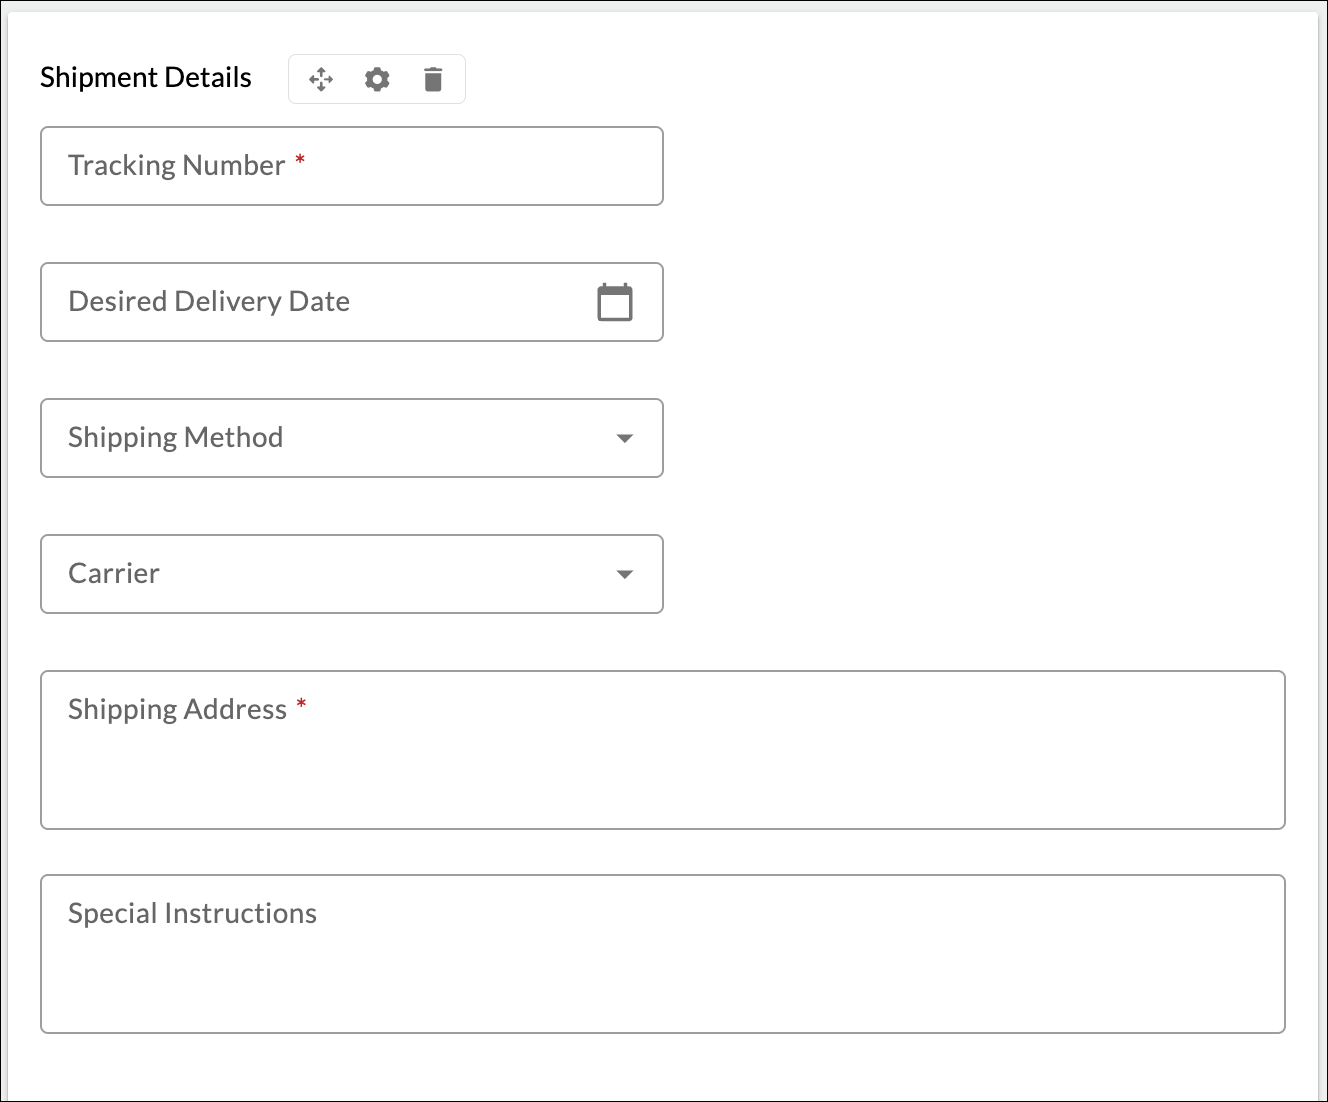
This is the logistics section of your form. It’s where you specify when and where the ordered items should be delivered, and how. As the person configuring this block, you’ll guide your users to input critical delivery info such as the shippingaddress, delivery date, and method of transport.
This ensures items reach the right place on time and helps both you and your vendors avoid confusion or delays.
| Field | Field Type | Reason |
|---|---|---|
| Tracking Number | Text Input (Optional) | Once provided by vendor, this field allows for real-time tracking of the shipment. |
| Desired Delivery Date | Date Picker | The preferred date for the goods or services to be received, aiding logistics planning. |
| Shipping Method | Static Dropdown | Defines how the items will be shipped (e.g., “Standard”, “Express”, “Freight”). |
| Carrier | Static Dropdown | Identifies the shipping company responsible for delivery. |
| Shipping Address | Mutiline Text | Specifies the exact location where the ordered items should be delivered. |
| Special Instructions | Mutiline Text | Allows for any specific notes or requirements for the delivery personnel. |
Block 5: Summary & Discounts
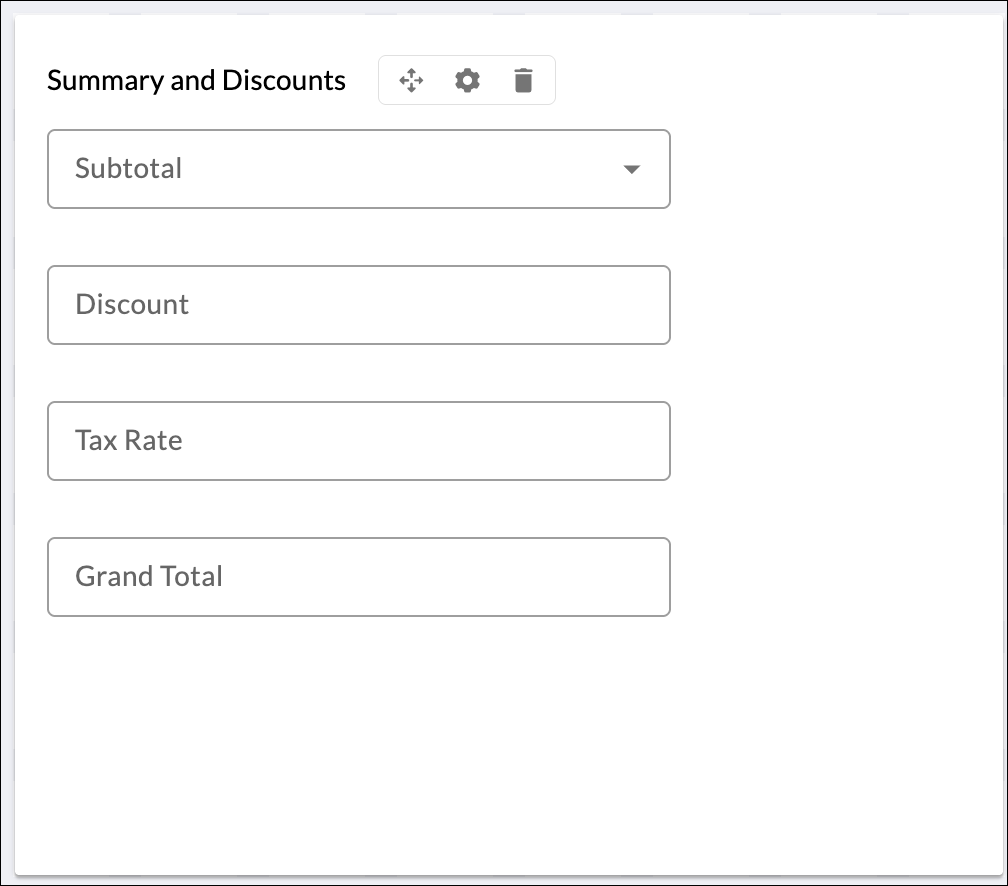
This is your finance block. Here, you’ll pull together all costs from the items listed earlier, apply any applicable discounts, and calculate taxes to arrive at the final grand total. It’s the block decision-makers look at before signing off the PO.
Think of it as the financial snapshot of your entire order—perfect for budget checks, audit readiness, and ensuring financial accuracy before submission.
| Field | Field Type | Reason |
|---|---|---|
| Subtotal | Formula | The sum of all “Amount” fields from Section 3, providing the raw cost before discounts/taxes. |
| Discount Amount/Percentage | Number | Allows for the entry of a specific discount amount or percentage to be applied to the subtotal. |
| Tax Rate | Number | The applicable tax rate (e.g., VAT, Sales Tax) to be applied to the order. |
| Grand Total | Formula (Auto-calculated) | The final, total cost of the Purchase Order, including all items, discounts, and taxes. |
Block 6: GRN – Goods Received Note
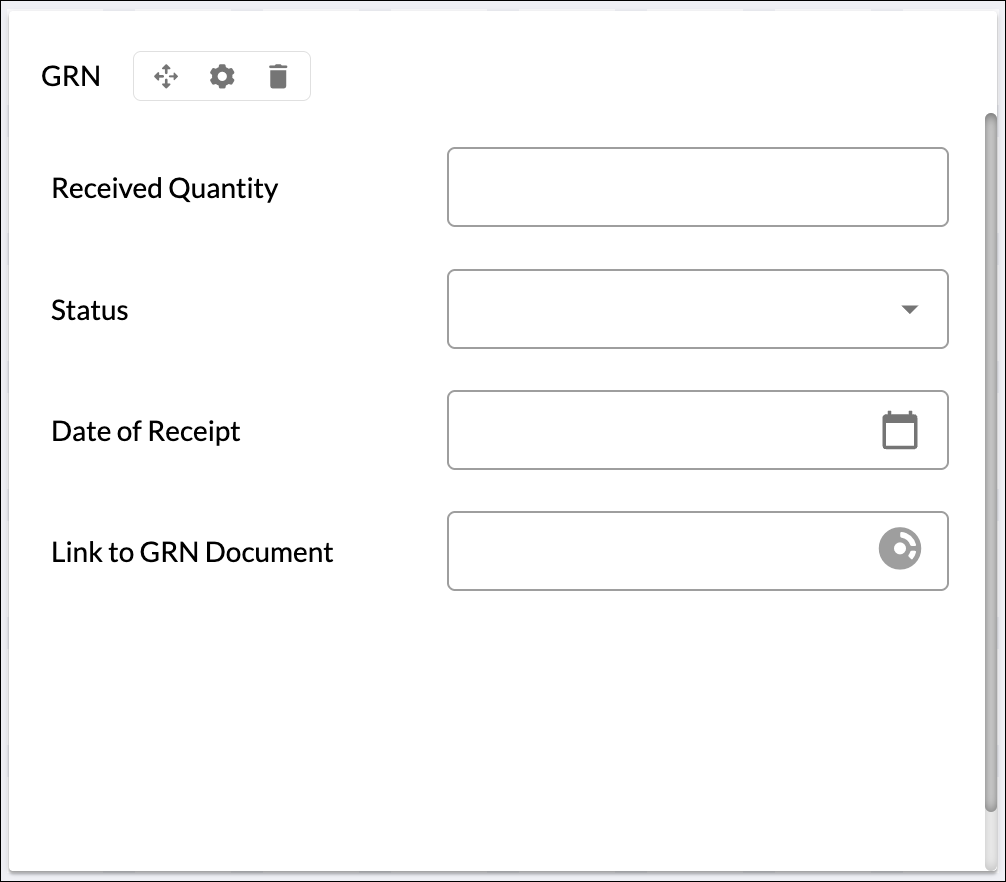
This is your fulfillment tracking block. It gives everyone using the form a quick glance at whether the items have been received or are still pending. You won’t input detailed GRN info here—that’s stored in a separate record—but by adding this block, you give users real-time visibility into delivery status.
This helps trigger next steps like payment processing or follow-ups with the vendor. Think of it as your connection between the PO and the actual physical goods arriving.
| Field | Field Type | Reason |
|---|---|---|
| Received Quantity | Number | Displays the total quantity of items confirmed as received against the PO, useful for reconciliation. |
| Status | Static Dropdown | Indicates the current state of goods receipt (e.g., “Not Received”, “Partially Received”, “Fully Received”). |
| Date(s) of Receipt | Date | Shows when the goods were physically received, aiding in tracking delivery timelines. |
| Link to GRN Document | URL | Provides a direct navigation path to the official Goods Received Note record for detailed verification. |
Block 7: Payment Details
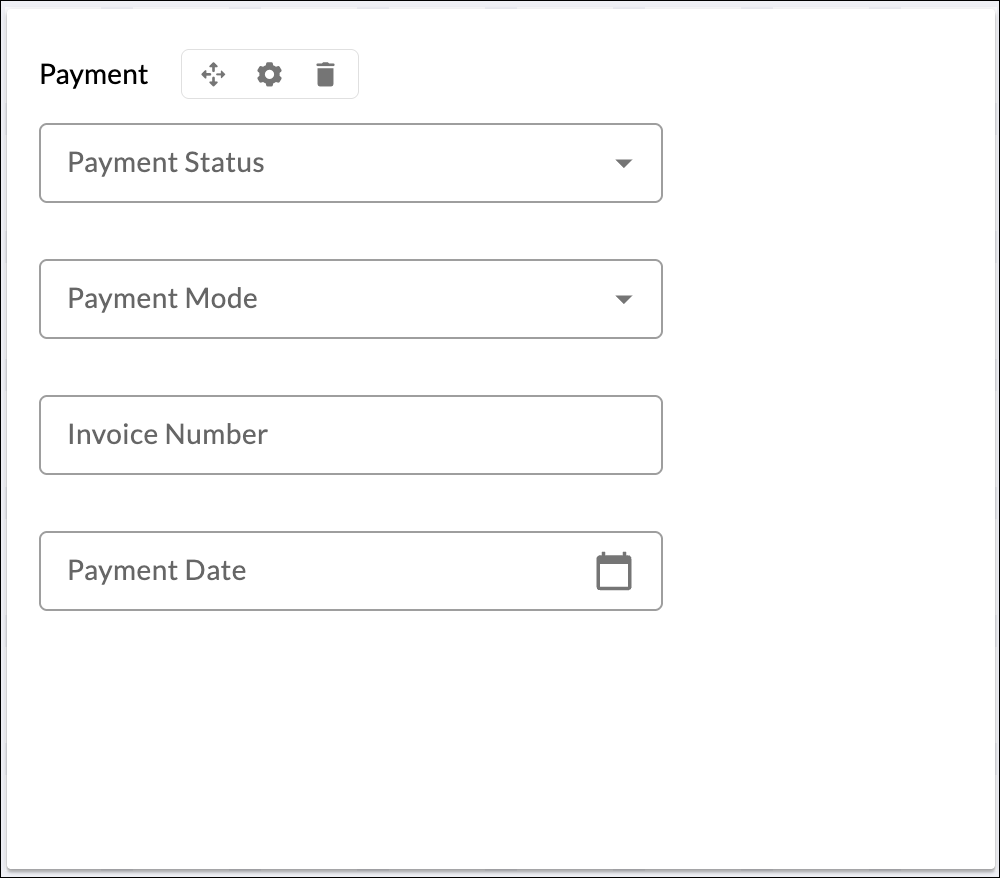
This is your payment tracking block. Here, you’re giving the finance team and stakeholders a quick overview of how and when the payment was made for the order.
Whether the payment is pending, partially done, or fully settled, this block helps maintain transparency across departments. It also makes follow-ups with vendors easy, keeps your accounts payable cycle organized, and supports timely and accurate vendor settlements.
| Field | Field Type | Reason |
|---|---|---|
| Payment Status | Static Dropdown | Shows current payment progress—Pending, Partially Paid, or Paid—for tracking payment lifecycle. |
| Payment Mode | Static Dropdown | Identifies the mode of payment (e.g., Bank Transfer, Cheque) to help reconcile financial records. |
| Invoice Number | Number | Captures the official invoice number from the vendor for validation and record-keeping. |
| Payment Date | Date | Records the actual date of payment, useful for audit trail and vendor communication. |
Supplementary Information Tabs
To keep your main PO form clean and easy to use, Forms 2.0 lets you organize related information into separate tabs. Each tab can hold its own sections and blocks, helping you present only what’s needed on screen while keeping everything accessible in one place.
Tabbed Layouts: You can add tabs for things like Comments, Attachments, or even an Activity Log. You can also create custom tabs to store extra info specific to your company’s PO process. This helps your users focus on one part of the form at a time and makes the whole experience smoother and less cluttered. To know more about tabs, click here.
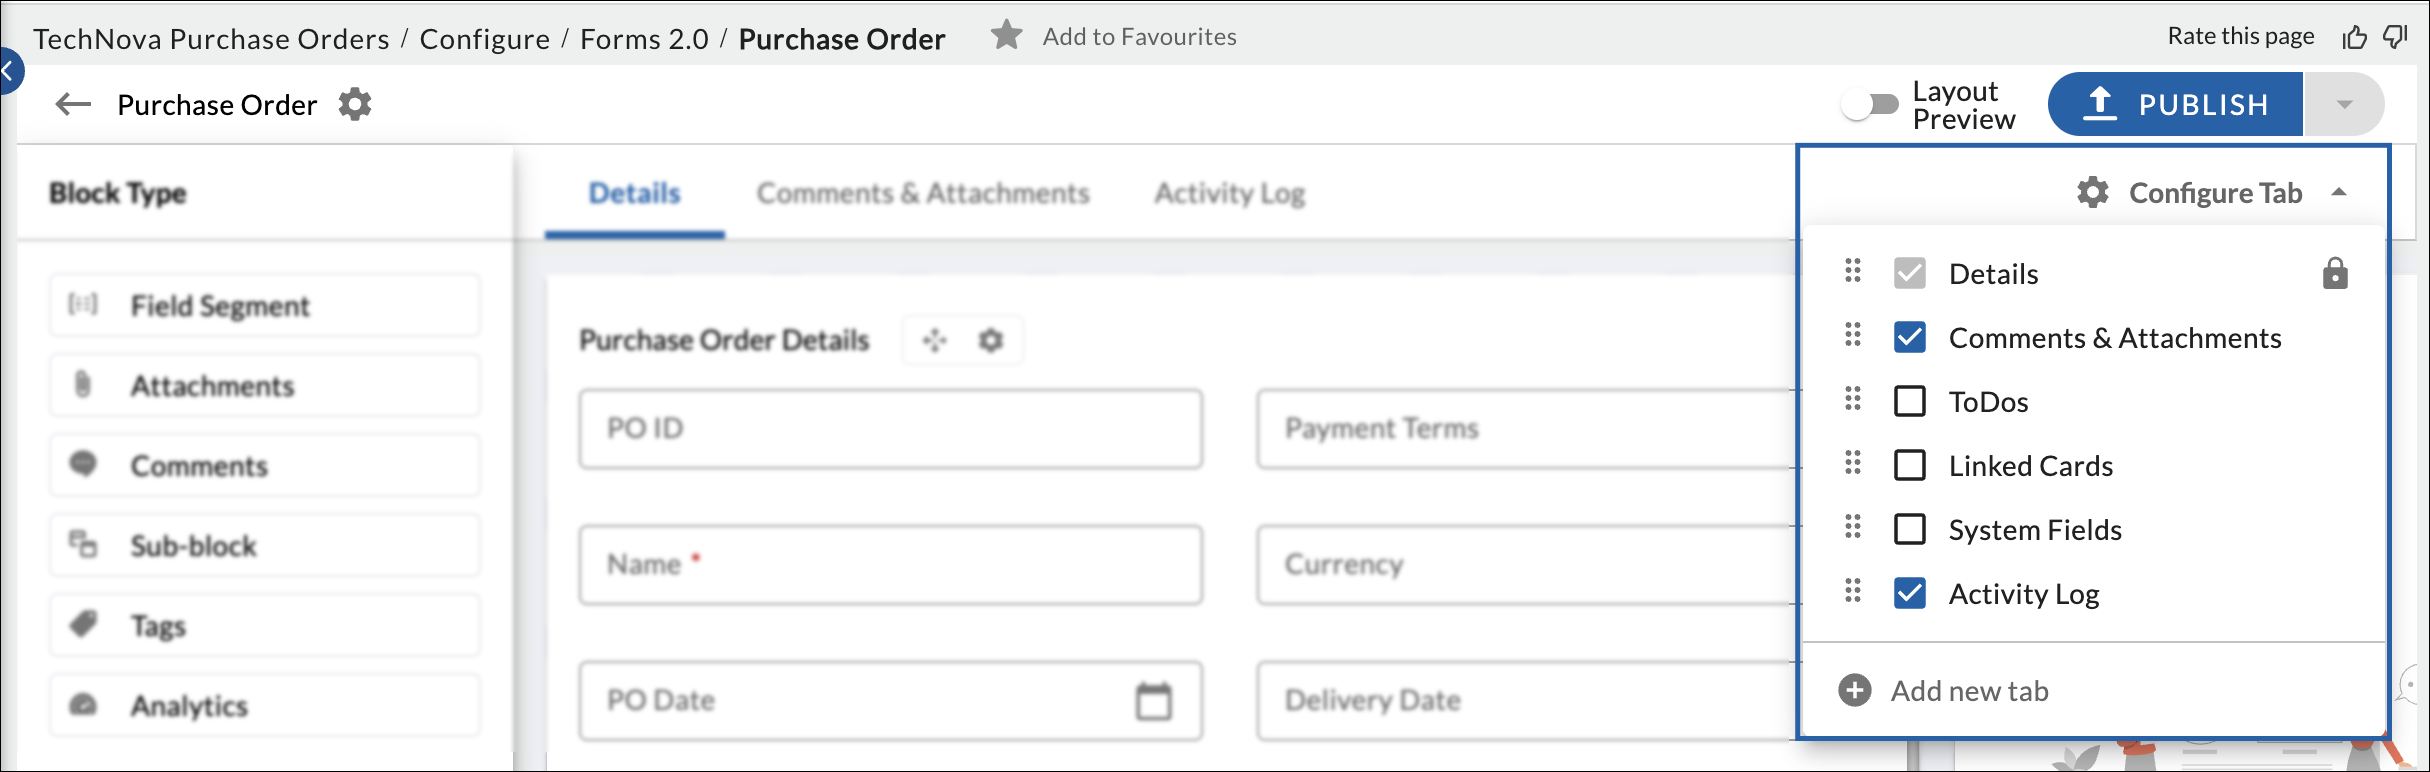
Note: You can place these blocks in a single tab, separate them into custom tabs, or even create a new form. Arrange them based on your specific needs and preferences.
Full Card View
The submitted PO form has clean tabs for attachments, logs, and discussions. Here’s how it looks: