
This article will familiarize you with the overview, navigation, and time tracking feature.
|
Skip Ahead to: Prerequisites for Time Tracking |
Overview
The Time Tracking tab in the Timesheet module is the primary workspace where team members log, review, and manage their weekly effort. It presents a grid-based view of time logged across projects, cards, and ToDos, and supports both direct logging and approval-based workflows.
This article explains: – How the Time Tracking grid works – Which workitems appear and why – How to log, submit, and track time – How filters, calendar, and column settings affect the view – How approval statuses impact editing and visibility.
Prerequisites for Time Tracking
To use the Time Tracking tab:
- Workitems must be created using Forms 2.0.
- Enable Time Tracking (applicable for Forms; not Lists) must be enabled on the form.
- The workitem must be assigned to you.
![]()
Important: The rules in this article apply only to time logged from the Time Tracking tab. Time logged directly from card details follows a different interaction model.
Understanding the Time Tracking Grid
The Time Tracking screen displays a weekly grid:
- Rows represent cards or ToDos, depending on form configuration.
- Columns represent days of the selected week.
- The Logged Hours column shows the total time logged against each row.
- A weekly total is displayed at the bottom of the grid.
Workitems with logged time are automatically shown at the top of the grid to help you focus on active work.
What Appears in the Time Tracking Grid
Only eligible workitems appear in the grid. A card or ToDo is shown when:
- It is created using a form with Time Tracking enabled.
- You are the owner of the workitem.
- It falls within its valid visibility period.
Visibility Logic
Workitems appear in the Time Tracking grid based on specific date rules. The visibility logic differs for Task workitems compared to other workitem types.
Standard Workitems (User Story, Defect, Change Request, etc.)
Standard workitems contain the following date fields:
- Date Created
- Date Identified (if configured in the form)
A standard workitem appears in the Time Tracking grid starting from the week derived from the earlier of:
- Date Created
- Date Identified (if set)
If the workitem is created midweek, it is visible from the beginning of that week (Monday).
Date Identified allows logging time from an earlier date within the same week when applicable.
Standard workitems (including their associated ToDos) remain visible:
- From their start week
- Until the week in which they are closed
- They do not appear in future weeks after closure
Task Workitems (Special Date Logic)
Task workitems follow a different visibility rule.
Tasks do not rely on Date Created or Date Identified for Time Tracking visibility.
Instead, Task visibility depends strictly on the Planned Start Date.
A Task appears in the Time Tracking grid starting from its Planned Start Date.
You cannot log time for a Task before its Planned Start Date, even if the Task was created earlier.
Tasks remain visible:
- From their Planned Start week
- Until the week in which they are closed
- They do not appear in future weeks after closure
Navigating Between Weeks Using the Calendar
The calendar control allows you to switch between weeks:
- Select a date to view the Timesheet for the corresponding week.
- Use the Previous and Next controls to move between weeks.
- Click Today to return to the current week.
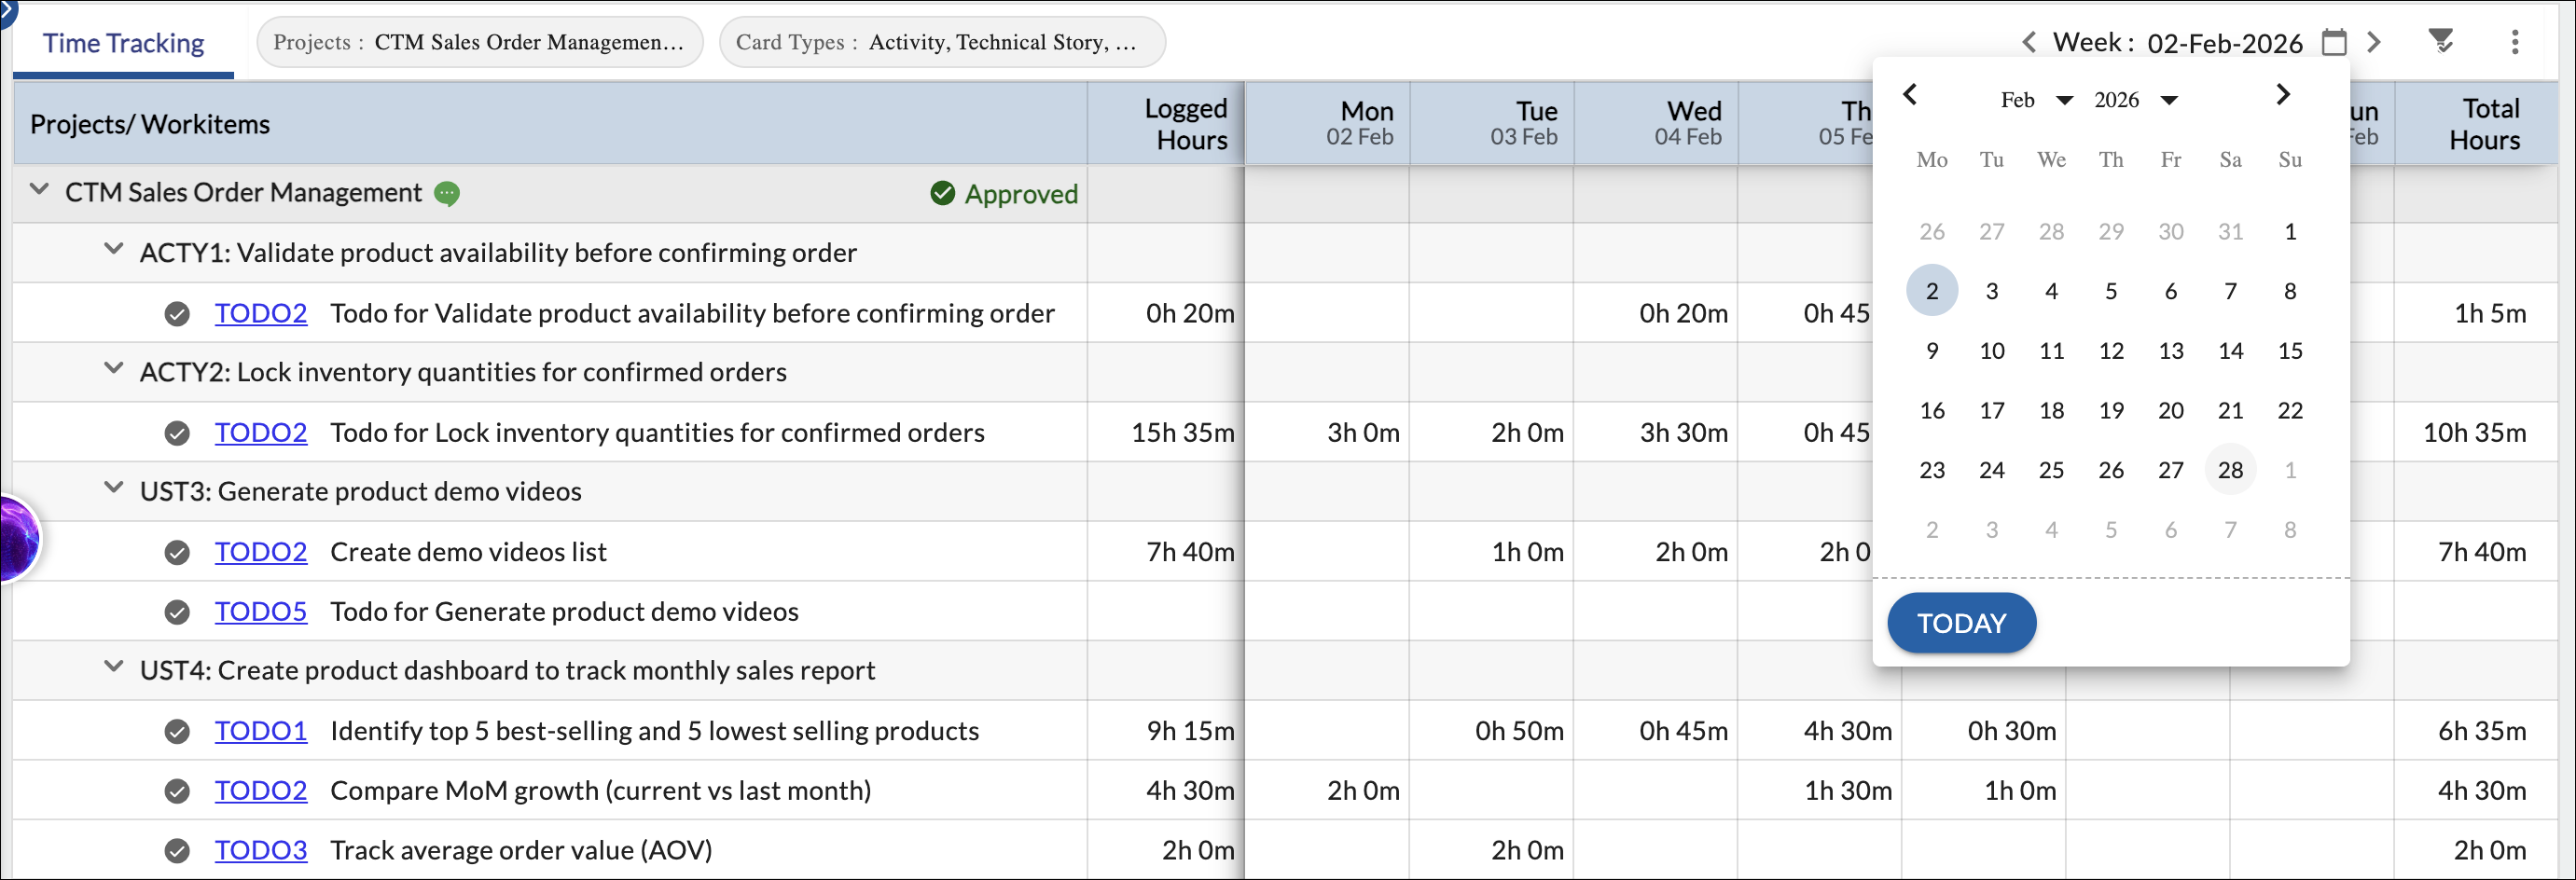
You can log time only for weeks in which the workitem is visible based on its start and end logic.
Managing Pending Timesheets from Previous Weeks
Time tracking in Nimble operates on a weekly basis.
If you have logged time for a previous week but have not submitted it (when approval is required), that week will remain in Draft status.
To submit a pending week:
- Use the Calendar to navigate to the required week.
- Review your logged time entries.
- Click Submit to send that week’s timesheet for approval.
It is recommended to ensure that all previous weeks are submitted to avoid delays in approval and reporting.
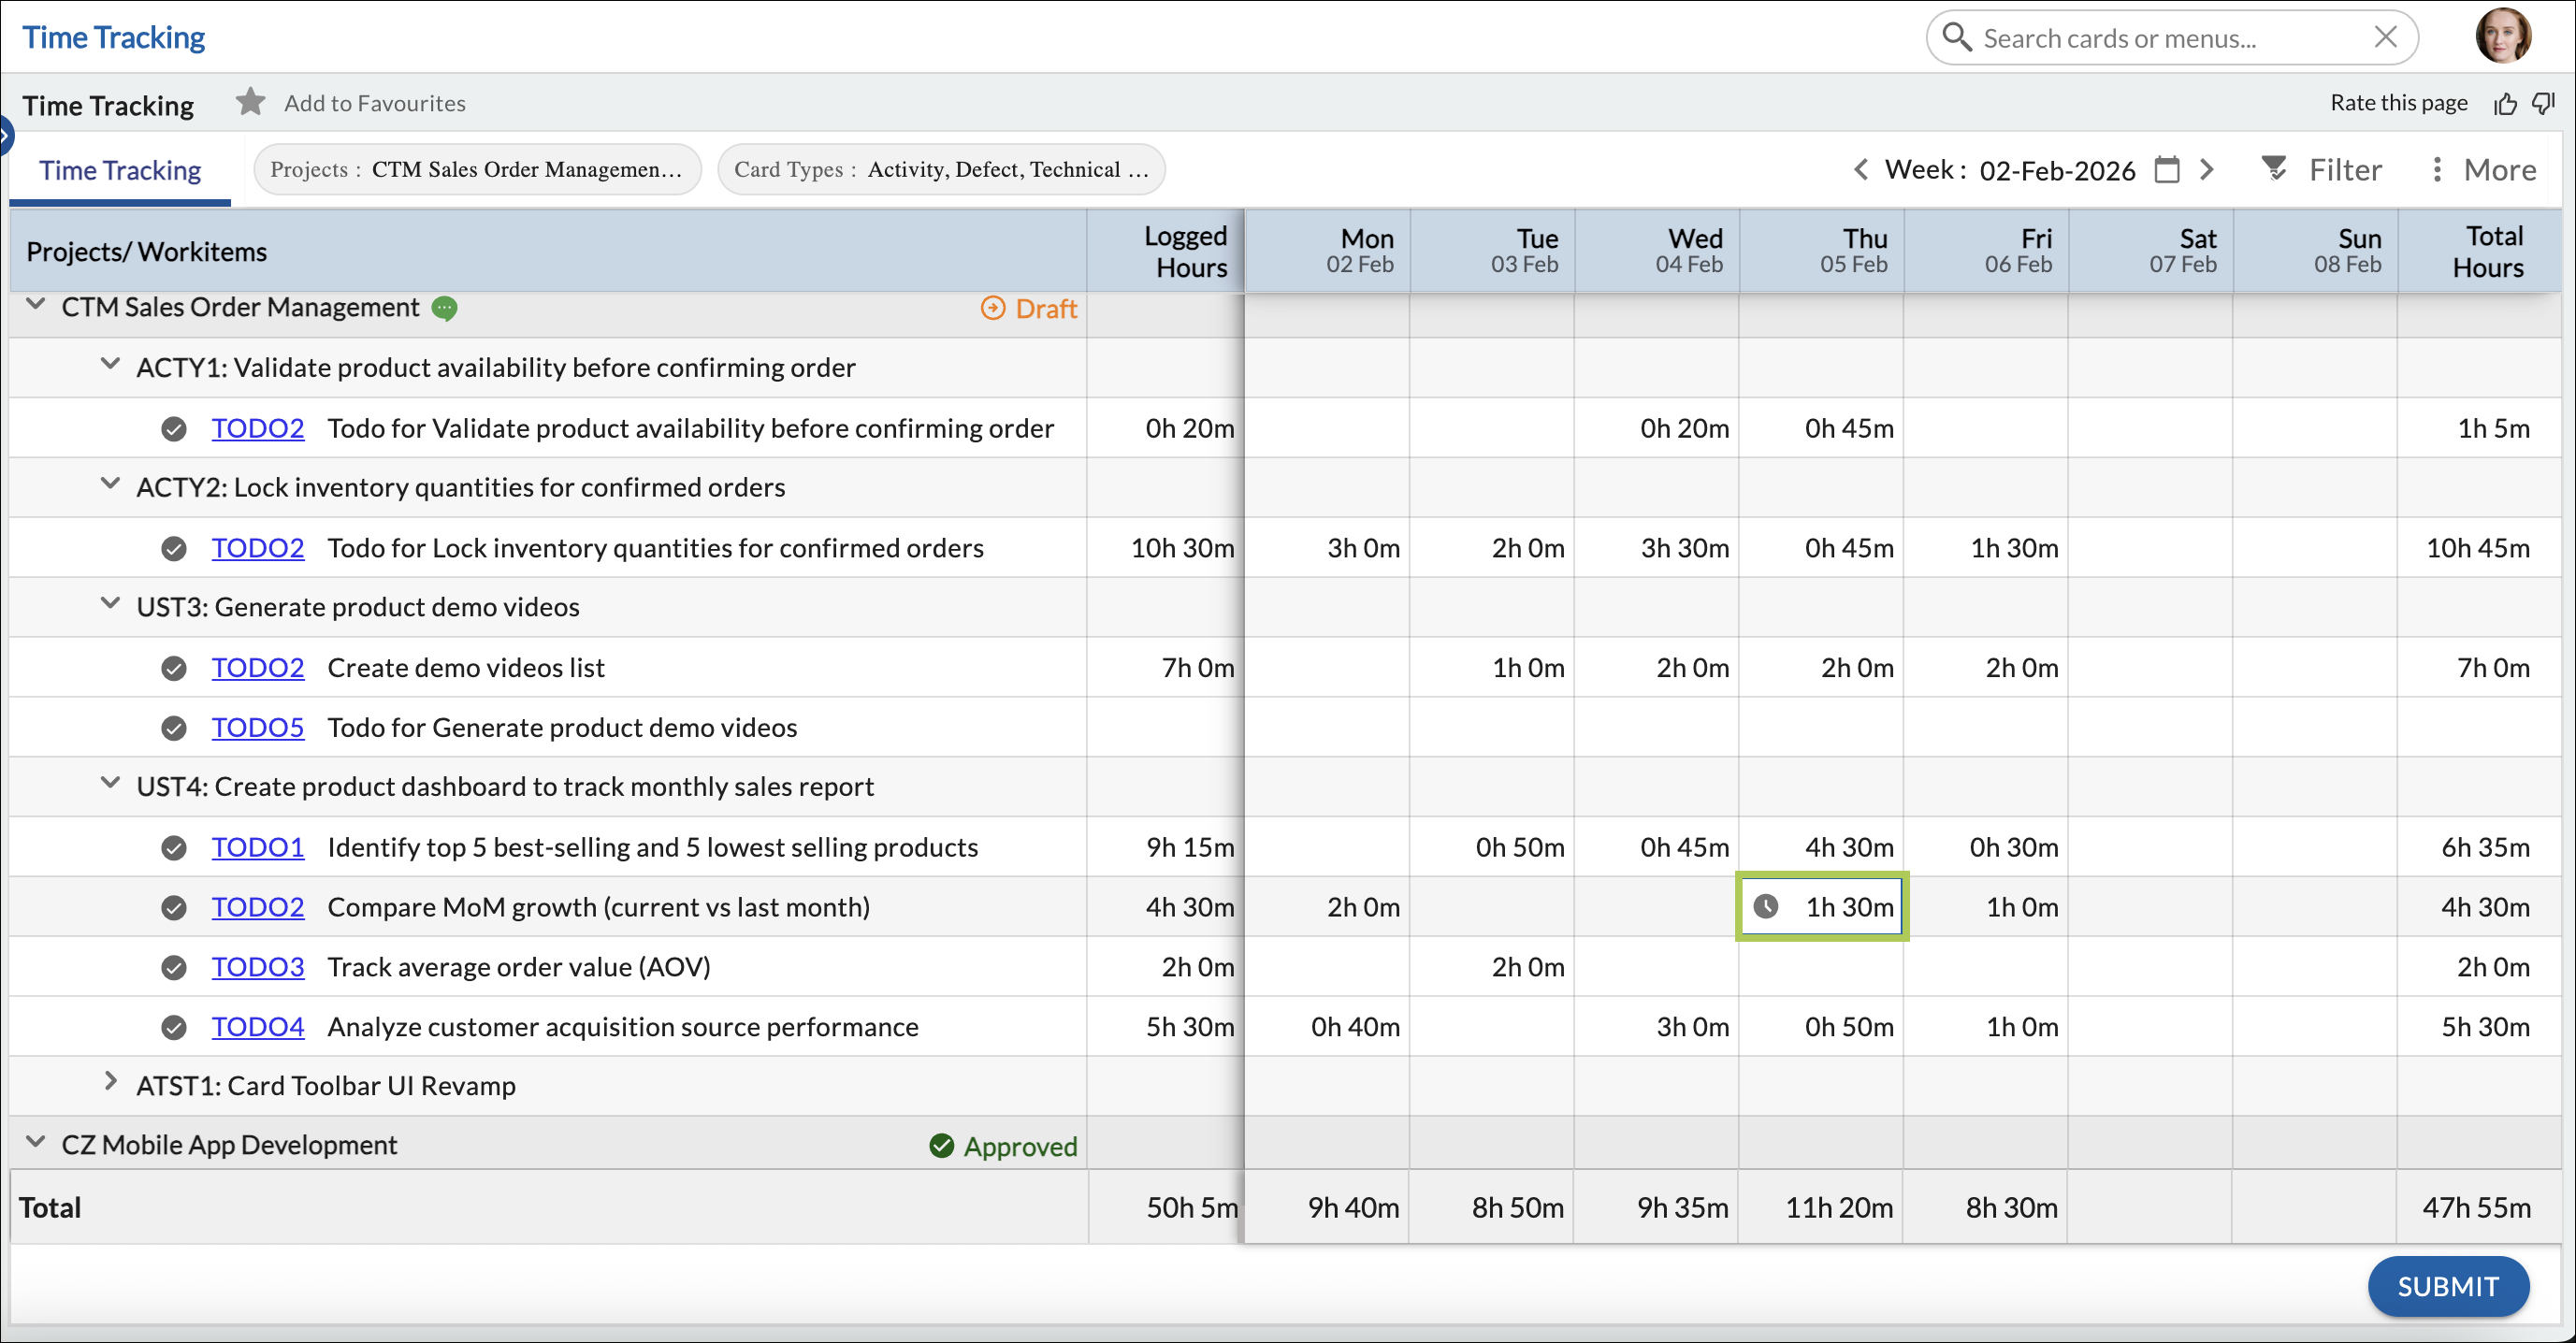
Logging Time
Inline Entry
- Click directly on a cell for the required day.
- Enter time in HH:MM format.
- Save by pressing Enter, Escape>, or clicking outside the cell.
Time Entry Popup
- Click the clock icon or double-click the cell.
- Use this to:
- Log actual effort
- Update remaining effort
Note: Remaining Effort can be updated only through the pop-up.
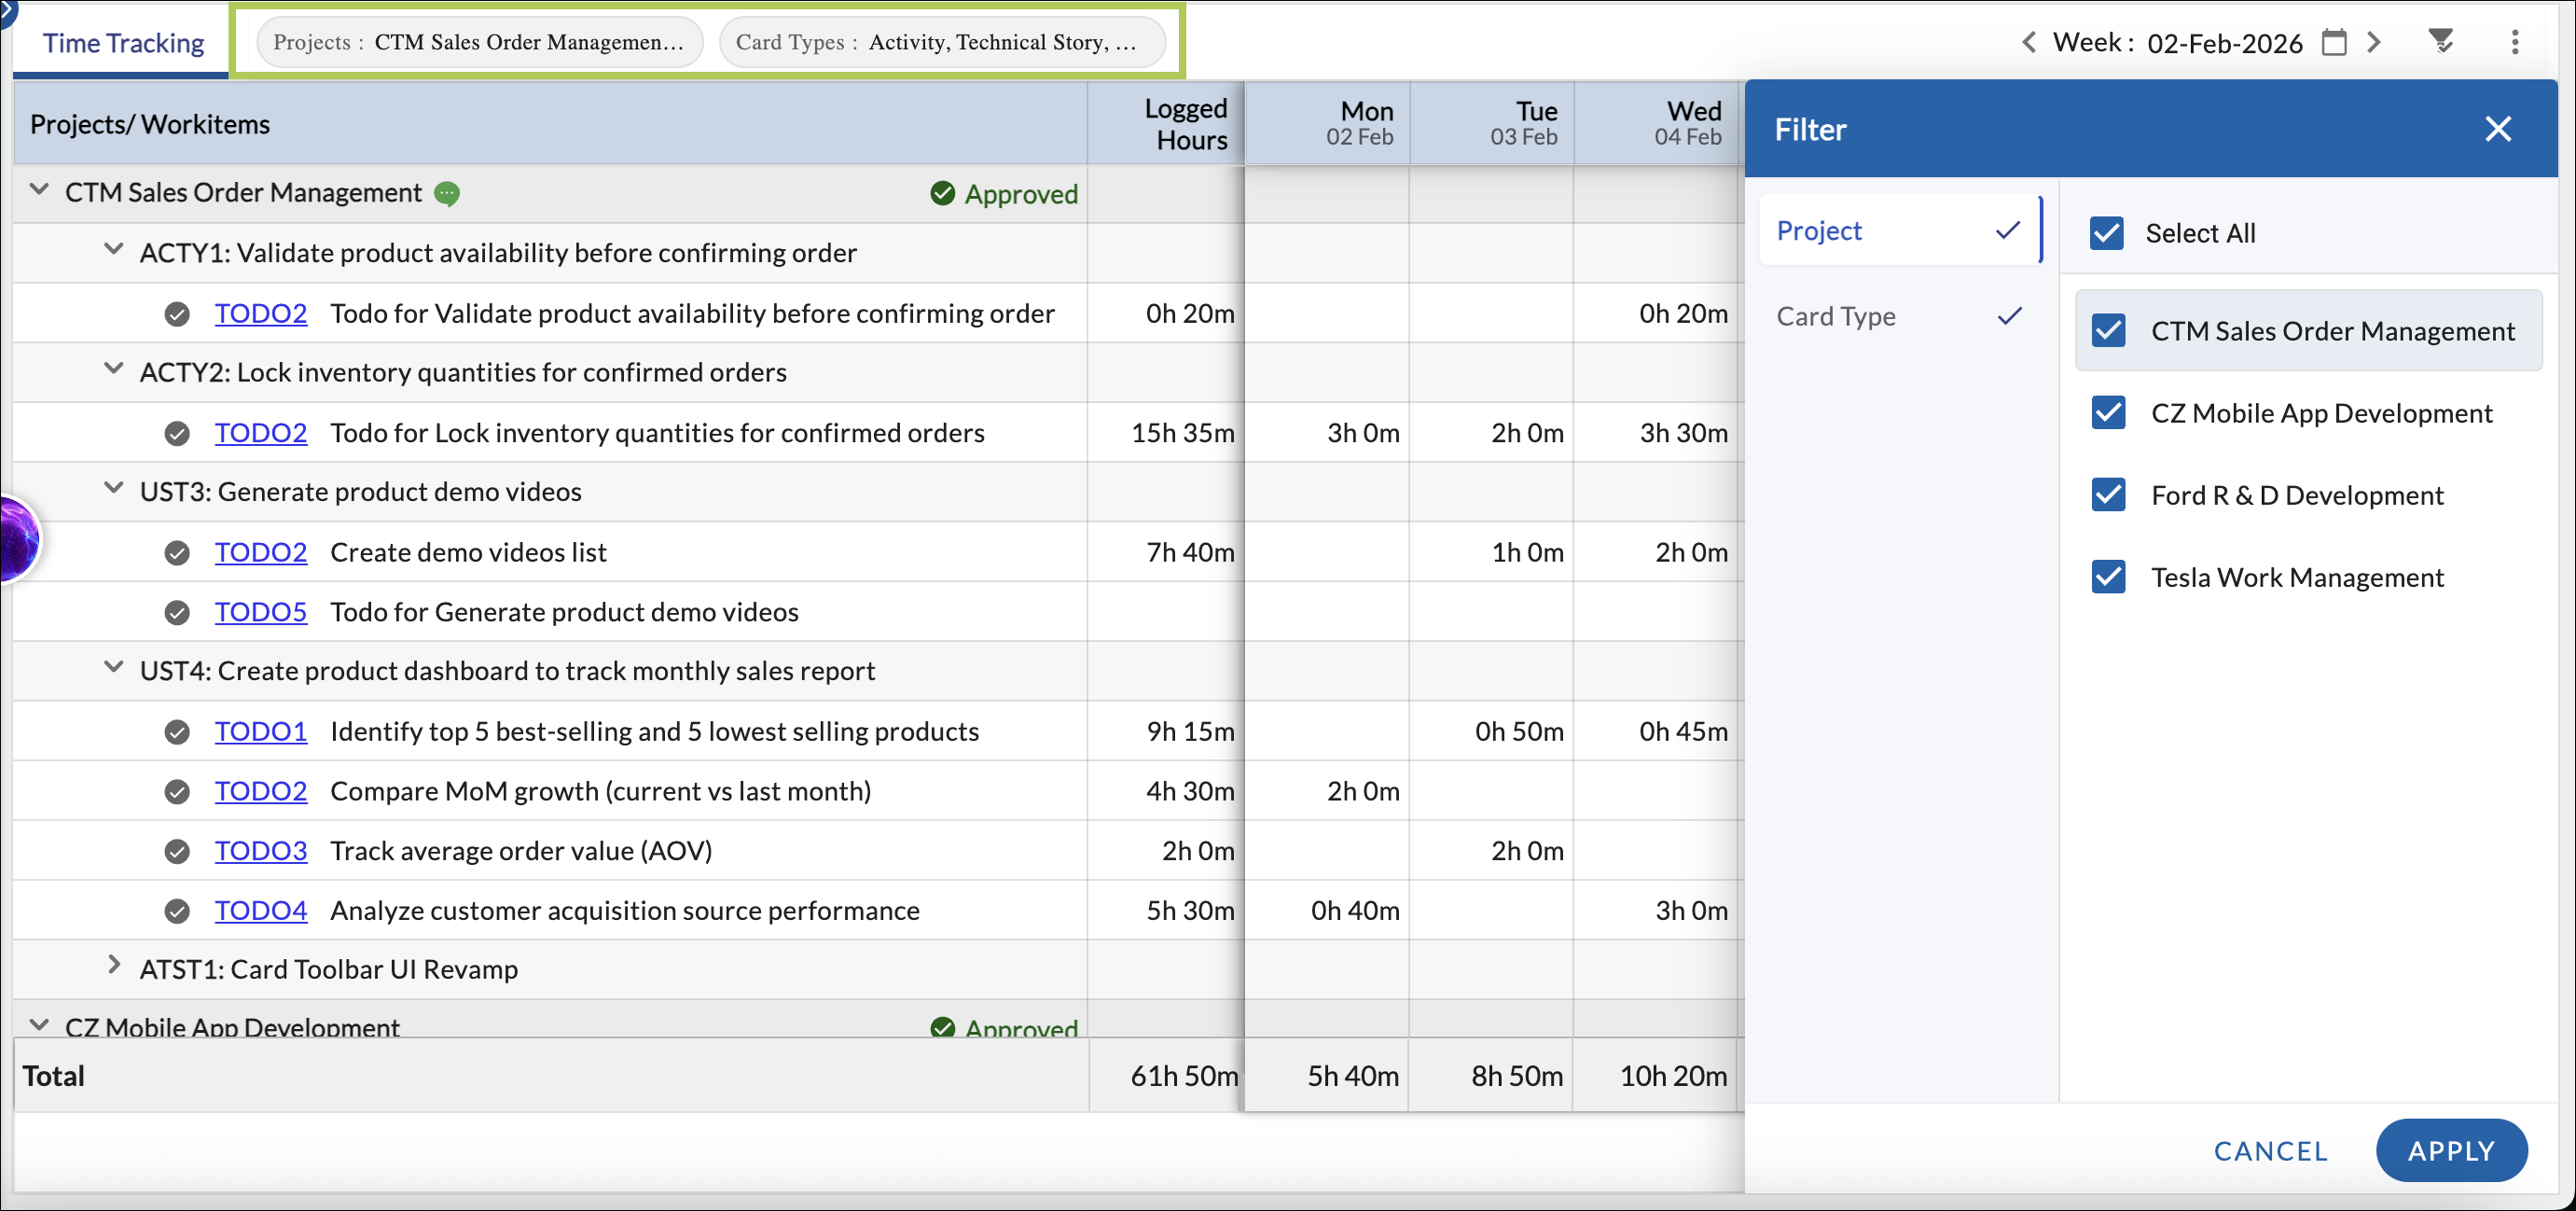
Filters
The Filter option helps you narrow down the Time Tracking grid to focus on specific workitems. Filters affect only what is displayed on the screen and do not impact the actual logged data.
Project Filter
- Displays only workitems belonging to the selected project(s).
- You can select one or multiple projects.
- Only projects for which Time Tracking is enabled and where you are a team member are listed.
Card Type Filter
The Card Type filter displays card types based on the following logic:<
- Only card types whose forms have Time Tracking enabled are shown.
- Card types are derived from the forms used in the selected projects.
- Card types for which no eligible cards or ToDos exist for the selected week are not displayed.
This ensures that the Card Type filter lists only relevant workitem types that can appear in the Time Tracking grid.
Applied filters are displayed at the top of the screen so you can clearly see which filters are currently in use.
Column Settings
The Column Settings option allows you to customize the grid:
- Projects / Workitems and Logged Hours are fixed columns.
- Additional columns, such as Actual Start, Actual Finish, Planned Hours, and Baseline fields, can be added.
- Columns can be reordered for better readability.
Approval Scenarios
How logged time is handled depends on whether a Timesheet Approver is assigned.
When No Approver is Assigned
- Logged time is saved immediately.
- No submission or approval is required.
When an Approver is Assigned
- Logged time is saved in the Draft state.
- You must click Submit to send the time for approval.
Time Statuses Explained
- Draft – Logged but not submitted.
- Submitted – Awaiting approval.
- Approved – Reviewed and finalized.
- Rejected – Returned with comments for correction.

Statuses are shown per project in the Time Tracking grid.
Handling Rejected Time
When time is rejected:
- A comment icon appears next to the project.
- Click the icon to view feedback.
- Update the logged time and resubmit for approval.
Viewing Pending Timesheet Submissions
It is possible that you may have logged time in a previous week but forgot to submit it for approval, or your submitted time may have been rejected by the approver. In such cases, the timesheet entry remains pending.
To help you quickly identify such cases, the Time Tracking tab displays a notification at the bottom of the screen when pending timesheet submissions exist.
The notification appears as:
“You have X timesheet entries pending. Click here to review.”
This notification appears when:
- Logged time from a previous week is still in Draft state and has not been submitted.
- Submitted time was rejected by the approver and needs to be corrected and resubmitted.
Click here to review and open the Pending Timesheet Submissions window.
Pending Timesheet Submissions Window
The Pending Timesheet Submissions window lists all projects where your timesheet entries require action.
The window displays:
- Project – The project where the pending timesheet exists.
- Status – Indicates whether the timesheet is in Draft or Rejected state.
- Week – The week for which the timesheet requires submission or resubmission.
This allows you to quickly identify and navigate to the week where action is required.
Once you navigate to the corresponding week and project, you can:
- Submit the timesheet if it is in Draft state.
- Review, update, and resubmit the timesheet if it was rejected.
Why This Feature Is Useful
This feature helps ensure that previously logged time is not missed.
Even if you are currently viewing a different week in the Time Tracking grid, the notification highlights pending entries from earlier weeks so that you can review and submit them promptly.
After Approval
- Approved time becomes non-editable.
- The week is finalized for that project.
Important Notes
- Approval is applied per week and per team member.
- Only Draft or Rejected time can be edited.
- Approved time cannot be changed unless reopened by an approver.
Related Articles
- Configuring Timesheet Approvers – Learn how approval workflows are set up.
- Working with Timesheet Approval – Learn how approvers review and act on submitted time.
This article explains the complete behavior of the Time Tracking tab. For approver-specific actions, refer to the related articles above.